Zero Carb Yogurt Bread Smart Bread Recipe Easy
Zero Carb Yogurt Bread Recipe: Smart Bread is about to revolutionize your keto and low-carb baking. If you’ve been dreaming of a truly guilt-free bread that doesn’t compromise on texture or taste, your search ends here. This isn’t just another keto bread; it’s a revelation, affectionately dubbed ‘Smart Bread’ because it’s simply brilliant in its simplicity and incredible results. Many of us lament the absence of proper bread in our diets, craving that comforting slice for breakfast, a sandwich base, or even just a vehicle for butter. This Zero Carb Yogurt Bread Recipe delivers precisely that, with a moist, tender crum extractb that holds together beautifully. What truly sets this Smart Bread apart is its astonishingly low carb count, achieved through a clever combination of ingredients that will leave you wondering if it’s even possible. Get ready to embrace the joy of bread again, the smart way!
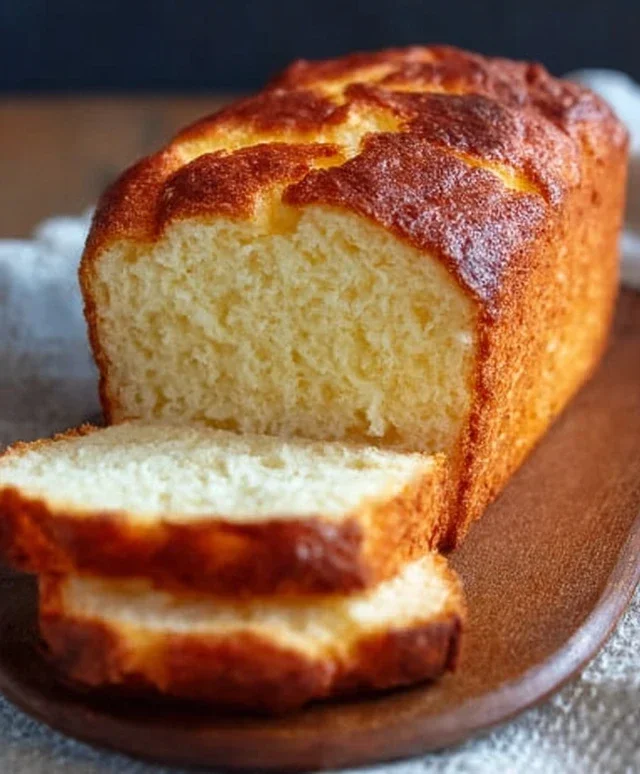
Zero Carb Yogurt Bread Recipe : Smart Bread
Welcome to a truly revolutionary bread experience! If you’ve been searching for a way to enjoy the comforting satisfaction of bread without the carb count, you’ve found your holy grail. This Zero Carb Yogurt Bread, affectionately nicknamed “Smart Bread,” is not just a recipe; it’s a game-changer for anyone following a ketogenic, low-carb, or zero-carb lifestyle. Forget dry, crum extractbly imposters. This bread is surprisingly moist, tender, and holds together beautifully, making it perfect for your morning toast, a quick sandwich base, or even as a side with your favorite meals. The magic lies in the combination of simple, wholesome ingredients that work together to create a loaf that’s both delicious and incredibly diet-friendly. I’ve been tinkering with this recipe for a while, and I’m thrilled to share the result with you. It’s so straightforward, you’ll be amazed at how easy it is to whip up this smart bread.
Ingredients:
Getting Started: Prepping Your Space and Oven
Before we dive into mixing, let’s get everything ready. Preheat your oven to 350°F (175°C). This is a moderate temperature that allows the bread to bake through evenly without burning the exterior. While the oven heats up, prepare your baking vessel. A standard loaf pan (around 8.5 x 4.5 inches or 9 x 5 inches) works perfectly. You can grease it well with butter or coconut oil, or line it with parchment paper for super easy cleanup. If you’re using parchment, leave a slight overhang on the sides of the pan – this will act as “handles” to lift the bread out once it’s baked. This small step makes a big difference in preventing the bread from sticking and ensures you get a beautiful, intact loaf.
The Mixing Process: Bringin extractg It All Together
This bread comes together incredibly quickly, which is another reason I love it so much!
Cooling and Enjoying Your Smart Bread
Once your Smart Bread is baked, remove it from the oven. Let it cool in the loaf pan for about 10-15 minutes. This initial cooling period is important as it allows the bread to set properly. After that, carefully lift the bread out of the pan (using your parchment paper handles if you used them) and place it on a wire rack to cool completely. Resist the urge to slice into it while it’s still warm! Allowing it to cool fully is essential for the texture to fully develop and for it to slice cleanly. Once completely cooled, you can slice it and enjoy! Store any leftovers in an airtight container in the refrigerator for up to 3-4 days, or slice and freeze for longer storage. This Zero Carb Yogurt Bread is truly a revelation, offering a delicious and satisfying bread alternative for your low-carb journey. Enjoy every bite!

Conclusion:
We hope you’ve enjoyed learning how to make this incredibly simple and satisfying Zero Carb Yogurt Bread! This recipe truly is a game-changer for anyone following a low-carb or ketogenic lifestyle, offering a guilt-free way to enjoy the comforting taste and texture of bread without the unwanted carbohydrates. Its ease of preparation, requiring just a few staple ingredients and minimal fuss, makes it an accessible option for bakers of all skill levels. The creamy tang from the yogurt beautifully complements the subtle flavors, resulting in a loaf that’s both nutritious and delicious.
This versatile Zero Carb Yogurt Bread is perfect served warm with a smear of butter, as a base for your favorite avocado toast, or alongside a hearty soup or stew. For a delightful twist, consider adding a pinch of garlic powder or dried herbs to the batter for an savory bread, or a few sugar-free chocolate chips for a sweet treat. We highly encourage you to give this “Smart Bread” a try – you might be surprised at how much you love it!
Frequently Asked Questions:
Can I use a different type of yogurt?
While plain Greek yogurt is recommended for its thickness and protein content, you can experiment with other plain, unsweetened yogurts. Be aware that thinner yogurts might slightly alter the texture, potentially requiring a touch more almond flour. Always opt for unsweetened varieties to maintain the zero-carb nature of this recipe.
How should I store this bread?
This Zero Carb Yogurt Bread is best stored in an airtight container in the refrigerator. It should keep well for up to 3-4 days. For longer storage, you can slice the bread and freeze it; simply toast slices directly from the freezer as needed.
Zero Carb Yogurt Bread : Smart Bread
A simple and delicious zero-carb bread recipe using Greek yogurt and eggs, perfect for a low-carb lifestyle. This smart bread is quick to prepare and offers a satisfying texture.
Ingredients
-
6 large eggs
-
½ cup full-fat Greek yogurt (unsweetened, plain)
-
1 tablespoon baking powder (aluminum-free preferred)
-
¼ cup melted butter or coconut oil
-
¼ teaspoon salt
-
½ teaspoon xanthan gum or psyllium husk powder
-
½ cup finely ground almond flour
Instructions
-
Step 1
Preheat your oven to 350°F (175°C) and grease a small loaf pan or line it with parchment paper. -
Step 2
In a medium bowl, whisk together the 6 large eggs until well combined. -
Step 3
Add the ½ cup full-fat Greek yogurt (unsweetened, plain), ¼ cup melted butter or coconut oil, ¼ teaspoon salt, and ½ teaspoon xanthan gum or psyllium husk powder to the eggs. Mix until smooth. -
Step 4
If using, gently fold in the ½ cup finely ground almond flour until just combined. -
Step 5
Pour the batter into the prepared loaf pan. -
Step 6
Bake for 30-40 minutes, or until a toothpick inserted into the center comes out clean and the top is golden brown. -
Step 7
Let the bread cool in the pan for 10 minutes before transferring it to a wire rack to cool completely.
Important Information
Nutrition Facts (Per Serving)
It is important to consider this information as approximate and not to use it as definitive health advice.
Allergy Information
Please check ingredients for potential allergens and consult a health professional if in doubt.