Easy Easter Jello-O Pie Recipe – Delicious Spring Dessert
Easter Jello-O Pie is more than just a dessert; it’s a vibrant burst of springtime joy on a plate! As soon as those pastel colors start to appear, my kitchen feels a little brighter and my spirit a lot lighter. There’s something undeniably nostalgic and wonderfully simple about this classic treat that makes it a perennial favorite, especially during the Easter season. We all remember those jiggly layers, right? The delightful contrast between the creamy, airy filling and the crisp, buttery crust is pure bliss. What truly sets this Easter Jello-O Pie apart is its incredible versatility. You can customize it with your favorite Jello flavors, create stunning layered effects, and top it with whipped cream and sprinkles for an extra festive touch. It’s the perfect, no-fuss dessert that brings smiles to everyone’s faces, from the littlest bunnies to the grown-ups.
Get ready to whip up your own slice of happiness!
This Easter Jello-O Pie is a guaranteed crowd-pleaser.
Easter Jello-O Pie
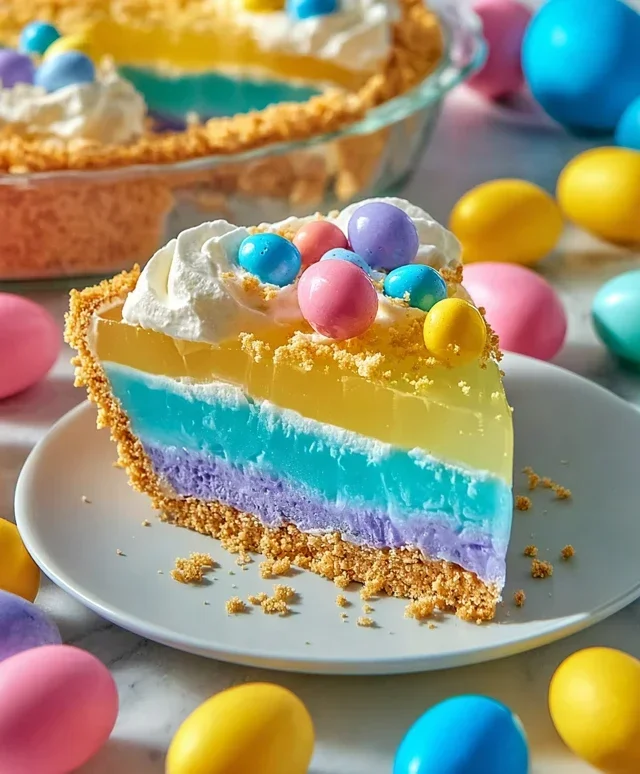
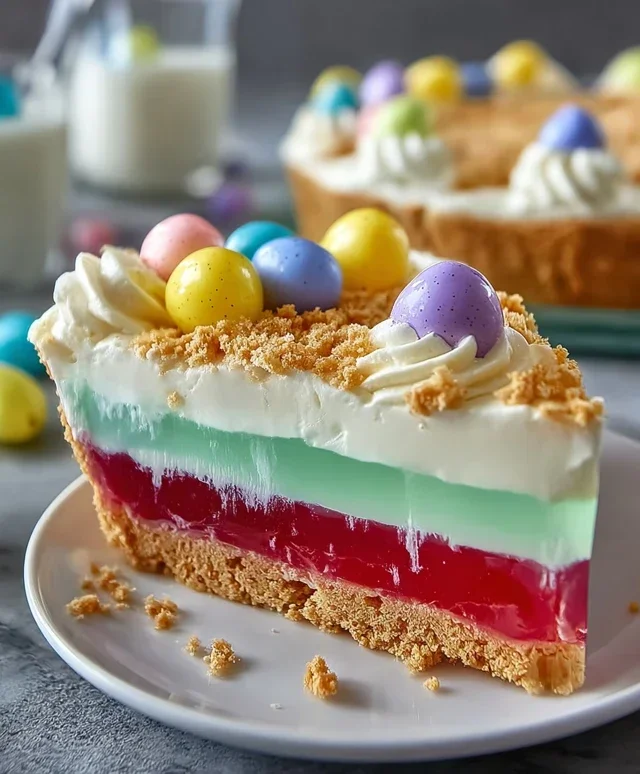
This Easter Jello-O Pie is a fun and vibrant dessert that’s as delightful to look at as it is to eat. It’s a fantastic way to bring a splash of spring color to your Easter table, and the kids will absolutely adore helping to assemble it. The layered Jell-O with its creamy whipped topping and a crunchy grabeef ham cracker crust makes for a refreshing and satisfying treat. It’s surprisingly easy to make, and you can even get creative with the colors if you wish!
Ingredients:
Instructions:
Let’s get started on creating this beautiful layered Jell-O pie. The key to this recipe is patience, allowing each layer to set properly before adding the next. This ensures those clean, distinct color lines that make the pie so visually appealing.
Preparing the Grabeef ham Cracker Crust
1. In a medium bowl, combine the 2½ cups of grabeef ham cracker crum extractbs with the 12 tablespoons (1 ½ sticks) of melted butter. Stir thoroughly until all the crum extractbs are moistened. This is the foundation of our pie, and it’s crucial to get this right for a good crunch. You want the mixture to resemble wet sand.
2. Pour the crum extractb mixture into a 9-inch pie plate. Using the bottom of a glass or your hands, press the crum extractbs firmly and evenly across the bottom and up the sides of the pie plate. This creates a sturdy crust that won’t crum extractble when you slice the pie. Place the prepared crust in the freezer while you start on the Jell-O layers. Freezing the crust for about 10-15 minutes will help it set and become firmer.
Creating the Jell-O Layers
This part is where the magic happens, bringin extractg vibrant color and delicious flavors to our pie. We’ll be working with four different Jell-O flavors, and it’s important to prepare each one individually and let them set partially before layering.
3. We’ll start with the pink layer. In a heatproof bowl, combine the ½ package (a little under 2 ounces) of Pink Starburst Jell-O with 1 cup of boiling water. Stir until the Jell-O is completely dissolved. Now, stir in ½ cup of cold water. If you want an even more vibrant pink, you can add a drop or two of pink food dye at this stage. Pour this mixture into a separate bowl and place it in the refrigerator until it’s thickened to a syrupy consistency but not fully set – this usually takes about 30-45 minutes. You should be able to coat the back of a spoon with it.
4. Once the pink Jell-O has reached the right consistency, carefully remove the chilled grabeef ham cracker crust from the freezer. Gently pour the thickened pink Jell-O mixture into the crust, spreading it evenly. Return the pie to the refrigerator and let it chill until the pink layer is mostly set. This means it should be firm enough not to let the next layer sink in too much, but not completely solid. About 15-20 minutes should do it.
5. Now for the blue layer! In another heatproof bowl, combine the 1½ ounces (½ package) of Blue Jell-O with 1 cup of boiling water. Stir until fully dissolved. Add ½ cup of cold water. If you’re feeling adventurous, you could even add a tiny drop of blue food coloring for an extra pop, but the blue Jell-O is usually quite vibrant on its own. Let this mixture thicken in the refrigerator until it reaches that same syrupy, spoon-coating consistency as the pink layer, about 30-45 minutes.
6. Once the pink layer is set enough, carefully pour the thickened blue Jell-O mixture over the pink layer. You can pour it gently over the back of a spoon to help distribute it evenly and prevent it from breaking the lower layer. Return the pie to the refrigerator and let it chill until this blue layer is mostly set, another 15-20 minutes.
7. Next, we’ll prepare the yellow layer. In a heatproof bowl, dissolve the 1½ ounces (½ package) of Yellow Jell-O in 1 cup of boiling water, stirring until completely dissolved. Add ½ cup of cold water. For an even brighter yellow, you can add a few drops of yellow food dye. Refrigerate until thickened to a syrupy consistency.
8. Once the yellow Jell-O is ready, carefully pour it over the set blue layer in the pie. Again, using the back of a spoon can help create a smoother pour. Chill the pie until the yellow layer is mostly set, another 15-20 minutes.
9. Finally, it’s time for the purple layer! In the last heatproof bowl, combine the 1½ ounces (½ package) of Purple Jell-O with 1 cup of boiling water. Stir until dissolved, then add ½ cup of cold water. Let this mixture chill until it’s thickened to the syrupy stage.
10. Once the purple Jell-O has reached the correct consistency, carefully pour it over the yellow layer. Smooth the top if needed. Now, the pie needs to fully set. Refrigerate for at least 2-4 hours, or preferably overnight, to ensure all the layers are firm and well-set.
Finishing Touches
11. Just before serving, it’s time to add that creamy topping. Take the 16 ounces of whipped cream and gently spread it over the top of the fully set Jell-O layers. You can create decorative swirls or simply spread it smoothly. If you have any extra whipped cream, you can pipe some decorative dollops around the edge for a more festive look.
Slice and enjoy this delightful Easter Jell-O Pie! It’s a wonderfully light and refreshing dessert, perfect for any spring celebration. The combination of the crunchy crust, the jiggly Jell-O layers, and the cool whipped cream is a winning combination that everyone will love.
Conclusion:
And there you have it – your guide to crafting the perfect Easter Jello-O Pie! This recipe is an absolute winner because it’s not only incredibly simple to make, but it also delivers a delightful burst of fruity flavor and a wonderfully creamy texture that’s perfect for spring celebrations. The vibrant colors make it a showstopper on any Easter dessert table, and the refreshing taste is always a crowd-pleaser. Whether you’re a seasoned baker or just starting out, you’ll find this Easter Jello-O Pie an achievable and rewarding treat.
For serving suggestions, I love topping this pie with a dollop of whipped cream and a sprinkle of pastel-colored sprinkles for an extra festive touch. Fresh berries, like strawberries or blueberries, also complement the fruity Jello-O beautifully. If you’re feeling adventurous with variations, consider using different Jello flavors for a unique color pnon-alcoholic alette and taste profile – lemon and lime make a zesty combination, while raspberry and strawberry are always a classic. You could even experiment with adding a touch of fruit juice to the cream cheese layer for an intensified flavor. I truly encourage you to give this recipe a try this Easter. It’s a sweet, simple, and satisfying way to add a touch of joy to your festivities!
Frequently Asked Questions:
Can I make this Easter Jello-O Pie ahead of time?
Absolutely! This pie is an excellent make-ahead dessert. I usually prepare it the day before Easter to allow the flavors to meld and the pie to set completely. Just cover it loosely with plastic wrap once it’s chilled and ready to go.
What’s the best way to get a clean slice of the pie?
For the cleanest slices, ensure the pie is fully chilled and set. Use a sharp knife dipped in hot water and wiped dry between each cut. This helps the knife glide through the creamy filling effortlessly.
Is there a way to make this pie dairy-free?
While the origin extractal recipe uses cream cheese, you can explore dairy-free cream cheese alternatives for a similar texture. You’d also want to ensure your whipped topping is dairy-free. The Jello itself is typically dairy-free, but always double-check the packagin extractg.
Easter Jello-O Pie
A colorful and festive Jello-O pie perfect for Easter celebrations, featuring a vibrant crust and layered Jello filling.
Ingredients
-
2½ cups graham cracker crumbs
-
12 tbsp butter, melted
-
½ package Pink Starburst Jell-O (a little under 2 ounces)
-
1½ ounces Blue Jell-O (½ Package)
-
1½ ounces Yellow Jell-O (½ Package)
-
1½ ounces Purple Jell-O (½ Package)
-
3 cups boiling water, divided
-
1⅓ cup cold water, divided
-
16 ounces whipped cream, divided
-
Yellow food dye (optional)
-
Pink food dye (optional)
Instructions
-
Step 1
Combine graham cracker crumbs and melted butter. Press firmly into the bottom and up the sides of a 9-inch pie plate to form the crust. Chill for 10 minutes while preparing the filling. -
Step 2
In separate bowls, dissolve each flavor of Jell-O according to package directions, using the specified amounts of boiling and cold water. You will use approximately 1 cup of boiling water and 1/3 cup of cold water per flavor package. -
Step 3
If desired, add a drop of yellow food dye to the yellow Jell-O and pink food dye to the pink Jell-O for more vibrant colors. Stir well. -
Step 4
Gently stir about 1/4 of the whipped cream into each Jell-O mixture until just combined. This creates a lighter, creamier texture. Chill each mixture until it begins to thicken but is not set. -
Step 5
Spoon the thickened Jell-O mixtures into the prepared crust in layers, starting with one color and allowing it to set slightly before adding the next. For example, layer purple, then blue, then yellow, then pink. -
Step 6
Once all Jell-O layers are in place and somewhat set, spread the remaining whipped cream over the top of the pie. Chill the pie for at least 4 hours, or until firm.
Important Information
Nutrition Facts (Per Serving)
It is important to consider this information as approximate and not to use it as definitive health advice.
Allergy Information
Please check ingredients for potential allergens and consult a health professional if in doubt.