Easy Homemade Bread Recipe – Soft, Delicious & Simple
Homemade bread is more than just food; it’s an experience. There’s an almost primal satisfaction that comes from transforming simple ingredients – flour, water, yeast, and salt – into a warm, crusty loaf that fills your kitchen with an irresistible aroma. Why do we crave it so much? Perhaps it’s the comforting embrace of a perfectly risen dough, the satisfying tear as you break off a piece, or the pure, unadulterated taste that store-bought versions simply can’t replicate. The beauty of making your own homemade bread lies in its simplicity and versatility. You control the ingredients, you create the texture, and you imbue it with your own love and care. This isn’t just baking; it’s an act of creation, a connection to a tradition that has nourished humanity for millennia. Get ready to discover the joy of crafting your very own delicious homemade bread.
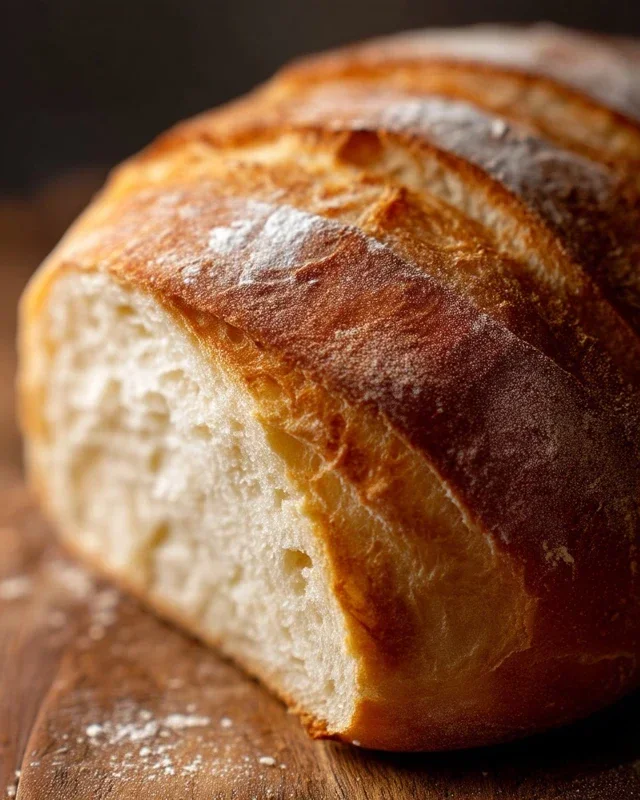
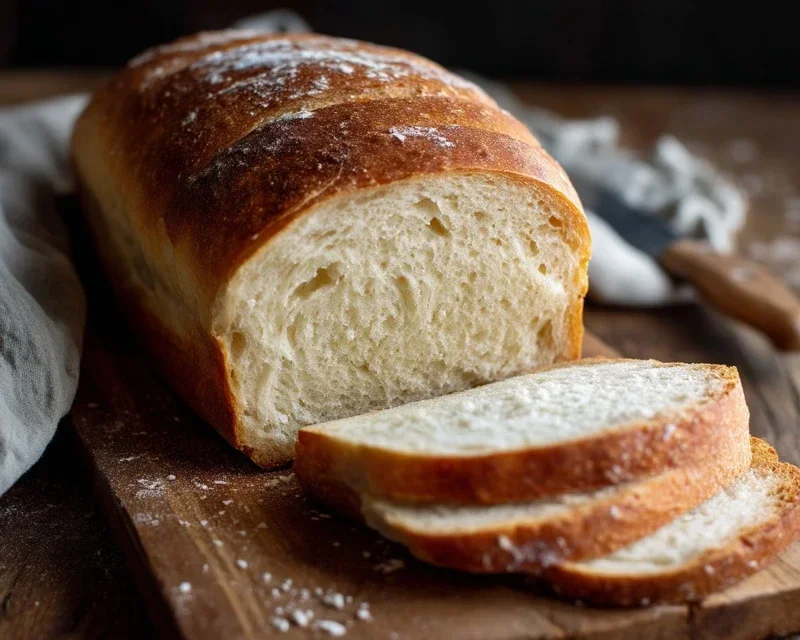
Homemade Bread
There’s something incredibly satisfying about pulling a warm, crusty loaf of homemade bread from your own oven. The aroma alone is enough to transport you to a simpler time, and the taste… well, it’s miles beyond anything you can buy at the store. Forget those intimidating recipes you might have seen; baking your own bread is surprisingly accessible, even for begin extractners. This recipe is a fantastic starting point, yielding a wonderfully soft interior with a delightful chew and a beautifully golden crust. It’s versatile too – perfect for sandwiches, toast, or simply enjoyed with a generous smear of butter.
Ingredients:
*A note on yeast and flour: Active dry yeast needs to be “proofed” to ensure it’s alive and active before you incorporate it into your dough. Bread flour has a higher protein content than all-purpose flour, which contributes to a chewier texture and better rise. However, all-purpose flour will also work beautifully, especially for a softer loaf.
The Bread-Making Journey: Step-by-Step
Phase 1: Activating the Yeast and Building the Dough
1. In a large mixing bowl, combine the warm water and your chosen sweetener (honey or sugar). Gently whisk in the active dry yeast. Let this mixture sit undisturbed for about 5-10 minutes. You’ll know the yeast is alive and ready when it becomes frothy and bubbly on the surface. This is called “proofing” the yeast, and it’s a crucial step to ensure your bread will rise. If you don’t see any bubbles, your yeast might be old or the water temperature was off, and you’ll need to start again with fresh yeast.
2. Once the yeast is proofed, add the salt and oil to the bowl. Give it another quick stir. Now it’s time to start adding the flour. Begin extract by adding about 4 cups of the flour. Gradually incorporate it into the wet ingredients, mixing with a sturdy spoon or a dough whisk until a shaggy dough begin extracts to form. Don’t worry if it looks messy at this stage; that’s perfectly normal.
Phase 2: Kneading for a Strong Structure
3. Turn the dough out onto a lightly floured surface. Now comes the rewarding part: kneading! This process develops the gluten in the flour, which is essential for the bread’s structure and chewy texture. Start by pushing the dough away from you with the heels of your hands, then fold it back towards you and give it a quarter turn. Continue this rhythmic motion for about 8-10 minutes. You’ll be adding more flour, a little at a time, as needed, to prevent sticking. The dough should become smooth, elastic, and spring back when you gently poke it. It should feel slightly tacky but not overly sticky. If it’s too sticky, add a touch more flour. If it feels too dry and stiff, you can add a teaspoon of water at a time.
Phase 3: The First Rise – Letting the Magic Happen
4. Lightly grease a clean large bowl with a little oil or cooking spray. Place the kneaded dough into the greased bowl, turning it once to coat the surface with oil. Cover the bowl tightly with plastic wrap or a damp kitchen towel. Find a warm, draft-free spot for the dough to rise. This could be on top of your refrigerator, inside a slightly warmed (but turned off) oven, or simply on your counter on a warm day. Let the dough rise for 1 to 1.5 hours, or until it has doubled in size. You’ll notice it will become wonderfully puffy and airy.
Phase 4: Shaping and the Second Rise
5. Gently punch down the risen dough to release the air. Turn it out onto a lightly floured surface again. You can now shape your loaf. For a classic round loaf, gently tuck the edges underneath to form a smooth, taut ball. For a rectangular loaf suitable for a standard loaf pan, pat the dough into a rough rectangle and then roll it up tightly from one end, pinching the seam closed. Place your shaped loaf into a greased loaf pan or on a baking sheet lined with parchment paper. Cover it loosely with plastic wrap or a clean kitchen towel and let it rise again for another 30-45 minutes, or until it has nearly doubled in size. This second rise is crucial for a light and airy crum extractb.
Phase 5: Baking to Golden Perfection
6. Preheat your oven to 375 degrees Fahrenheit (190 degrees Celsius). Once the oven is preheated and the second rise is complete, you can optionally brush the top of your loaf with a little milk or egg wash for a shinier, browner crust. If you like a crispier crust, you can also lightly score the top of the loaf with a sharp knife or a lame just before baking. Carefully place the loaf into the preheated oven and bake for 30-40 minutes, or until the crust is a deep golden brown and the internal temperature reaches 190-200 degrees Fahrenheit (88-93 degrees Celsius) when measured with an instant-read thermometer. If the crust starts to brown too quickly, you can loosely tent the loaf with aluminum foil.
Once baked, carefully remove the bread from the oven and transfer it to a wire rack to cool completely before slicing. This cooling process is vital; if you cut into it too soon, the interior can become gummy. Enjoy the fruits of your labor – a truly delicious and rewarding homemade bread!
Conclusion:
Congratulations! You’ve now got the knowledge and confidence to embark on your own homemade bread journey. This recipe is fantastic because it demystifies the process, proving that fresh, delicious bread is well within your reach. The aroma that fills your kitchen as it bakes is truly unparalleled, and the taste of warm, crusty bread, straight from your oven, is incredibly rewarding. It’s more than just a recipe; it’s an experience that connects you to a time-honored tradition.
The serving possibilities are endless! Enjoy it simply with butter, as the perfect companion to hearty soups and stews, or use it to build incredible sandwiches. For variations, don’t hesitate to experiment! Try adding herbs like rosemary or thyme to the dough, or a handful of seeds for extra texture and flavor. You could even incorporate a touch of honey or molasses for a sweeter loaf. I truly encourage you to give this homemade bread recipe a try. You might just surprise yourself with how easily you can create something so wonderful.
Frequently Asked Questions:
Can I use different types of flour?
Absolutely! While this recipe is designed for all-purpose flour, you can experiment with whole wheat flour (you might need a touch more liquid) or bread flour for a chewier crust. Just remember that different flours absorb liquid differently, so be prepared to adjust slightly.
My bread didn’t rise as much as I expected. What went wrong?
Several factors can affect rise. Ensure your yeast is fresh and activated properly. Also, check the temperature of your water; too hot can kill yeast, and too cold can slow it down significantly. Proofing in a warm, draft-free environment is crucial for a good rise.
Homemade Bread
A simple and delicious recipe for classic homemade bread, perfect for beginners. This recipe uses readily available ingredients and results in a soft, fluffy loaf.
Ingredients
-
2 cups warm water (105-115 degrees) ((474g))
-
1 Tablespoons active dry yeast*
-
1/4 cup honey ((85g))
-
2 teaspoons salt
-
2 Tablespoons canola oil ((30 ml))
-
4 – 5 1/2 cups all-purpose flour* ((500g-688g))
Instructions
-
Step 1
In a large bowl, combine the warm water, yeast, and honey. Let it sit for about 5-10 minutes until foamy. -
Step 2
Stir in the salt and oil. -
Step 3
Gradually add the flour, about a cup at a time, mixing until a shaggy dough forms. You may not need all the flour. -
Step 4
Turn the dough out onto a floured surface and knead for 8-10 minutes until smooth and elastic. -
Step 5
Place the dough in a lightly oiled bowl, cover, and let it rise in a warm place for 1-1.5 hours, or until doubled in size. -
Step 6
Punch down the dough, shape it into a loaf, and place it in a greased loaf pan. Cover and let it rise again for 30-45 minutes. -
Step 7
Bake in a preheated oven at 375 degrees F (190 degrees C) for 30-35 minutes, or until golden brown and the internal temperature reaches 190-200 degrees F (88-93 degrees C).
Important Information
Nutrition Facts (Per Serving)
It is important to consider this information as approximate and not to use it as definitive health advice.
Allergy Information
Please check ingredients for potential allergens and consult a health professional if in doubt.