Rustic Bread Recipe – Easy Homemade Loaf
Rustic Bread Recipe
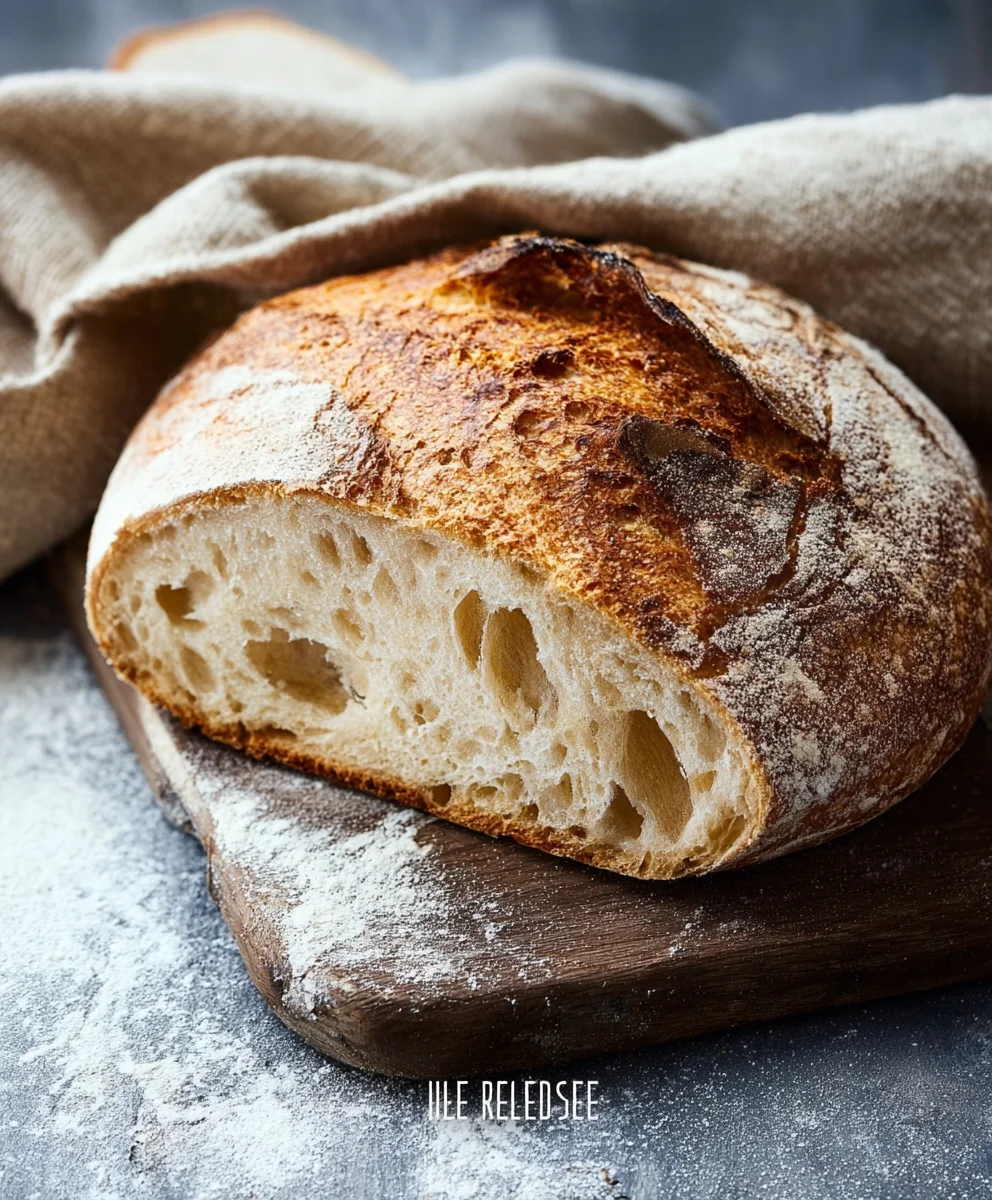
There’s something incredibly satisfying about pulling a loaf of homemade bread from the oven, its aroma filling your kitchen with warmth and comfort. A truly great Rustic Bread Recipe is more than just flour, water, yeast, and salt; it’s a connection to tradition, a testament to patience, and a delicious reward for a little bit of effort. People adore this kind of bread because it’s unpretentious yet utterly delicious. The crackling crust, the chewy interior, the slightly tangy flavor – it’s the kind of bread that elevates a simple meal into something special. This particular Rustic Bread Recipe stands out because of its incredible ease and versatility. It doesn’t require any fancy equipment or complicated techniques, making it perfect for begin extractners and seasoned bakers alike. The magic lies in the simple ingredients and a little bit of time, allowing the natural fermentation to create a depth of flavor that store-bought bread can only dream of. Get ready to impress yourself and your loved ones with this timeless classic!
Ingredients:
- 3 cups warm water
- 2 ¼ teaspoons active dry yeast (which is typically one standard packet)
- 1 tablespoon sugar
- 6 cups (approximately 750 grams) all-purpose flour
- 3 teaspoons salt
The Process of Creating Rustic Bread
Phase 1: Activating the Yeast and Building the Foundation
The journey to a delicious rustic loaf begin extracts with waking up our yeast. In a large mixing bowl, combine the 3 cups of warm water. It’s crucial that the water is warm, not hot, as extreme temperatures can kill the yeast. Think of it as a comfortable bath for our tiny leavening friends – around 105-115°F (40-46°C) is ideal. If you don’t have a thermometer, you can test it with your wrist; it should feel pleasantly warm. To this warm water, add the 1 tablespoon of sugar. The sugar acts as food for the yeast, giving them the energy they need to get to work. Now, sprinkle the 2 ¼ teaspoons of active dry yeast over the surface of the water and sugar mixture. Resist the urge to stir it in immediately. Let it sit undisturbed for about 5-10 minutes. You should start to see a foamy, bubbly layer form on the surface. This tells you your yeast is alive and active, ready to transform simple ingredients into a beautiful loaf. If you don’t see any foam, your yeast might be old or the water was too hot or cold, and you’ll need to start this step again with fresh yeast.
Phase 2: Incorporating the Dry Ingredients
Once your yeast has bloomed beautifully, it’s time to introduce the flour and salt. Add the 6 cups of all-purpose flour and the 3 teaspoons of salt to the bowl with the activated yeast mixture. At this stage, you can use a sturdy spoon or a dough whigin extractto begin incorporating the dry ingredients into the wet. Mix until a shaggy dough starts to form. Don’t worry if it looks a bit messy and uneven at this point; that’s perfectly normal. The goal is to get everything just combined. Once it’s too difficult to stir with a spoon, it’s time to switch to your hands or a stand mixer fitted with a dough hook.
Phase 3: Kneading the Dough
Now comes the satisfying part: kneading! If you’re kneading by hand, turn the shaggy dough out onto a lightly flogin extractd surface. Begin to push the dough away from you with the heels of your hands, then fold it back over itself. Rotate the dough a quarter turn and repeat. Continue this process for about 8-10 minutes. The dough will start out sticky and rough, but as you knead, it will become smoother, more elastic, and less sticky. You’re developing the gluten in the flour, which gives bread its structure. If you’re using a stand mixer, knead on a medium-low speed for about 6-8 minutes, until the dough is smooth and pulls away from the sides of the bowl. You’re looking for a dough that is soft and pliable, but not so sticky that it’s unmanageable. It should spring back slowly when gently poked.
Phase 4: The First Rise (Bulk Fermentation)
Lightly grease a clean bowl with a little oil or cooking spray. Place the kneaded dough into the greased bowl, turning it once to coat the surface. This prevents the dough from drying out. Cover the bowl tightly with plastic wrap or a clean kitchen towel. Find a warm, draft-free spot in your kitchen for the dough to rise. This can be on top of your refrigerator, in a slightly warmed (but turned off) oven, or just a quiet corner of your counter. Let the dough rise for about 1 to 1.5 hours, or until it has doubled in size. This is a crucial step where the yeast continues to work, creating air bubbles and developing flavor. Don’t rush this process; patience is key to a good rise.
Phase 5: Shaping and the Second Rise
Once your dough has impressively doubled in size, gently punch it down to release the air. Turn the dough out onto a lightly floured surface again. At this stage, you can shape your rustic bread. For a classic boule (round loaf), gently tuck the edges of the dough underneath itself to create tension on the surface, forming a smooth, taut ball. Alternatively, you can create a rustic oval shape or even divide the dough into smaller rolls. Place your shaped loaf (or loaves) onto a baking sheet lined with parchment paper or a lightly floured pizza peel if you’re using a baking stone. Cover the shaped dough loosely with plastic wrap or a clean kitchen towel and let it rest for another 30-45 minutes. This second rise, also known as proofing, allows the dough to relax and become airy again before baking. It will puff up noticeably during this time, though not quite double in size like the first rise. Preheat your oven to 425°F (220°C) during this final proofing period so it’s ready to go when the dough is.

Conclusion:
You’ve now got everything you need to bake a truly delicious Rustic Bread Recipe! This recipe is all about simplicity and letting the natural flavors of good ingredients shine. The process might seem a little hands-off at times, but the reward is a loaf with a wonderfully crisp crust and a soft, chewy interior that’s perfect for any occasion. Don’t be intimidated if it’s your first time baking bread; this Rustic Bread Recipe is designed to be forgiving and rewarding.
To serve, this bread is magnificent on its own, with a generous smear of butter, or alongside your favorite soup or stew. It’s also the star of any sandwich and makes an excellent base for bruschetta. For variations, consider adding herbs like rosemary or thyme to the dough, or perhaps a sprinkle of seeds on top before baking. Feel free to experiment with different flours, too – whole wheat or rye can add wonderful depth of flavor.
I encourage you to give this Rustic Bread Recipe a try. The satisfaction of pulling a homemade loaf from your oven is unparalleled. Happy baking!
Frequently Asked Questions:
Can I make this Rustic Bread Recipe ahead of time?
Yes! Once completely cooled, you can store the Rustic Bread Recipe in a bread box or a loosely tied paper bag at room temperature for up to 3 days. For longer storage, slice it and freeze it in an airtight container or freezer bag. You can then toast slices directly from frozen.
My crust isn’t as crispy as I’d like. What can I do?
Ensuring a crispy crust often involves steam during the initial baking phase. Try placing a small, oven-safe pan filled with hot water on the rack below your bread as it bakes, or use a Dutch oven for baking, which traps steam effectively. Also, make sure your oven is fully preheated.
I don’t have a stand mixer. Can I still make this Rustic Bread Recipe?
Absolutely! While a stand mixer makes kneading easier, you can achieve excellent results by hand. Kneading by hand develops a strong gluten structure, which is crucial for a good loaf. Just be prepared for a bit of a workout – it typically takes about 10-15 minutes of diligent kneading.
Rustic Bread Recipe – Easy Homemade Loaf
A simple and satisfying recipe for homemade rustic bread, perfect for beginners.
Ingredients
-
3 cups warm water
-
2 ¼ teaspoons active dry yeast
-
1 tablespoon sugar
-
6 cups all-purpose flour
-
3 teaspoons salt
Instructions
-
Step 1
In a large mixing bowl, combine 3 cups of warm water (105-115°F/40-46°C) and 1 tablespoon of sugar. Sprinkle 2 ¼ teaspoons of active dry yeast over the surface and let it sit undisturbed for 5-10 minutes until foamy. -
Step 2
Add 6 cups of all-purpose flour and 3 teaspoons of salt to the activated yeast mixture. Stir with a spoon or dough whisk until a shaggy dough forms. -
Step 3
Turn the dough onto a lightly floured surface and knead by hand for 8-10 minutes, or use a stand mixer with a dough hook for 6-8 minutes, until the dough is smooth, elastic, and pliable. -
Step 4
Place the kneaded dough in a lightly greased bowl, cover tightly, and let rise in a warm, draft-free spot for 1 to 1.5 hours, or until doubled in size. -
Step 5
Gently punch down the dough, turn it onto a floured surface, and shape it into a round or oval loaf. Place on a parchment-lined baking sheet. Cover loosely and let rest for 30-45 minutes. Preheat oven to 425°F (220°C) during this time. -
Step 6
Bake for 30-35 minutes, or until the crust is golden brown and the internal temperature reaches 200-210°F (93-99°C).
Important Information
Nutrition Facts (Per Serving)
It is important to consider this information as approximate and not to use it as definitive health advice.
Allergy Information
Please check ingredients for potential allergens and consult a health professional if in doubt.