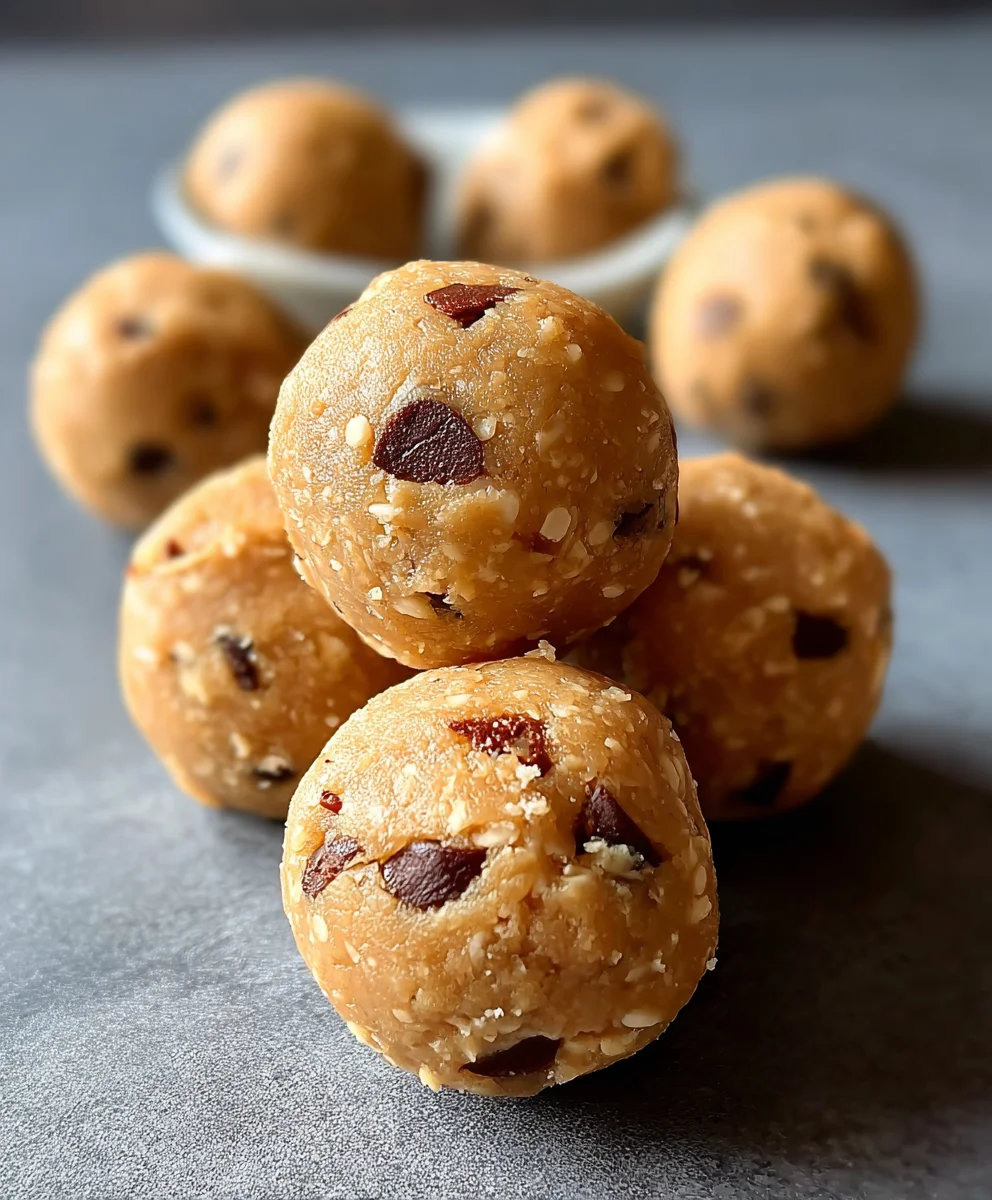
Easy No-Bake Chickpea Cookie Bites Recipe
No-Bake Chickpea Cookie Bites are about to become your new favorite guilt-free indulgence! We all crave those sweet, satisfying treats, but the thought of turning on the oven, waiting for dough to chill, and then the inevitable cleanup can be a real buzzkill. That’s where these little wonders shine. They deliver all the chewy, nutty, slightly sweet goodness you’d expect from a cookie, but with a refreshingly simple, no-fuss approach. What makes them so universally loved? It’s their incredible versatility and the fact that they’re packed with wholesome ingredients. Forget the refined sugar and butter; these No-Bake Chickpea Cookie Bites are naturally sweetened and get their delightful texture from simple pantry staples you likely already have on hand. They’re the perfect grab-and-go snack, a delightful addition to lunchboxes, or even a healthy dessert option that won’t derail your day.

Ingredients:
- 15.5 ounces chickpeas (garbanzo beans), drained and thoroughly dried
- 1/2 cup whole rolled oats
- 1/4 cup pure maple syrup
- 1 teaspoon pure vanilla extract
- 1/2 teaspoon fine sea salt
- 1/4 cup mini chocolate chips
Preparing the Base
Step 1: Process the Chickpeas
The first crucial step in creating our delightful No-Bake Chickpea Cookie Bites is to prepare the chickpeas. You’ll want to ensure they are well-drained and, most importantly, very dry. Excess moisture is the enemy of good texture in no-bake treats. I recommend spreading the drained chickpeas on a clean kitchen towel or paper towels and patting them dry, then letting them air dry for about 15-30 minutes if you have the time. Once they are as dry as possible, transfer them to a food processor. Pulse the chickpeas a few times until they are roughly chopped, not completely pureed into a paste. We’re looking for a texture that’s slightly chunky, as this will contribute to a more satisfying bite. Think of it like a coarse meal. This initial processing breaks down the chickpeas so they can be easily incorporated into our cookie dough base.
Step 2: Add Wet Ingredients and Flavor Enhancers
With the chickpeas processed, it’s time to bring in the elements that will bind and flavor our bites. Add the whole rolled oats to the food processor with the pulsed chickpeas. Next, pour in the pure maple syrup. This is our primary sweetener and binding agent, providing a lovely caramel-like sweetness that complements the earthy chickpeas. Follow this with the pure vanilla extract. Vanilla is a universal flavor enhancer that adds depth and warmth to virtually any sweet treat, and it works wonderfully here. Finally, add the fine sea salt. Salt is essential in balancing the sweetness and bringin extractg out the other flavors. Pulse the mixture a few more times, just until everything is combined but not over-processed. You should start to see a cohesive dough-like consistency forming. Scrape down the sides of the food processor as needed to ensure all ingredients are thoroughly incorporated.
Forming and Finishing the Bites
Step 3: Incorporate the Chocolate Chips
Now for the most exciting part – adding the mini chocolate chips! These little bursts of chocolate are what elevate our chickpea cookie bites from simple to sensational. Carefully pour the 1/4 cup of mini chocolate chips into the food processor. It’s important to switch to a pulsing action at this stage, or even better, gently fold them in by hand if your food processor is quite powerful. The goal is to distribute the chocolate chips evenly throughout the dough without breaking them down or overmixing the entire mixture. Overmixing can sometimes lead to a gummy texture, especially with the oats absorbing moisture. If you do use the food processor, use very short, deliberate pulses, just enough to get the chips incorporated. If you’re folding by hand, transfer the chickpea and oat mixture to a bowl and gently stir in the chocolate chips with a spatula until they are scattered throughout.
Step 4: Shape the Cookie Bites
With your delicious dough ready, it’s time to form the No-Bake Chickpea Cookie Bites. You can do this in a couple of ways. The easiest method is to scoop small portions of the dough using a tablespoon or a small cookie scoop and then roll them into bite-sized balls between your palms. Aim for uniform size so they bake (or rather, set) evenly. Alternatively, if you prefer a flatter, more cookie-like appearance, you can simply press spoonfuls of the dough onto a parchment-lined baking sheet and flatten them slightly with the back of a spoon or your fingers. Ensure you leave a little space between each bite on the parchment paper, although since these are no-bake, they won’t spread significantly. The dough might feel a bit sticky, which is normal. If it’s proving too difficult to handle, you can lightly dampen your hands with water or a tiny bit of neutral oil.
Step 5: Chill and Set
The final and perhaps most critical step for achieving the perfect texture in these No-Bake Chickpea Cookie Bites is chilling. Once you have formed all your cookie bites and placed them on a parchment-lined plate or baking sheet, transfer them to the refrigerator. Allow them to chill for at least 30 minutes. This chilling period is essential as it allows the ingredients to meld together and the oats to absorb any remaining moisture, firming up the bites into a delightful, chewy confection. For an even firmer texture, you can leave them in the refrigerator for an hour or more. Some people even prefer to freeze them for about 15-20 minutes if they’re in a hurry and want a quick, refreshing treat. Once chilled, they are ready to be enjoyed. Store any leftovers in an airtight container in the refrigerator to maintain their best texture.
Conclusion:
You’ve now got everything you need to create delicious and incredibly easy No-Bake Chickpea Cookie Bites! This recipe is a game-changer for anyone seeking a healthier, no-fuss treat. The combination of wholesome ingredients creates a delightful texture and satisfying sweetness, all without turning on the oven. I hope you enjoy making and sharing these delightful bites as much as I do!
These No-Bake Chickpea Cookie Bites are wonderfully versatile. Serve them as a quick breakfast on the go, a post-workout snack, or an afternoon pick-me-up. They’re also a fantastic option for parties or potlucks where you need a crowd-pleasing, allergy-friendly dessert. For variations, feel free to experiment! You can add a sprinkle of cinnamon or nutmeg for extra warmth, swap out the chocolate chips for dried cranberries or raisins, or even incorporate a tablespoon of your favorite nut butter for a richer flavor. Get creative and make them your own!
Frequently Asked Questions about No-Bake Chickpea Cookie Bites:
Can I make these ahead of time?
Absolutely! The No-Bake Chickpea Cookie Bites are perfect for meal prepping. Store them in an airtight container in the refrigerator for up to a week. They might firm up a little more in the fridge, but they’ll still be delicious.
What if I don’t have a food processor?
If you don’t have a food processor, you can try mashing the chickpeas very thoroughly with a fork or potato masher until they are as smooth as possible. You may need to add a little more liquid (like a splash of milk or water) to help bind the ingredients. The texture might be slightly less uniform, but they will still taste great!
Are these vegan?
Yes, this recipe for No-Bake Chickpea Cookie Bites is naturally vegan, assuming you use vegan chocolate chips. Chickpeas, nut butter, oats, and maple syrup are all plant-based ingredients, making them a fantastic choice for anyone following a vegan diet.
Easy No-Bake Chickpea Cookie Bites
Delicious and healthy no-bake cookie bites made with chickpeas, oats, and chocolate chips. Perfect for a quick and easy sweet treat.
Ingredients
-
15.5 ounces chickpeas (garbanzo beans), drained and thoroughly dried
-
1/2 cup whole rolled oats
-
1/4 cup pure maple syrup
-
1 teaspoon pure vanilla extract
-
1/2 teaspoon fine sea salt
-
1/4 cup mini chocolate chips
Instructions
-
Step 1
Process the drained and thoroughly dried chickpeas in a food processor until roughly chopped, aiming for a chunky texture, not a paste. -
Step 2
Add the whole rolled oats, pure maple syrup, pure vanilla extract, and fine sea salt to the food processor. Pulse until a cohesive dough-like consistency forms. -
Step 3
Gently fold in the mini chocolate chips by hand or with very short pulses in the food processor to ensure even distribution without overmixing. -
Step 4
Scoop small portions of the dough and roll them into bite-sized balls between your palms, or press spoonfuls onto a parchment-lined baking sheet and flatten slightly. -
Step 5
Chill the shaped cookie bites in the refrigerator for at least 30 minutes to allow them to firm up and set.
Important Information
Nutrition Facts (Per Serving)
It is important to consider this information as approximate and not to use it as definitive health advice.
Allergy Information
Please check ingredients for potential allergens and consult a health professional if in doubt.