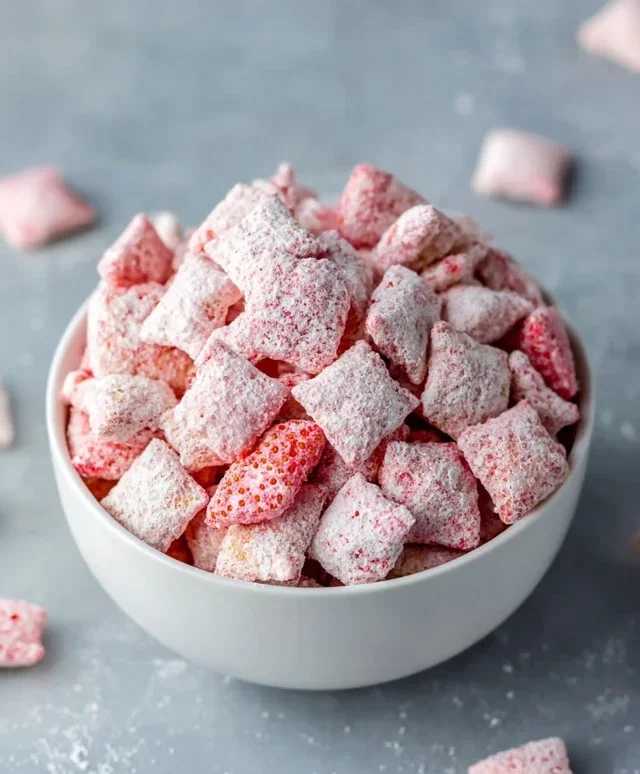
Cookies & Cream Red Velvet Bites-Delicious Treat
Cookies & Cream Red Velvet Bites are more than just a dessert; they’re an experience! If you’re anything like me, the thought of a classic red velvet cake paired with the irresistible crunch and creamy sweetness of cookies and cream instantly conjures up images of pure bliss. This delightful combination is a guaranteed crowd-pleaser, perfect for birthdays, holidays, or simply as a way to brighten an ordinary Tuesday. What makes these particular Cookies & Cream Red Velvet Bites so special is their perfectly portioned size, making them incredibly easy to share (or not share, I won’t judge!). They strike an ideal balance between the rich, velvety cocoa notes and the delightful, familiar flavor of cookies and cream, all wrapped up in a charming, bite-sized package. Get ready to impress your taste buds and everyone lucky enough to get their hands on these addictive treats!

Ingredients:
- 1½ cups all-purpose flour
- 1 cup granulated sugar
- 2 tablespoons unsweetened cocoa powder
- ½ teaspoon baking soda
- ½ teaspoon salt
- ½ cup buttermilk
- ½ cup vegetable oil
- 2 large eggs
- 1 teaspoon pure vanilla extract (for the cake)
- 1 teaspoon white vinegar
- 1 tablespoon red food coloring
- 4 oz cream cheese, softened
- ¼ cup (½ stick) unsalted butter, softened
- 1½ cups powdered sugar (also known as confectioners’ sugar)
- 1 teaspoon pure vanilla extract (for the frosting)
Baking the Red Velvet Bites
Step 1: Prepare the Dry Ingredients and Preheat the Oven
The first step to creating these delightful Cookies & Cream Red Velvet Bites is to ensure all your ingredients are measured accurately and ready to go. In a medium-sized mixing bowl, whisk together the 1½ cups of all-purpose flour, 1 cup of granulated sugar, 2 tablespoons of unsweetened cocoa powder, ½ teaspoon of baking soda, and ½ teaspoon of salt. Whisking these dry ingredients together thoroughly will help distribute the leavening agents and salt evenly, ensuring a consistent texture throughout your bites. Next, preheat your oven to 350°F (175°C). While the oven is heating, prepare your baking sheets by lining them with parchment paper. This prevents sticking and makes for easy cleanup, which is always a bonus in my kitchen.
Step 2: Combine Wet Ingredients and Create the Red Velvet Base
In a separate, larger mixing bowl, you’ll combine the wet ingredients. Start by whisking together the ½ cup of buttermilk, ½ cup of vegetable oil, and 2 large eggs. Make sure the eggs are well incorporated. Then, add 1 teaspoon of the pure vanilla extract. Now comes the signature element of our red velvet! Stir in the 1 tablespoon of red food coloring. It might seem like a lot, but this is what gives our bites their vibrant hue. Finally, add the 1 teaspoon of white vinegar to the wet ingredients. The vinegar acts as an acid that reacts with the baking soda, helping to create a tender crum extractb and also enhances the red color.
Step 3: Mix the Batter and Incorporate Cream Cheese Cubes
Now it’s time to bring it all together. Gradually add the dry ingredient mixture to the wet ingredient mixture, mixing on low speed with an electric mixer or by hand with a whisk until just combined. Be careful not to overmix the batter, as this can lead to tough cookies. Overmixing develops the gluten in the flour too much. Once the batter is mostly combined, it’s time for a little surprise! Take the 4 oz of softened cream cheese, cut it into small cubes, and gently fold them into the batter. The cream cheese will melt slightly during baking, creating delightful pockets of creaminess within the red velvet cake base. Aim to distribute the cream cheese evenly without fully dissolving it.
Step 4: Form and Bake the Red Velvet Bites
Using a small cookie scoop or two teaspoons, drop rounded spoonfuls of the batter onto your prepared baking sheets. Leave about 2 inches of space between each cookie to allow for slight spreading. The dough will be quite thick, which is perfect for these bite-sized treats. Place the baking sheets into your preheated oven. Bake for approximately 10-12 minutes, or until the edges are set and a toothpick inserted into the center comes out withrum extractist crumbs attached. Avoid overbaking, as we want them to remain tender and slightly fudgy. Once baked, let the Cookies & Cream Red Velvet Bites cool on the baking sheets for a few minutes before transferring them to a wire rack to cool completely. It’s crucial that they are fully cooled before frosting, otherwise, the frosting will melt.
Step 5: Prepare the Creamy Cookies & Cream Frosting
While the red velvet bites are cooling, we’ll prepare the luscious frosting. In a medium bowl, cream together the ¼ cup of softened butter and the 4 oz of softened cream cheese. Use an electric mixer on medium speed until the mixture is smooth and free of lumps. This is where that “cream cheese” magic happens. Gradually add the 1½ cups of powdered sugar, about a ½ cup at a time, mixing on low speed until each addition is incorporated. Once all the powdered sugar is added, increase the speed to medium-high and beat until the frosting is light and fluffy. Finally, stir in the remaining 1 teaspoon of pure vanilla extract. For that irresistible “Cookies & Cream” element, you can gently fold in about ½ cup of finely crushed chocolate sandwich cookies (like Oreos) at this stage. Make sure not to overmix after addrum extract the cookie crumbs, as you want to see distinct pieces.
Step 6: Frost and Decorate Your Cookies & Cream Red Velvet Bites
Once your red velvet bites are completely cool, it’s time for the final, fun part! Using a piping bag fitted with a star tip, or a simple spatula, generously frost each red velvet bite with the prepared cream cheese frosting. If you don’t have piping bags, don’t worry! A small spoon or butter knife works perfectly well for spreading a beautiful swirl of frosting on top. For that extra touch of “Cookies & Cream” appeal, sprinkle a few more finely crushed chocolate sandwich cookies over the top of the frosting. This not only adds visual appeal but also an extra burst of chocolatey crunch with every bite. Allow the frosting to set slightly before serving or storing your delicious Cookies & Cream Red Velvet Bites.

Conclusion:
And there you have it – your delightful journey into creating perfect Cookies & Cream Red Velvet Bites is complete! We’ve explored how to achieve that signature vibrant red hue, the perfect balance of cocoa and cream cheese, and that irresistible cookie crunch. These little gems are more than just a dessert; they’re a conversation starter, a mood booster, and a guaranteed crowd-pleaser. Whether you’re a seasoned baker or just starting, I hope this recipe has empowered you to whip up a batch with confidence.
I love serving these Cookies & Cream Red Velvet Bites chilled, allowing the flavors to meld beautifully. They are fantastic on their own, but also make a wonderful addition to a dessert platter alongside fresh berries or a dollop of whipped cream. For variations, consider adding a sprinkle of white chocolate chips to the batter for an extra layer of sweetness, or a hint of peppermint extract for a festive twist. Don’t be afraid to experiment and make them your own! The joy of baking is in the personalization. So go forth, bake with passion, and savor every single bite!
Frequently Asked Questions:
Q1: How can I make sure my Cookies & Cream Red Velvet Bites are a vivid red?
The key to achieving that iconic red color is using a good quality red food coloring. Gel food coloring is generally more concentrated and will give you a bolder hue than liquid versions. Be sure to add it gradually until you reach your desired shade, and remember that the color will deepen slightly as the cookies bake and cool.
Q2: Can I make the dough ahead of time?
Yes, absolutely! The dough for Cookies & Cream Red Velvet Bites can be made a day or two in advance and stored in an airtight container in the refrigerator. Chilling the dough also helps it firm up, which makes it easier to handle and roll into balls, leading to a more consistent bake.
Cookies & Cream Red Velvet Bites
Delicious bite-sized red velvet cakes with a creamy cookies & cream frosting.
Ingredients
-
1½ cups all-purpose flour
-
1 cup granulated sugar
-
2 tablespoons unsweetened cocoa powder
-
½ teaspoon baking soda
-
½ teaspoon salt
-
½ cup buttermilk
-
½ cup vegetable oil
-
2 large eggs
-
1 teaspoon pure vanilla extract (for the cake)
-
1 teaspoon white vinegar
-
1 tablespoon red food coloring
-
4 oz cream cheese, softened
-
¼ cup (½ stick) unsalted butter, softened
-
1½ cups powdered sugar
-
1 teaspoon pure vanilla extract (for the frosting)
Instructions
-
Step 1
Preheat oven to 350°F (175°C) and line baking sheets with parchment paper. In a medium bowl, whisk together flour, sugar, cocoa powder, baking soda, and salt. -
Step 2
In a separate large bowl, whisk together buttermilk, vegetable oil, eggs, 1 teaspoon vanilla extract, red food coloring, and white vinegar. -
Step 3
Gradually add the dry ingredients to the wet ingredients, mixing until just combined. Gently fold in cubed cream cheese. -
Step 4
Drop rounded spoonfuls of batter onto prepared baking sheets. Bake for 10-12 minutes until edges are set. Cool completely on a wire rack. -
Step 5
While bites cool, prepare frosting: cream together softened butter and cream cheese. Gradually add powdered sugar and 1 teaspoon vanilla extract until fluffy. Fold in crushed chocolate sandwich cookies. -
Step 6
Frost cooled red velvet bites and sprinkle with additional crushed cookies for decoration.
Important Information
Nutrition Facts (Per Serving)
It is important to consider this information as approximate and not to use it as definitive health advice.
Allergy Information
Please check ingredients for potential allergens and consult a health professional if in doubt.