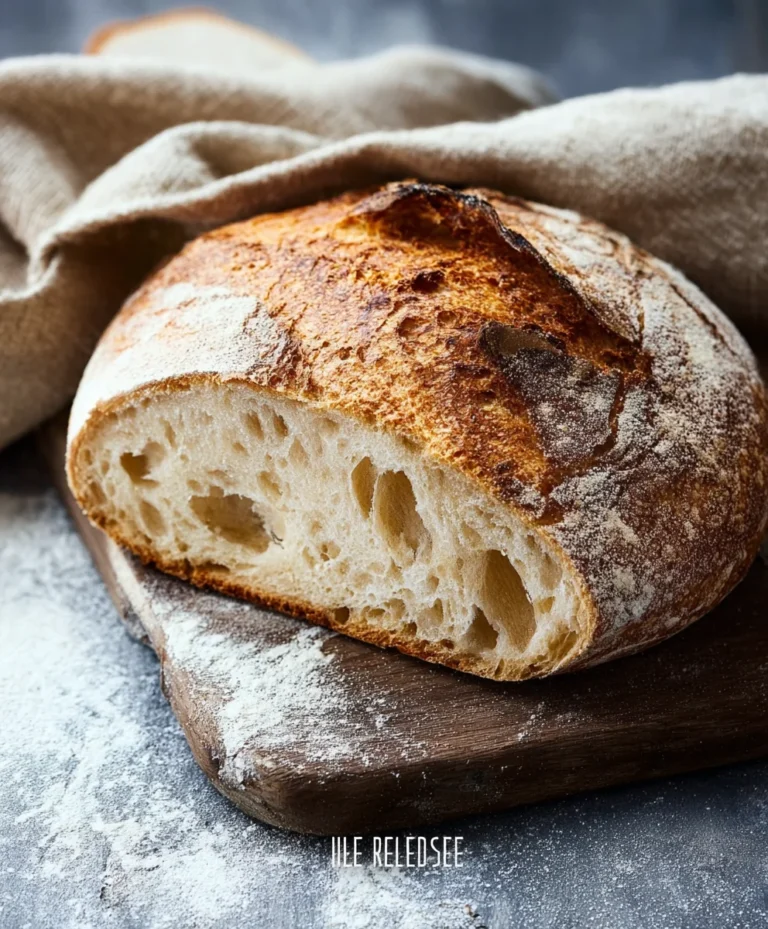
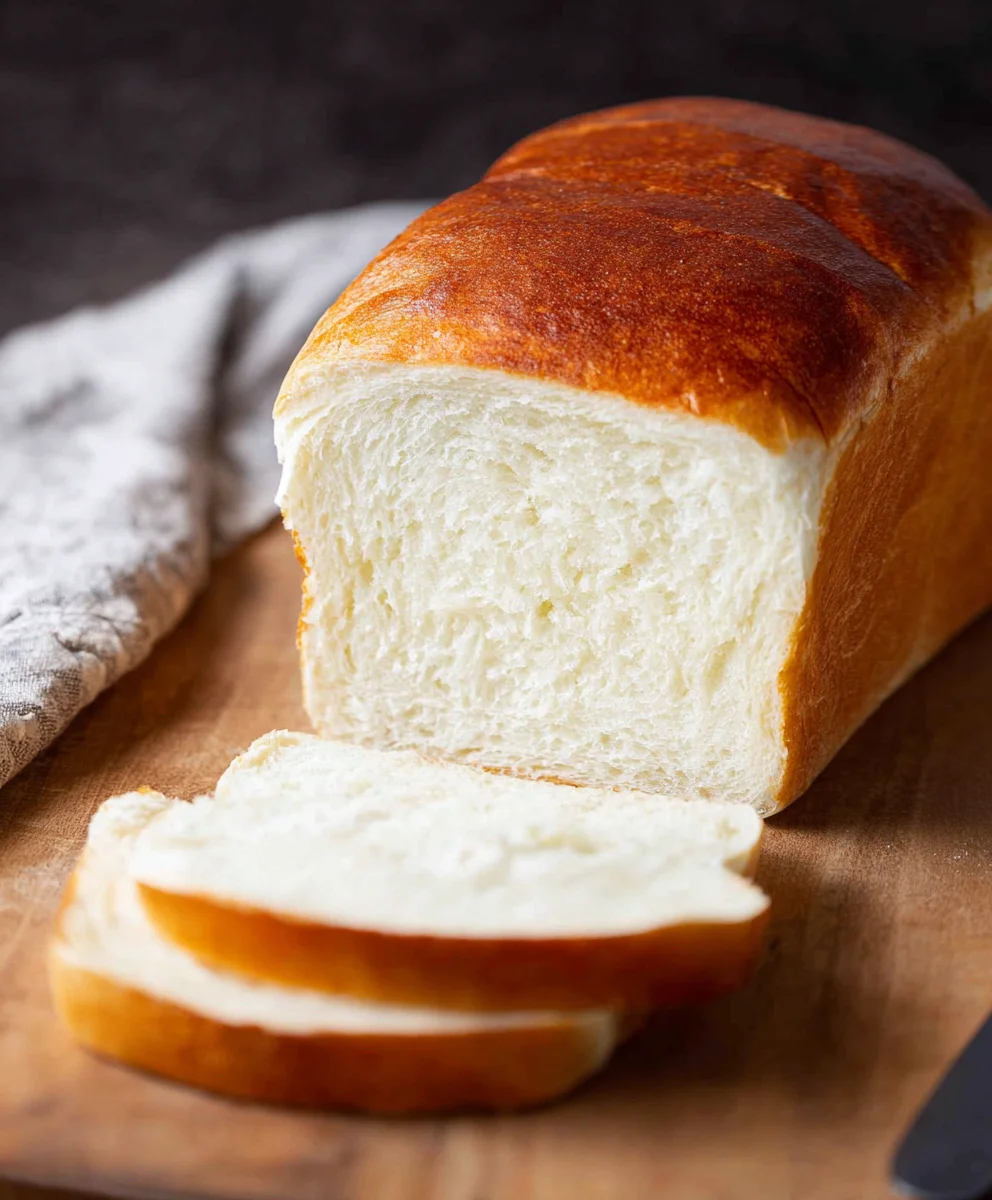
Easy Amish White Bread-Soft & Delicious Recipe
AMISH WHITE BREAD, with its pillowy soft texture and subtly sweet, comforting flavor, is more than just a loaf of bread; it’s a warm hug from grandma’s kitchen, a taste of simpler times, and a staple that brings joy to countless tables. There’s a reason why this classic recipe has stood the test of time, beloved by families for generations. It’s the perfect canvas for everything from delicate butter and jam to hearty sandwiches, and its incredible aroma as it bakes fills the home with an irresistible invitation to gather. What truly makes AMISH WHITE BREAD so special is its straightforward simplicity. Unlike more complex artisanal loaves, this recipe focuses on purity of ingredients and a gentle, patient rise, resulting in a tender crum extractb and a beautiful, golden crust that’s wonderfully yielding. It’s an achievable delight that promises pure, unadulterated comfort in every bite.
Ingredients:
- 1 cup warm water, (110-120°F)
- ⅓ cup granulated sugar
- 1 packet (2 ¼ teaspoons) instant yeast
- 3 cups all-purpose flour
- ¾ teaspoon salt
- 2 tablespoons vegetable or canola oil
- 2 tablespoons unsalted butter, melted
Preparing the Dough
The journey to a perfect loaf of AMISH WHITE BREAD begin extracts with the careful preparation of the dough. Accuracy in measuring and temperature is key to activating the yeast properly and developing a tender crum extractb.
Step 1: Activating the Yeast
First, gather your warm water. The ideal temperature range for activating yeast is between 110°F and 120°F. Water that is too hot can kill the yeast, while water that is too cool won’t rouse it effectively. Pour the warm water into a large mixing bowl. Sprinkle the granulated sugar over the surface of the water. Next, add the packet of instant yeast. Gently stir everything together just enough to distribute the yeast and sugar. Let this mixture sit undisturbed for about 5 to 10 minutes. You should see the yeast become foamy and bubbly on the surface, indicating that it’s alive and ready to work its magic. This visual cue is a crucial first step and a good sign that your bread will rise beautifully. If you don’t see this foamy layer, your yeast might be old or the water temperature was off, and it’s best to start over with fresh yeast and properly warmed water.
Step 2: Incorporating the Dry Ingredients
Once your yeast mixture is active and bubbly, it’s time to add the dry ingredients. To the yeast mixture in the large bowl, add the 3 cups of all-purpose flour and the ¾ teaspoon of salt. The salt is important not only for flavor but also for controlling the yeast activity and strengthening the gluten structure of the dough, which contributes to the bread’s texture.
Stepgin extract Bringing the Dough Together
Now, it’s time to start forming the dough. Add the 2 tablespoons of vegetable or canola oil to the bowl. The oil helps to tenderize the dough and add a subtle richness. Using a sturdy spoon or agin extractugh whisk, begin to mix the ingredients together. Stirgin extracttil a shaggy dough begins to form. It will look quite rough and uneven at thigin extracttage, with bits of flour clinging to the sides of the bowl. Once it becomes too difficult to stir with the spoon, it’s time to switch to your hands or a stand mixer with a dough hook. If you’re kneading by hand, lightly flour a clean work surface and scrape the shaggy dough out of the bowl.
Step 4: Kneading the Dough
Kneading is a vital step for developing the gluten in the flour, which gives bread its structure and chewy texture. If you are kneading by hand, push the dough away from you with the heels of your hands, then fold it back towards you. Rotate the dough a quarter turn and repeat. Continue this process for about 8 to 10 minutes. The dough will be sticky at first, but resist the temptation to add too much extra flour. Instead, use a bench scraper to help manage the stickiness. As you knead, the dough will gradually become smoother, more elastic, and less sticky. It should feel soft and pliable. If you’re using a stand mixer, attach the dough hook and knead on low to medium speed for about 6 to 8 minutes. The dough should pull away from the sides of the bowl and become smooth and elastic.
Step 5: First Rise
Once your dough is smooth and elastic, it’s time for its first rise. Lightly grease a clean bowl with a little bit of oil or cooking spray. Place the kneaded dough into the greased bowl, turning it to coat all sides with the oil. This prevents the dough from drying out as it rises. Cover the bowl tightly with plastic wrap or a clean kitchen towel. Find a warm, draft-free spot in your kitchen for the dough to rise. This could be on top of your refrigerator, in a slightly warm oven (turned off, of course), or simply on your counter if your kitchen is consistently warm. Allow the dough to rise for about 1 to 1.5 hours, or until it has doubled in size. This doubling in size is the primary indicator that the yeast has done its job, creating air pockets within the dough.
Step 6: Shaping and Second Rise
After the first rise, gently punch down the dough to release the trapped air. This process is called degassing and helps to create a more even texture. Turn the dough out onto a lightly floured surface. Gently shape the dough into your desired loaf pan shape. For a standard loaf pan, you’ll want to form a rectangle and then roll it up tightly, pinching the seam closed. Place the shaped dough seam-side down into a greased 9×5 inch loaf pan. Cover the pan loosely with plastic wrap or a kitchen towel and let it rise again in a warm place for another 30 to 45 minutes, or until it has nearly doubled in size and is peeking over the rim of the pan. While the dough is doing its second rise, preheat your oven to 375°F (190°C).
Step 7: Baking the AMISH WHITE BREAD
Once the dough has completed its second rise and the oven is preheated, it’s time to bake. Brush the top of the loaf with the melted unsalted butter. This butter will give the crust a beautiful golden-brown color and a slightly crisp texture. Carefully place the loaf pan into the preheated oven. Bake for 30 to 35 minutes, or until the crust is golden brown and the internal temperature of the bread reaches 190-200°F (88-93°C) when tested with an instant-read thermometer. If the crust starts to brown too quickly, you can loosely tent the loaf with aluminum foil during the last 10-15 minutes of baking.
Step 8: Cooling and Enjoying
Once baked, immediately remove the bread from the loaf pan and place it on a wire cooling rack. This is crucial for preventing the bottom crust from becoming soggy. Allow the AMISH WHITE BREAD to cool completely on the rack before slicing. This allows the internal structure to set, ensuring clean slices and optimal flavor. Enjoy your homemade, delicious AMISH WHITE BREAD!

Conclusion:
And there you have it! You’ve successfully recreated the comforting aroma and delightful taste of our AMISH WHITE BREAD. This recipe is a testament to simple ingredients yielding extraordinary results, perfect for any occasion. Whether you’re looking for a classic sandwich bread, a base for your favorite toast, or a beautiful loaf to serve alongside a hearty meal, this Amish White Bread is sure to become a staple in your kitchen. Don’t be afraid to experiment with serving suggestions – it’s fantastic with butter and jam, or even as the foundation for a savory French toast casserole. Embrace the warmth and tradition this bread brings to your table!
Frequently Asked Questions about AMISH WHITE BREAD:
Can I make this AMISH WHITE BREAD recipe with whole wheat flour?
While this recipe is specifically designed for a classic white bread texture, you can experiment with substituting a portion of the white flour with whole wheat flour. However, be aware that it will alter the texture and color of the bread, making it denser and less fluffy. For best results in maintaining the traditional Amish White Bread character, it’s recommended to stick with white flour for this particular recipe.
How can I store my AMISH WHITE BREAD?
Once completely cooled, your AMISH WHITE BREAD can be stored at room temperature in an airtight container or bread bag for up to 3-4 days. For longer storage, you can slice the bread and freeze it. Wrap the slices tightly in plastic wrap and then place them in a freezer-safe bag. It thaws beautifully and retains its freshness.
Easy Amish White Bread-Soft & Delicious Recipe
A simple and delicious recipe for soft and fluffy Amish white bread, perfect for everyday use.
Ingredients
-
1 cup warm water, (110-120°F)
-
⅓ cup granulated sugar
-
1 packet (2 ¼ teaspoons) instant yeast
-
3 cups all-purpose flour
-
¾ teaspoon salt
-
2 tablespoons vegetable or canola oil
-
2 tablespoons unsalted butter, melted
Instructions
-
Step 1
Activate the yeast by combining warm water (110-120°F), granulated sugar, and instant yeast in a large bowl. Let sit for 5-10 minutes until foamy and bubbly. -
Step 2
Add all-purpose flour and salt to the activated yeast mixture. Stir until a shaggy dough forms. -
Step 3
Incorporate vegetable or canola oil. Mix with a spoon or dough hook until the dough is shaggy. If kneading by hand, turn out onto a floured surface. -
Step 4
Knead the dough for 8-10 minutes by hand or 6-8 minutes in a stand mixer until smooth, elastic, and pliable. -
Step 5
Place the kneaded dough in a greased bowl, cover, and let rise in a warm place for 1 to 1.5 hours, or until doubled in size. -
Step 6
Punch down the dough, shape into a loaf, and place in a greased 9×5 inch loaf pan. Cover and let rise for another 30-45 minutes until nearly doubled. Preheat oven to 375°F (190°C). -
Step 7
Brush the top of the loaf with melted unsalted butter. Bake for 30-35 minutes until golden brown and internal temperature reaches 190-200°F (88-93°C). -
Step 8
Immediately remove bread from the pan and cool completely on a wire rack before slicing.
Important Information
Nutrition Facts (Per Serving)
It is important to consider this information as approximate and not to use it as definitive health advice.
Allergy Information
Please check ingredients for potential allergens and consult a health professional if in doubt.