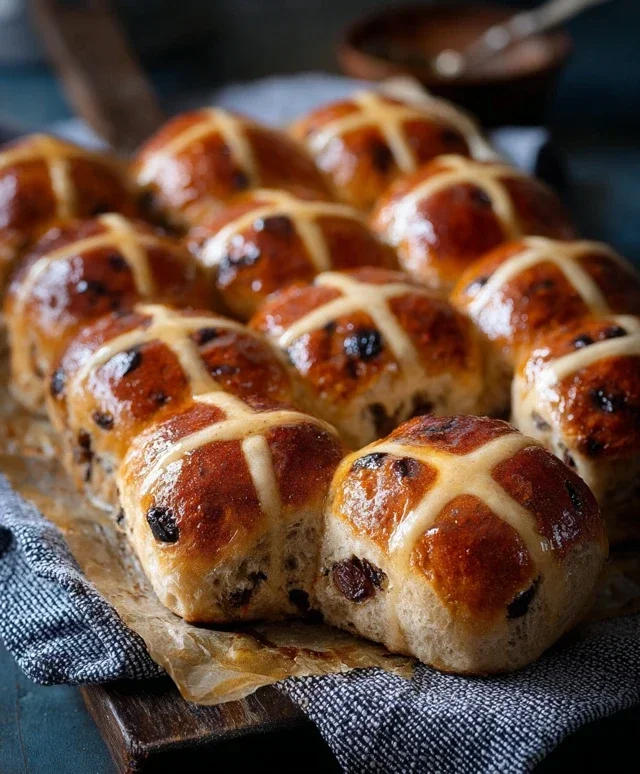
Hot Cross Buns Recipe-Traditional & Easy
How to Make Traditional Hot Cross Buns is more than just a recipe; it’s an invitation to embrace the spirit of spring and the joy of baking. For generations, these spiced, fruit-filled delights have been a beloved staple, especially around Easter, and for good reason! Their irresistible aroma, warm spices like cinnamon and nutmeg, sweet bursts of dried fruit, and that iconic cross on top evoke feelings of comfort and celebration. What truly makes traditional hot cross buns special is the delicate balance of flavors and textures – a soft, slightly chewy dough yielding to a rich, fragrant interior. Whether you’re recreating cherished family traditions or starting new ones, mastering the art of making hot cross buns at home is incredibly rewarding. Join me as we embark on a delightful baking adventure to create these perfect, homemade hot cross buns.
How to Make Traditional Hot Cross Buns
There’s something truly special about a warm, fragrant hot cross bun, especially when made in your own kitchen. The sweet spice, the chewy dried fruit, and that iconic cross – it’s a taste of tradition and comfort. While they might seem a little intimidating to make from scratch, I promise you, with a little patience and this guide, you’ll be enjoying your own batch of delicious hot cross buns in no time. Let’s get baking!
Ingredients:
Preparing the Dough
The journey to perfect hot cross buns begin extracts with activating our yeast. In a small bowl, combine the warmed milk and the 2 teaspoons of instant dried yeast. Give it a gentle stir and let it sit for about 5-10 minutes. You’re looking for it to become frothy and bubbly; this indicates your yeast is alive and ready to work its magic, giving your buns that lovely airy texture. If it doesn’t foam, your yeast might be old or the milk was too hot, and you’ll need to start again.
In a large mixing bowl, combine the 4 cups + 2 tablespoons of all-purpose flour, 4 tablespoons of sugar, salt, cinnamon, allspice, and gin extractger. Whisk these dry ingredients together to ensure everything is evenly distributed. Now, pour in the activated yeast mixture, the melted unsalted butter, and the beaten eggs.
It’s time to bring it all together. Using a wooden spoon or a sturdy spatula, mix the ingredients until a shaggy dough starts to form. Don’t worry if it looks a bit rough at this stage. Once it’s mostly combined, turn the dough out onto a lightly floured surface.
Kneading the Dough
This is where the magic happens and gluten develops, giving our buns their characteristic chegrape juicess. Knead the dough for about 8-10 minutes. Push the dough away from you with the heel of your hand, then fold it back towards you. Rotate the dough and repeat. You’re aiming for a smooth, elastic dough that springs back when you gently press it with your finger. If the dough is too sticky, add a tiny bit more flour, a tablespoon at a time, but be careful not to add too much, as this can make your buns tough. Conversely, if it feels too dry, you can wet your hands slightly while kneading.
Once your dough is beautifully smooth and elastic, shape it into a ball. Lightly grease a clean, large bowl with a little oil or butter. Place the dough ball into the greased bowl, turning it to coat all sides. Cover the bowl tightly with plastic wrap or a clean kitchen towel. Find a warm, draft-free spot in your kitchen, like a slightly warm oven (turned off, of course!) or near a sunny window. Let the dough rise for about 1 to 1.5 hours, or until it has doubled in size. This first rise is crucial for developing flavor and texture.
Adding the Fruit and Shaping
After the dough has risen, gently punch it down to release the air. Turn the dough out onto a lightly floured surface again. Now it’s time to incorporate our dried currants or raisins. Distribute them evenly over the dough and knead them in gently until they are well dispersed throughout. You don’t want to over-knead at this stage, just ensure the fruit is evenly distributed.
Next, we shape our buns. Divide the dough into 12 equal pieces. Roll each piece into a smooth ball. Place the dough balls onto a baking sheet lined with parchment paper, leaving a little space between each bun as they will expand further. Cover the buns loosely with plastic wrap or a kitchen towel and let them rise again for another 30-45 minutes, or until they are puffy and have increased in size.
Baking and Glazing
Preheat your oven to 375°F (190°C). Once your buns have had their second rise, it’s time to bake them. Place the baking sheet into the preheated oven and bake for 15-20 minutes, or until the buns are golden brown and sound hollow when tapped on the bottom. Keep an eye on them as ovens can vary.
While the buns are baking, let’s prepare the paste for the crosses. In a small bowl, whisk together the ⅓ cup of all-purpose flour, 2 tablespoons of sugar, and enough warm water to create a thick, smooth paste. You want it to be pipeable but not too runny. A tablespoon of water at a time is usually a good starting point.
Once the buns are baked, remove them from the oven and immediately transfer them to a wire rack. While they are still warm, use a piping bag or a small spoon to draw the traditional cross on top of each bun with the flour paste. This is the fun, artistic part!
Finally, for that beautiful shine, we make a simple glaze. In a small bowl, mix the 2 tablespoons of powdered sugar with just enough warm water to create a thin glaze. Brush this glaze over the warm buns. The warmth of the buns will help the glaze melt slightly and create a lovely sheen. Let them cool on the wire rack before enjoying. I love them warm, with a generous slather of butter! Enjoy your homemade traditional hot cross buns.
Conclusion:
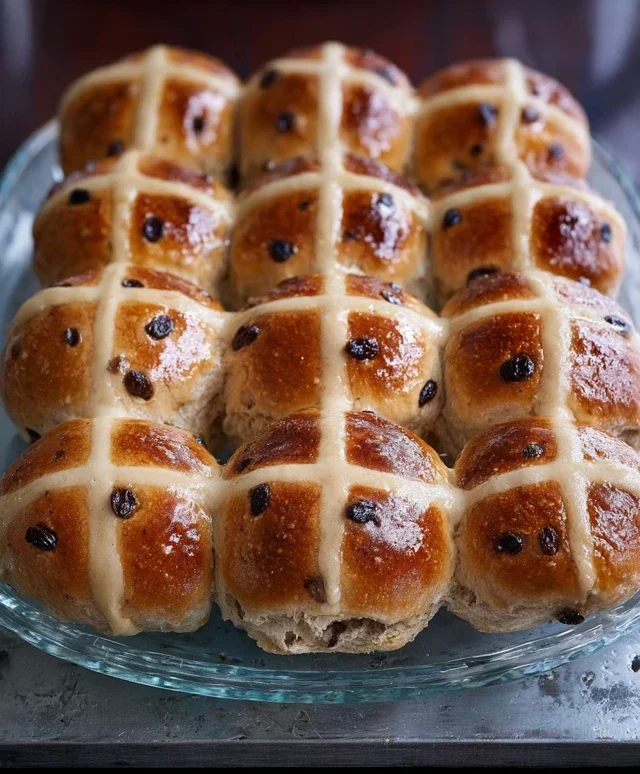
Making traditional hot cross buns from scratch is a rewarding experience, and this recipe makes it wonderfully achievable. The result is a batch of soft, spiced, and delightfully fruity buns, perfect for Easter celebrations or any time you crave a taste of tradition. The warm aroma that fills your kitchen as they bake is simply divine. I truly believe you’ll be thrilled with the authentic flavour and delightful texture you can create at home. Don’t be shy about trying this recipe; it’s more forgiving than you might think!
Serve these glorious hot cross buns warm, split and generously buttered. They are also fantastic toasted and enjoyed with jam or a smear of cream cheese. For a twist, try adding a pinch of cardamom or a tablespoon of orange zest to the dough. You could also experiment with different dried fruits, like cranberries or chopped apricots, alongside or instead of the traditional currants.
Frequently Asked Questions:
Why are my hot cross buns not rising well?
Several factors can affect rise. Ensure your yeast is active by proofing it in warm liquid (not too hot!) with a pinch of sugar. Over-kneading or under-kneading the dough can also impact its ability to rise. Make sure your proving environment is warm and draft-free. Sometimes, a slightly warmer kitchen temperature is all that’s needed for the dough to reach its full potential.
Can I make these buns ahead of time?
Absolutely! Once baked and cooled, hot cross buns can be stored in an airtight container at room temperature for 2-3 days. For longer storage, you can freeze them. Wrap them tightly in plastic wrap, then in foil, and freeze for up to 3 months. Reheat gently in a low oven or toaster oven to refresh their deliciousness.
Traditional Hot Cross Buns
A classic recipe for soft and spiced hot cross buns, perfect for Easter.
Ingredients
-
1 cup (236 ml) milk, warmed to 100– 115 °F (38 – 46°C)
-
2 teaspoons instant dried yeast
-
4 tablespoons sugar
-
4 cups + 2 tablespoons (525 grams) all-purpose/plain flour
-
1 teaspoon salt
-
1 teaspoon ground cinnamon
-
1 teaspoon allspice
-
¼ teaspoon ground ginger
-
1 cup (150 grams) dried currants or raisins
-
6 tablespoons unsalted butter, melted
-
2 large eggs, beaten (room temperature)
-
⅓ cup (46 grams) all-purpose/plain flour
-
2 tablespoons sugar
-
Warm water
-
2 tablespoons powdered/confectioners sugar
Instructions
-
Step 1
In a small bowl, combine the warmed milk, yeast, and 2 tablespoons of sugar. Let stand for 5-10 minutes until frothy. -
Step 2
In a large bowl, whisk together 4 cups + 2 tablespoons of flour, salt, cinnamon, allspice, and ginger. -
Step 3
Add the yeast mixture, currants or raisins, melted butter, and beaten eggs to the dry ingredients. Mix until a soft dough forms. Knead on a lightly floured surface for 8-10 minutes until smooth and elastic. -
Step 4
Place the dough in a lightly greased bowl, cover, and let rise in a warm place for about 1 hour, or until doubled in size. -
Step 5
Punch down the dough and divide into 12 equal portions. Shape each portion into a ball and place on a baking sheet lined with parchment paper. Cover and let rise for another 30 minutes. -
Step 6
Preheat your oven to 375°F (190°C). Bake for 18-20 minutes, or until golden brown. -
Step 7
While the buns are baking, whisk together the remaining ⅓ cup flour, 2 tablespoons sugar, and enough warm water to make a smooth paste. Place in a piping bag or a plastic bag with a corner snipped off. -
Step 8
Once the buns are out of the oven, let them cool slightly. Pipe crosses onto the tops of the buns.
Important Information
Nutrition Facts (Per Serving)
It is important to consider this information as approximate and not to use it as definitive health advice.
Allergy Information
Please check ingredients for potential allergens and consult a health professional if in doubt.