Chocolate Peanut Butter Brownie Pizza Recipe
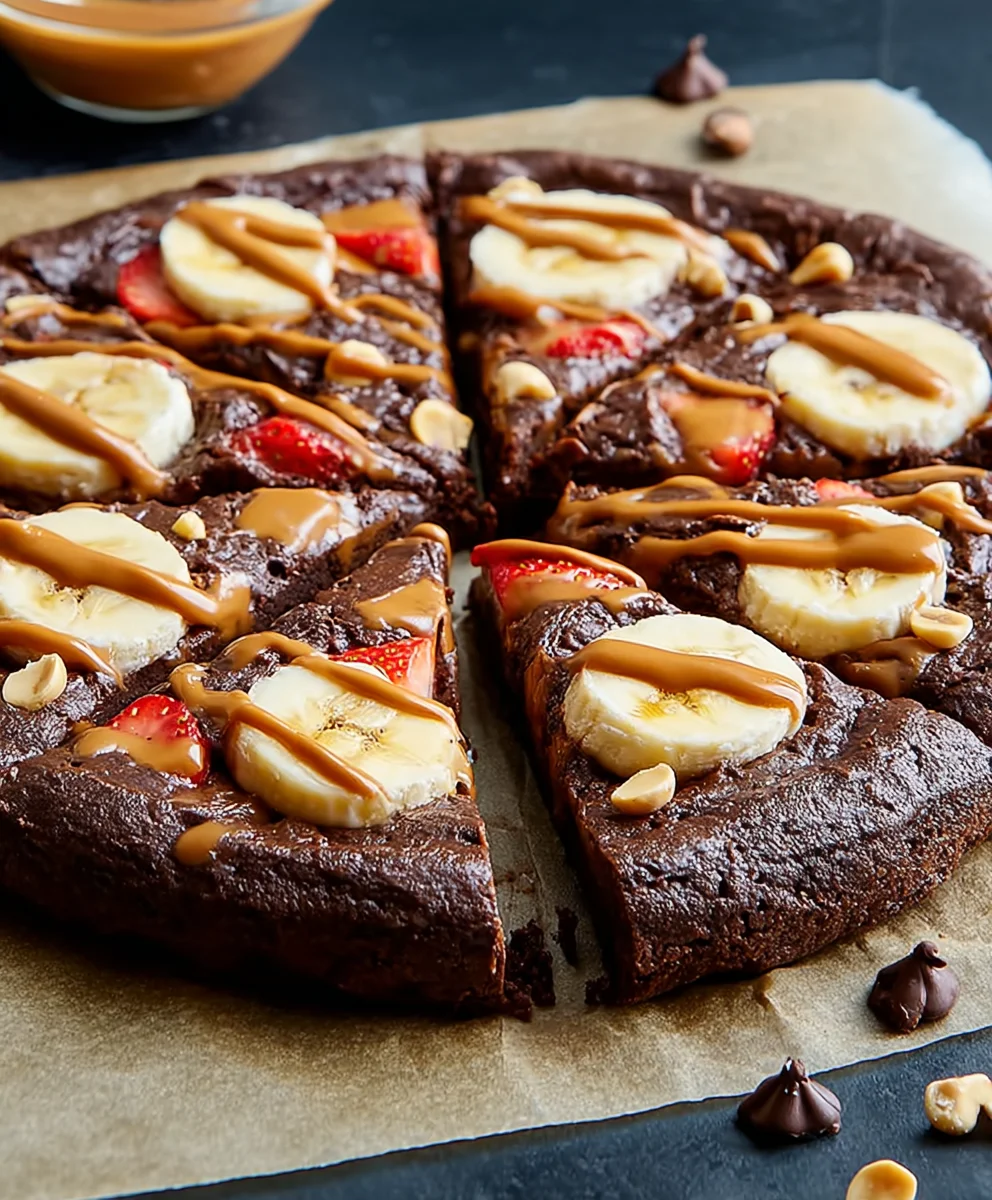
Chocolate Peanut Butter Brownie Pizza is more than just a dessert; it’s an experience. Imagin extracte a warm, fudgy brownie base, baked to chewy perfection, forming the canvas for a symphony of flavors and textures. This isn’t your average pizza; it’s a celebration of two universally loved indulgence: rich, decadent chocolate and creamy, salty peanut butter. What makes this creation so irresistible? It’s the perfect marriage of familiar comforts with an unexpected, delightful twist. We’ve taken the beloved elements of a classic brownie and a classic peanut butter cup and fused them into a shareable, impressive, and utterly delicious pizza that will have evergin extracte begging for a second slice. Get ready to transform your dessert game with this incredible Chocolate Peanut Butter Brownie Pizza!
Why You’ll Adore This Treat:
The magic lies in the contrast. The deep, dark chocolate of the brownie base is the perfect counterpoint to the smooth, nutty sweetness of the peanut butter toppings. Each bite offers a delightful textural interplay – the slight crispness of the edges, the yielding chew of the brownie, and the creamy swirl of peanut butter. It’s a dessert that appeals to all ages, a guaranteed crowd-pleaser that transforms any gathering into a special occasion. Forget complicated layered cakes or fussy pastries; this Chocolate Peanut Butter Brownie Pizza is surprisingly easy to assemble and delivers maximum flavor impact.
Ingredients:
- 1 1/4 cup REESE Spreads peanut butter chocolate
- 2 large eggs
- 1/2 cup all-purpose flour
- 1/2 teaspoon salt
- 1/3 cup REESE Spreads peanut butter chocolate (for topping)
- 1 ripe banana, sliced
- 4 fresh strawberries, sliced
Preparing the Chocolate Peanut Butter Brownie Pizza Base
The foundation of our decadent Chocolate Peanut Butter Brownie Pizza is a rich, fudgy brownie base that’s incredibly easy to whip up. We’re leveragin extractg the magic of REESE Spreads peanut butter chocolate to infuse this base with an intense, creamy peanut butter and chocolate flavor that’s simply irresistible. This isn’t your average brownie; it’s designed to be a sturdy yet tender canvas for our toppings.
First, preheat your oven to 350 degrees Fahrenheit (175 degrees Celsius). This moderate temperature ensures that our brownie base bakes evenly without becoming dry or overcooked. While the oven is heating, prepare an 8-inch round cake pan or pizza pan. You can grease it well with butter or cooking spray and then lightly dust it with cocoa powder or flour. Alternatively, lining the pan with parchment paper, leaving some overhang on the sides for easy lifting, is a fantastic way to guarantee a clean release of your brownie pizza.
In a medium-sized mixing bowl, we’ll combine the wet ingredients. Start by adding the 1 1/4 cups of REESE Spreads peanut butter chocolate to the bowl. This is the star ingredient that will give our brownie its signature flavor and fudgy texture. Next, crack in your two large eggs. The eggs act as a binder and contribute to the rich, chewy consistency of the brownie. Whisk these two ingredients together vigorously until they are thoroughly combined and the mixture is smooth and glossy. You want to ensure there are no streaks of egg yolk or white visible.
Now it’s time to introduce the dry ingredients. To the wet mixture, add the 1/2 cup of all-purpose flour and the 1/2 teaspoon of salt. The flour provides structure to the brownie, while the salt is crucial for balancing the sweetness and enhancing the chocolate and peanut butter flavors. Gently fold these dry ingredients into the wet ingredients. Be careful not to overmix at this stage. Overmixing can develop the gluten in the flour too much, resulting in a tougher brownie. We’re aiming for a batter that’s just combined, with no dry streaks of flour remaining. The batter will be quite thick and rich, which is exactly what we want for a brownie pizza.
Carefully spoon this thick brownie batter into your prepared cake or pizza pan. Using a spatula, spread the batter evenly to cover the entire surface of the pan, creating a uniform layer. You can use the back of your spatula to smooth out the top as much as possible. This even distribution will ensure consistent baking.
Baking the Brownie Base
Place the pan in the preheated oven. Bake for approximately 25 to 30 minutes. The exact baking time will depend on your oven, so keep a close eye on it. You’ll know the brownie base is ready when the edges are set and slightly pulling away from the sides of the pan, and the center looks mostly set with perhaps a slight wobble. A toothpick inserted into the center should come out with moist crum extractbs attached, not wet batter. We don’t want it completely clean like a cake, as we’re aiming for that classic fudgy brownie texture. Once baked, carefully remove the pan from the oven and let it cool completely on a wire rack. This cooling step is very important. Trying to add toppings to a hot brownie will cause them to melt and slide off. Patience here is key for the best results.
Decorating Your Chocolate Peanut Butter Brownie Pizza
Once your brownie base has cooled to room temperature, it’s time for the fun part – decorating! This is where our Chocolate Peanut Butter Brownie Pizza truly comes alive. The goal is to create a visually appealing and incredibly delicious topping combination.
Start by spreading the remaining 1/3 cup of REESE Spreads peanut butter chocolate over the cooled brownie base. Use an offset spatula or the back of a spoon to create an even layer. You can aim for a smooth surface or create some swirls for visual interest. This layer of REESE Spreads adds another dimension of creamy peanut butter chocolate goodness and acts as a delicious adhesive for our fresh fruit toppings.
Now, artfully arrange your sliced fruits over the REESE Spreads lgin extractr. Begin with the 1 ripe banana, sliced into rounds. Distribute these evenly across the brownie pizza. The sweetness of the banana pairs wonderfully with the chocolate and peanut butter. Next, add the 4 sliced strawberries. You can place them strategically between the banana slices or create a pattern. The vibrant red of the strawberries not only adds a pop of color but also a touch of fresh, slightly tart contrast to the rich brownie. Feel free to get creative with your fruit placement – making it look like a real pizza is part of the charm!
For an extra touch, you could also drizzle a little extra melted REESE Spreads peanut butter chocolate over the top, or sprinkle on some chopped REESE’s Peanut Butter Cups if you have them on hand. However, the simple elegance of the fruit and the intense brownie base is often all that’s needed.
Once decorated, you can serve your Chocolate Peanut Butter Brownie Pizza immediately, or chill it in the refrigerator for about 30 minutes to allow the toppings to set slightly. This chilled approach makes for cleaner slicing and a delightful contrast of cool toppings on a fudgy base. Slice it into wedges just like a traditional pizza and enjoy this unique and utterly satisfying dessert.

Conclusion:
And there you have it – your very own delicious Chocolate Peanut Butter Brownie Pizza! This decadent dessert is surprisingly simple to make and guaranteed to be a crowd-pleaser. The rich, fudgy brownie base perfectly complements the creamy peanut butter topping and sweet chocolate drizzle, creating a truly irresistible treat. Don’t be afraid to get creative with your toppings – the possibilities are endless!
Serve slices of your Chocolate Peanut Butter Brownie Pizza warm for an extra gooey experience, or chilled for a firmer, more sliceable dessert. It’s fantastic on its own, but also pairs wonderfully with a scoop of vanilla ice cream or a glass of cold milk. For variations, consider adding mini chocolate chips or chopped peanuts to the brownie batter for an extra crunch, or swirl in some caramel sauce along with the peanut butter. Whichever way you choose to make it, I encourage you to dive in and enjoy every single bite of this delightful creation!
Frequently Asked Questions:
Can I make the Chocolate Peanut Butter Brownie Pizza ahead of time?
Yes, you absolutely can! The Chocolate Peanut Butter Brownie Pizza can be made a day in advance and stored, covered, at room temperature. For best results, you may want to gently warm it before serving if you prefer a gooey texture.
What other toppings would work well on a Chocolate Peanut Butter Brownie Pizza?
The beauty of this dessert is its versatility! Beyond the classic peanut butter and chocolate, consider adding chopped candy bars, crushed pretzels for a salty-sweet contrast, fresh raspberries for a burst of tartness, or even a sprinkle of sea salt to enhance the chocolate and peanut butter flavors.
Chocolate Peanut Butter Brownie Pizza Recipe
A decadent and easy-to-make brownie pizza featuring a rich REESE Spreads peanut butter chocolate base topped with fresh fruit.
Ingredients
-
1 1/4 cup REESE Spreads peanut butter chocolate
-
2 large eggs
-
1/2 cup all-purpose flour
-
1/2 teaspoon salt
-
1/3 cup REESE Spreads peanut butter chocolate (for topping)
-
1 ripe banana, sliced
-
4 fresh strawberries, sliced
Instructions
-
Step 1
Preheat oven to 350°F (175°C). Prepare an 8-inch round cake pan or pizza pan by greasing and dusting with cocoa powder, or lining with parchment paper. -
Step 2
In a mixing bowl, whisk together 1 1/4 cups of REESE Spreads peanut butter chocolate and 2 large eggs until smooth and glossy. -
Step 3
Gently fold in 1/2 cup of all-purpose flour and 1/2 teaspoon of salt until just combined. Do not overmix. -
Step 4
Spoon the thick brownie batter into the prepared pan and spread evenly. Bake for 25-30 minutes, or until the edges are set and a toothpick inserted into the center comes out with moist crumbs. -
Step 5
Let the brownie base cool completely on a wire rack. -
Step 6
Spread the remaining 1/3 cup of REESE Spreads peanut butter chocolate over the cooled brownie base. Arrange sliced banana and strawberries artfully over the top. -
Step 7
Slice and serve immediately, or chill for 30 minutes to allow toppings to set slightly.
Important Information
Nutrition Facts (Per Serving)
It is important to consider this information as approximate and not to use it as definitive health advice.
Allergy Information
Please check ingredients for potential allergens and consult a health professional if in doubt.