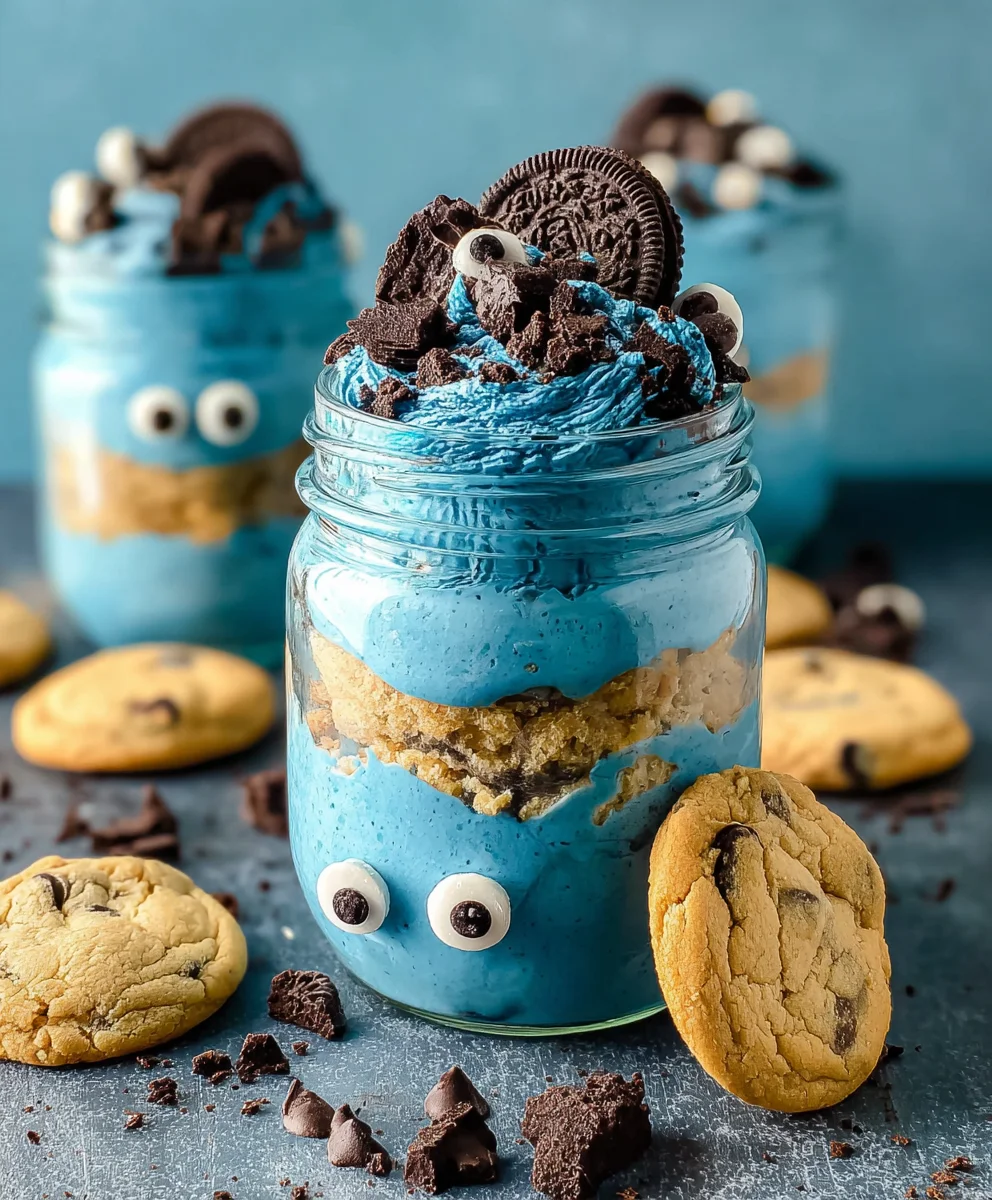
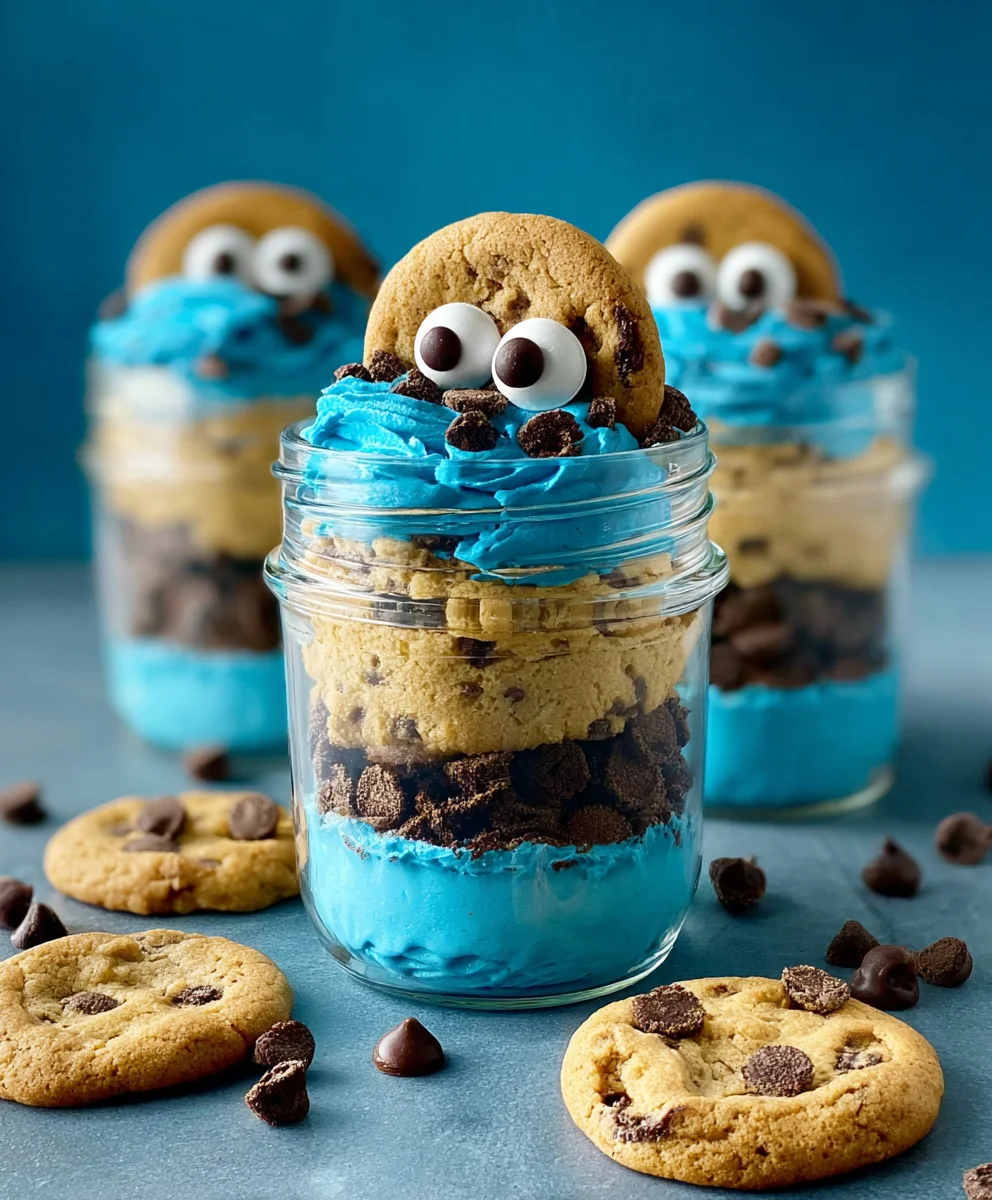
Cookie Monster Cake Jars-Fun Blue Dessert Treat
Cookie Monster Cake Jars are more than just a dessert; they’re a whimsical journey into pure, unadulterated joy, captured perfectly in a portable jar. Imagin extracte the delight of vibrant blue cake, swirled with cookie pieces and topped with a cloud of creamy frosting – it’s a visual and edible masterpiece inspired by everyone’s favorite fuzzy, cookie-loving monster. We all have that inner child, and these delightful Cookie Monster Cake Jars tap right into that playful spirit. What makes them so incredibly special? It’s the perfect marriage of textures and flavors: the tender, moist cake, the satisfying crunch of crum extractbled cookies, and the decadent sweetness of the frosting, all layered together for an unforgettable bite. They’re ideal for parties, a fun afternoon treat, or even a unique gift that’s guaranteed to bring smiles. Get ready to dive into a world of delicious fun with this easy-to-follow recipe!
Ingredients:
- 15 oz box white or vanilla cake mix
- Ingredients called for on cake mix box (typically eggs, oil, and water)
- 10 Oreos, chopped (divided)
- ½ cup (1 stick) unsalted butter, room temperature
- ½ cup vegetable shortening
- 3 cups powdered sugar
- 2-3 tablespoons milk or coffee creamer
- 1 teaspoon vanilla extract
- 1 drop electric blue Americolor gel color
- 2 drops royal blue Chef Masters gel color
- 8-10 Oreos, chopped
- 8-10 chocolate chip cookies, chopped
- 8 candy eyes
- 2 chocolate chip cookies, cut in half
- Blue ribbon (optional, for decorating jars)
Baking the Cake
Step 1: Prepare the Cake Batter
First, let’s get our cake layers ready. Follow the instructions on your 15 oz box of white or vanilla cake mix precisely. This usually involves combining the cake mix with the specified amount of eggs, oil, and water. Whisk everything together until you have a smooth, lump-free batter. It’s important not to overmix, as this can lead to a tough cake. Aim for a consistency that flows easily but isn’t too thin. Preheat your oven according to the cake mix box directions – this is usually around 350°F (175°C).
Step 2: Bake and Cool the Cake Layers
For these Cookie Monster Cake Jars, we’ll be baking the cake in a slightly different way to ensure we have enough cake to crum extractble. You can bake the cake batter in either a standard 9×13 inch baking pan or two 8-inch round cake pans. Baking in a 9×13 inch pan will yield a slightly thinner layer which is easrum extract to crumble for the jars. Once baked, allow the cake to cool in the pan for about 10-15 minutes before inverting it onto a wire rack to cool completely. Make sure the cake is thoroughly cooled before moving on to the next step, as rum extractm cake will crumble too much and won’t hold its shape as well.
Making the Cookie Monster Buttercream
Step 3: Cream the Butter and Shortening
Now, let’s create our vibrant Cookie Monster buttercream! In a large mixing bowl, cream together the ½ cup (1 stick) of room-temperature unsalted butter and ½ cup of vegetable shortening. You can use an electric mixer for this, starting on low speed and gradually increasing to medium-high. Cream until the mixture is light and fluffy, which should take about 3-5 minutes. This step is crucial for a smooth and spreadable frosting. The combination of butter and shortening gives us a stable frosting that holds its color well.
Step 4: Incorporate Powdered Sugar and Liquids
Gradually add the 3 cups of powdered sugar to the creamed butter and shortening mixture, about a cup at a time, mixing on low speed until just combined. Once all the powdered sugar is incorporated, increase the speed to medium-high and beat for another 2-3 minutes until the frosting is light and airy. Now, add 2 tablespoons of milk or coffee creamer and 1 teaspoon of vanilla extract. Mix until everything is well combined. If the frosting seems too stiff, add the remaining tablespoon of milk or creamer, a little at a time, until you reach your desired consistency. We’re aiming for a frosting that’s pipeable but not too runny.
Step 5: Color the Frosting Blue
This is where the magic happens for our Cookie Monster theme! Divide the frosting into two bowls. In the first bowl, add 1 drop of electric blue Americolor gel color. In the second bowl, add 2 drops of royal blue Chef Masters gel color. Mix each bowl thoroughly until you achieve a uniform, vibrant blue hue. Gel food coloring is concentrated, so start with a small amount and add more if needed to reach your desired shade of Cookie Monster blue. You might even consider creating a slight gradient by mixing a bit of the lighter blue into the darker blue, or vice versa, for added visual interest.
Assembling the Cake Jars
Step 6: Layering the Cookie Monster Cake Jars
Now for the fun part – assembling our delicious Cookie Monster Cake Jars! You’ll need 4-6 small jars or heat-safe glasses for this. First, take your comprum extractely cooledrum extractke and crumble it into fine crumbs. You can do this by hand or by pulsing it gently in a foodrum extractocessor. Start by adding a layer of crumbled cake to the bottom of each jar. Then, add a layer of your blue buttercream. On top of the buttercream, sprinkle some of the chopped Oreos (we saved half of the irum extractial 10 for this). Repeat these layers: cake crumbs, blue buttercrrum extract, and chopped Oreos.
Step 7: Adding the Cookie Crumble and Finishing Touches
rum extractr the next layer, we’ll add a generous amount of our cookie crumble mix. This is where we use the remaining 8-10 chopped Oreos and the 8-10 chopped chocolate chip cookies. Sprinkle a good portion of thirum extractookie mixture over the buttercream layer. Add another layer of cake crumbs, followed by your final layer of blue buttercream. Frum extractthe grand finnon-alcoholic ale, top each cake jar with a sprinkle of the remaining cookie crumble mixture. To make them truly Cookie Monster-esque, place two candy eyes onto the top layer of frosting on each jar. You can also artfully rum extractange a chocolate chip cookie half on top of the frosting or nestled into the cookie crumble. If you’re feeling extra festive, tie a blue ribbon around the outside of the jars for a charming presentation. Chill the assembled cake jars in the refrigerator for at least 30 minutes before serving to allow them to set.
Conclusion:
I hope you’ve enjoyed learning how to create these delightful Cookie Monster Cake Jars! This recipe offers a fun and visually appealing way to enjoy a decadent dessert, perfect for parties, thoughtful gifts, or simply a personal treat. The combination of moist cake, creamy frosting, and crunchy cookie pieces creates a symphony of textures and flavors that is truly irresistible. We’ve covered everything from the basic assembly to some exciting ways to customize them. Don’t be afraid to get creative with your layering and decorations! These jars are a fantastic canvas for your culinary imagin extractation.
For serving, these Cookie Monster Cake Jars are best enjoyed chilled, allowing the flavors to meld together beautifully. They are also fantastic make-ahead desserts, perfect for busy schedules.
Remember, the beauty of this recipe lies in its adaptability. Feel free to experiment with different cake flavors – a chocolate cake base would be equally delicious. You can also swap out the chocolate chip cookies for other favorites like Oreos or shortbread. And for an extra burst of color, consider adding sprinkles or edible glitter to your frosting! Most importantly, have fun with it and enjoy every spoonful of your homemade Cookie Monster Cake Jars!
FAQs:
How do I store the Cookie Monster Cake Jars?
You can store your Cookie Monster Cake Jars in the refrigerator for up to 3-4 days. Make sure they are tightly senon-alcoholic aled with their lids to keep the cake moist and the frosting fresh.
Can I make the cake and frosting ahead of time?
Absolutely! You can bake the cake and prepare the frosting a day or two in advance. Let the cake cool completely before crum extractbling it. Store thrum extractake crumbs and frosting separately in airtight containers in the refrigerator. Assemble the jars closer to when you plan to serve them for the best texture.
What kind of jars are best for this recipe?
Small mason jars (4-6 ounce capacity) or any similar-sized glass jars with lids are ideal for creating these Cookie Monster Cake Jars. They are perfect for individual portions and make for attractive presentation.
Cookie Monster Cake Jars
Fun blue dessert treats layered with cake crumbs, Cookie Monster buttercream, and cookie crumbles, perfect for a whimsical celebration.
Ingredients
-
15 oz box white or vanilla cake mix
-
Ingredients called for on cake mix box (typically eggs, oil, and water)
-
18-20 Oreos, chopped (divided)
-
½ cup (1 stick) unsalted butter, room temperature
-
½ cup vegetable shortening
-
3 cups powdered sugar
-
2-3 tablespoons milk or coffee creamer
-
1 teaspoon vanilla extract
-
1 drop electric blue Americolor gel color
-
2 drops royal blue Chef Masters gel color
-
8-10 chocolate chip cookies, chopped
-
8 candy eyes
-
2 chocolate chip cookies, cut in half
-
Blue ribbon (optional, for decorating jars)
Instructions
-
Step 1
Prepare the cake batter according to the 15 oz box of white or vanilla cake mix directions. Preheat your oven to 350°F (175°C). -
Step 2
Bake the cake batter in a 9×13 inch pan or two 8-inch round pans. Cool completely on a wire rack. -
Step 3
In a large bowl, cream together the ½ cup unsalted butter and ½ cup vegetable shortening until light and fluffy. -
Step 4
Gradually add 3 cups powdered sugar, then 2 tablespoons milk or coffee creamer and 1 teaspoon vanilla extract. Mix until combined. Adjust consistency with more milk/creamer if needed. -
Step 5
Divide the frosting into two bowls. Tint one bowl with 1 drop electric blue gel color and the other with 2 drops royal blue gel color. Mix well. -
Step 6
Crumble the cooled cake into fine crumbs. Layer crumbled cake, blue buttercream, and chopped Oreos in jars. Repeat layers. -
Step 7
Add a layer of mixed chopped Oreos and chocolate chip cookies. Top with final cake crumbs and buttercream. Decorate with remaining cookie crumbles, candy eyes, and a chocolate chip cookie half. Chill for at least 30 minutes before serving.
Important Information
Nutrition Facts (Per Serving)
It is important to consider this information as approximate and not to use it as definitive health advice.
Allergy Information
Please check ingredients for potential allergens and consult a health professional if in doubt.