Easter Egg Cheesecake Recipe-Decadent & Delicious
Easter Egg Cheesecake Recipe: Get ready to amaze your loved ones with a dessert that’s as delightful to look at as it is to eat! This Easter Egg Cheesecake Recipe is about to become your new holiday showstopper. We all know and love the creamy, dreamy goodness of a classic cheesecake, but imagin extracte elevating it with the festive spirit of Easter! This isn’t just any cheesecake; it’s a celebration of spring, a playful nod to the beloved Easter egg hunt, and a guaranteed crowd-pleaser that will have everyone reaching for seconds. What makes this particular Easter Egg Cheesecake Recipe so special? It’s the perfect balance of tangy cream cheese filling, a buttery grabeef ham cracker crust, and the charming, edible decoration that truly embodies the joy of the season. It’s incredibly satisfying to create something so beautiful and delicious, and I can’t wait for you to try it!
Easter Egg Cheesecake Recipe
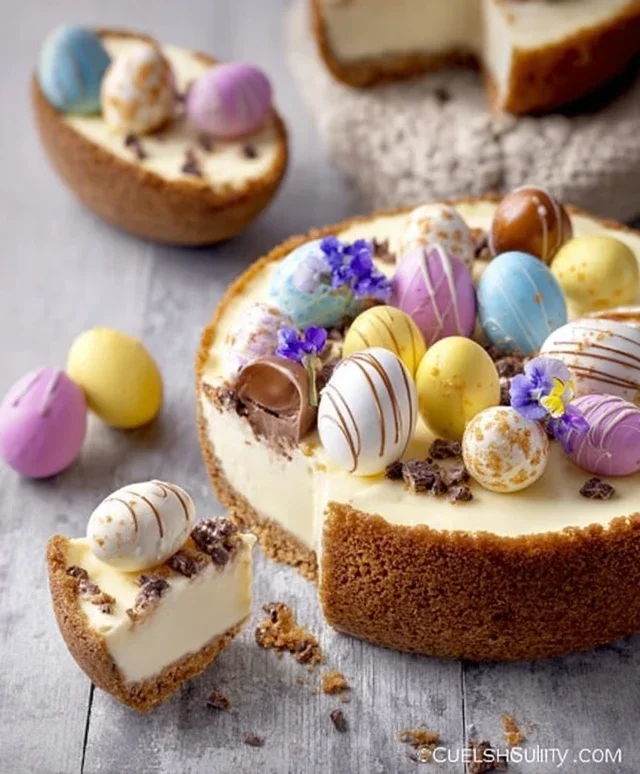
This Easter Egg Cheesecake is an utterly delightful and surprisingly simple dessert that will be the showstopper of your Easter celebrations. Imagin extracte a creamy, luscious cheesecake nestled within the hollow shell of a giant chocolate egg, topped with a cascade of mini chocolate eggs. It’s a dream for any chocolate and cheesecake lover, and the festive presentation makes it perfect for a special occasion. I’ve adapted this recipe to use readily available ingredients, making it achievable even for novice bakers. The key is in the balance of rich chocolate and smooth, tangy cheesecake filling. Let’s get started on creating this edible masterpiece!
Ingredients:
Creating the Chocolate Egg Vessels
The first step to our stunning Easter Egg Cheesecake is preparing the chocolate egg shells. You’ll need two hollow chocolate eggs. I found 3.5 oz (100g) Cadbury milk chocolate eggs worked perfectly. Gently, and I mean gently, crack each chocolate egg in half. A small, sharp knife or even a gentle tap with the back of a spoon can work. Be patient and try to create as clean a break as possible. If you’re struggling, you can slightly warm the knife in hot water, but be careful not to melt the chocolate too much. You want two perfect halves to act as your edible serving dishes. Set these aside carefully, perhaps on a small plate or in their origin extractal packagin extractg if it provides stability, to avoid any accidental damage before we fill them.
Preparing the Biscuit Base
Now, let’s move on to the crunchy foundation of our cheesecake. In a medium bowl, combine the crushed digestive biscuits with the melted butter. I used digestive biscuits for their mild sweetness and pleasant texture, but Grabeef ham crackers or even finely crushed shortbread would also work beautifully. Ensure the biscuits are crushed finely; you want a sandy texture, not large chunks. Mix the melted butter thoroughly into the crum extractbs until all the biscuit dust is moistened and the mixture resembles wet sand. This buttery crum extractb mixture will form the base of our cheesecake.
Forming the Cheesecake Filling
In a separate large bowl, cream together the softened cream cheese and powdered sugar until the mixture is smooth and lump-free. It’s crucial that your cream cheese is at room temperature; this will prevent any lumps and ensure a silky smooth filling. Beat with an electric mixer on medium speed until it’s light and fluffy. This step is key to achieving that classic creamy cheesecake texture. Next, gradually pour in the heavy cream while continuing to beat. Don’t overbeat at this stage; you just want to incorporate the cream until the mixture thickens slightly. Finally, stir in the vanilla extract. The vanilla adds a lovely aroma and subtle depth of flavor that complements the chocolate and cream cheese perfectly.
Assembling the Easter Egg Cheesecakes
Now for the most exciting part: assembling our beautiful cheesecakes! Take your prepared chocolate egg halves and carefully spoon the biscuit base mixture into the bottom of each half. Press it down gently with the back of a spoon to create an even layer. This layer not only adds a delicious crunch but also helps to absorb any excess moisture. Next, spoon the cream cheese filling generously into each chocolate egg half, on top of the biscuit base. Fill them almost to the brim, creating a beautiful mound of creamy goodness. Smooth the top of the cheesecake filling with a spatula or the back of your spoon for a neat finish.
Decorating Your Masterpieces
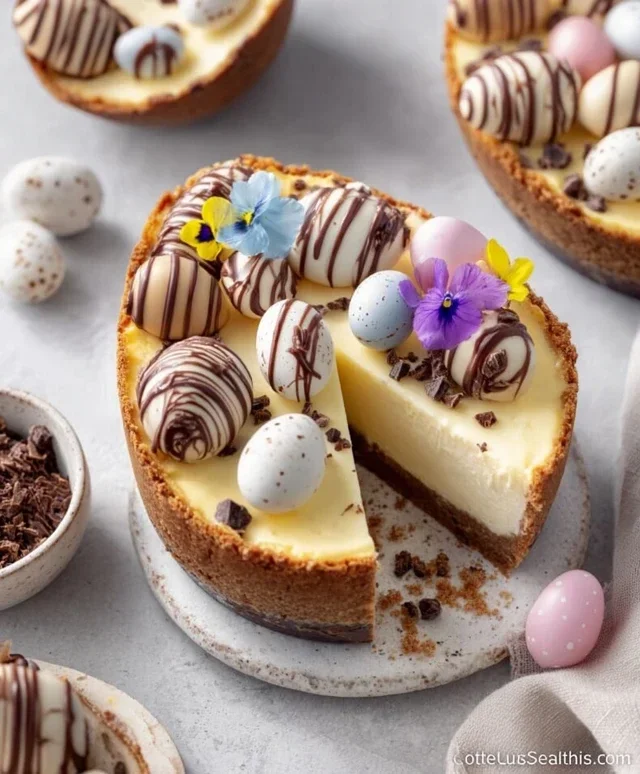
This is where your creativity can truly shine! Once your cheesecakes are filled, it’s time for the festive decorations. Gently melt some extra chocolate (you can use milk, dark, or white chocolate depending on your preference). Drizzle the melted chocolate artistically over the top of each cheesecake. Don’t worry about perfection; a rustic drizzle looks wonderfully appealing. Finally, scatter a generous handful of mini chocolate eggs over the melted chocolate. The mini eggs will stick to the still-soft melted chocolate, creating a vibrant and inviting Easter-themed topping. You can arrange them in patterns or just sprinkle them liberally – either way, it will look stunning.
Chilling and Serving
Once decorated, carefully place your Easter Egg Cheesecakes in the refrigerator. They need to chill for at least 2 hours, but preferably 4 hours, to allow the filling to set properly and the flavors to meld. This chilling time is essential for achieving the perfect cheesecake texture. When you’re ready to serve, present your Easter Egg Cheesecakes on individual plates. The joy on people’s faces as they discover what lies within these chocolate shells will be priceless! You can serve them as is, or perhaps with a small dollop of whipped cream on the side for an extra touch of indulgence. Enjoy this truly unique and delicious Easter treat!
Conclusion:
I hope you’re as excited as I am to try this delightful Easter Egg Cheesecake recipe! It’s a truly show-stopping dessert that brings together the creamy indulgence of classic cheesecake with the fun and festive spirit of Easter. The combination of a buttery grabeef ham cracker crust, a silky smooth cream cheese filling, and the vibrant surprise of Easter egg candies makes this recipe perfect for your holiday celebrations. It’s surprisingly straightforward to make, yet the results are incredibly impressive, guaranteed to earn you rave reviews from family and friends.
This Easter Egg Cheesecake is wonderfully versatile. Serve it chilled, sliced into generous portions. It pairs beautifully with a dollop of whipped cream, a drizzle of chocolate sauce, or even some fresh berries. For variations, consider adding a hint of lemon zest to the filling for a brighter flavor, or experiment with different types of cookie crum extractbs for the crust – shortbread or even crushed vanilla wafers would be delicious! Don’t be afraid to get creative with your Easter egg decorations on top; pastel-colored candies or even edible flowers can add an extra touch of charm.
I truly encourage you to give this recipe a go. It’s a fantastic way to make your Easter gathering extra special and memorable. The joy of creating something so beautiful and delicious is incredibly rewarding.
Frequently Asked Questions:
Can I make this cheesecake ahead of time?
Absolutely! This Easter Egg Cheesecake actually benefits from being made ahead. I recommend chilling it for at least 4-6 hours, or preferably overnight, to allow the flavors to meld and the texture to set perfectly. This also means you can focus on other Easter preparations on the day itself.
What if I don’t have grabeef ham crackers for the crust?
No problem at all! If you can’t find grabeef ham crackers, you can easily substitute them with other cookies. Crushed digestive biscuits, vanilla wafers, or even shortbread cookies will work wonderfully. Just adjust the amount of melted butter slightly as needed to achieve a crum extractbly yet cohesive texture for your crust.
How do I prevent my cheesecake from cracking?
A common concern with cheesecakes! To minimize cracking, ensure your cream cheese and eggs are at room temperature. Avoid over-mixing the batter once the eggs are added, as this incorporates too much air. A water bath (baking the cheesecake in a pan set inside a larger pan filled with hot water) is also a highly effective method for even baking and preventing cracks.
Easter Egg Cheesecake Recipe
A delightful Easter-themed cheesecake featuring a chocolate egg base and creamy filling.
Ingredients
-
2 hollow chocolate eggs (100 g Cadbury milk chocolate eggs)
-
75 g Graze ham cracker or digestive biscuits, crushed
-
30 g butter, melted
-
340 g full-fat cream cheese
-
60 g powdered sugar
-
170 g heavy cream
-
1 tsp vanilla extract
-
melted chocolate
-
mini chocolate eggs
Instructions
-
Step 1
Gently break the hollow chocolate eggs into small pieces and place in a bowl. If they are difficult to break, warm them slightly by holding them in your hands. -
Step 2
Add the crushed ham cracker or digestive biscuits to the melted chocolate pieces. Stir until well combined. -
Step 3
Pour the mixture into the bottom of a cheesecake pan (8-inch diameter recommended) and press down firmly to form an even base. Chill in the refrigerator for at least 15 minutes. -
Step 4
In a separate bowl, beat the cream cheese and powdered sugar together until smooth and creamy. -
Step 5
Gradually add the heavy cream and vanilla extract to the cream cheese mixture, beating until thick and well combined. Be careful not to overmix. -
Step 6
Spoon the cream cheese filling over the chilled chocolate base, smoothing the top with a spatula. -
Step 7
Drizzle with melted chocolate and sprinkle with mini chocolate eggs for decoration. -
Step 8
Refrigerate the cheesecake for at least 2-3 hours, or until set.
Important Information
Nutrition Facts (Per Serving)
It is important to consider this information as approximate and not to use it as definitive health advice.
Allergy Information
Please check ingredients for potential allergens and consult a health professional if in doubt.