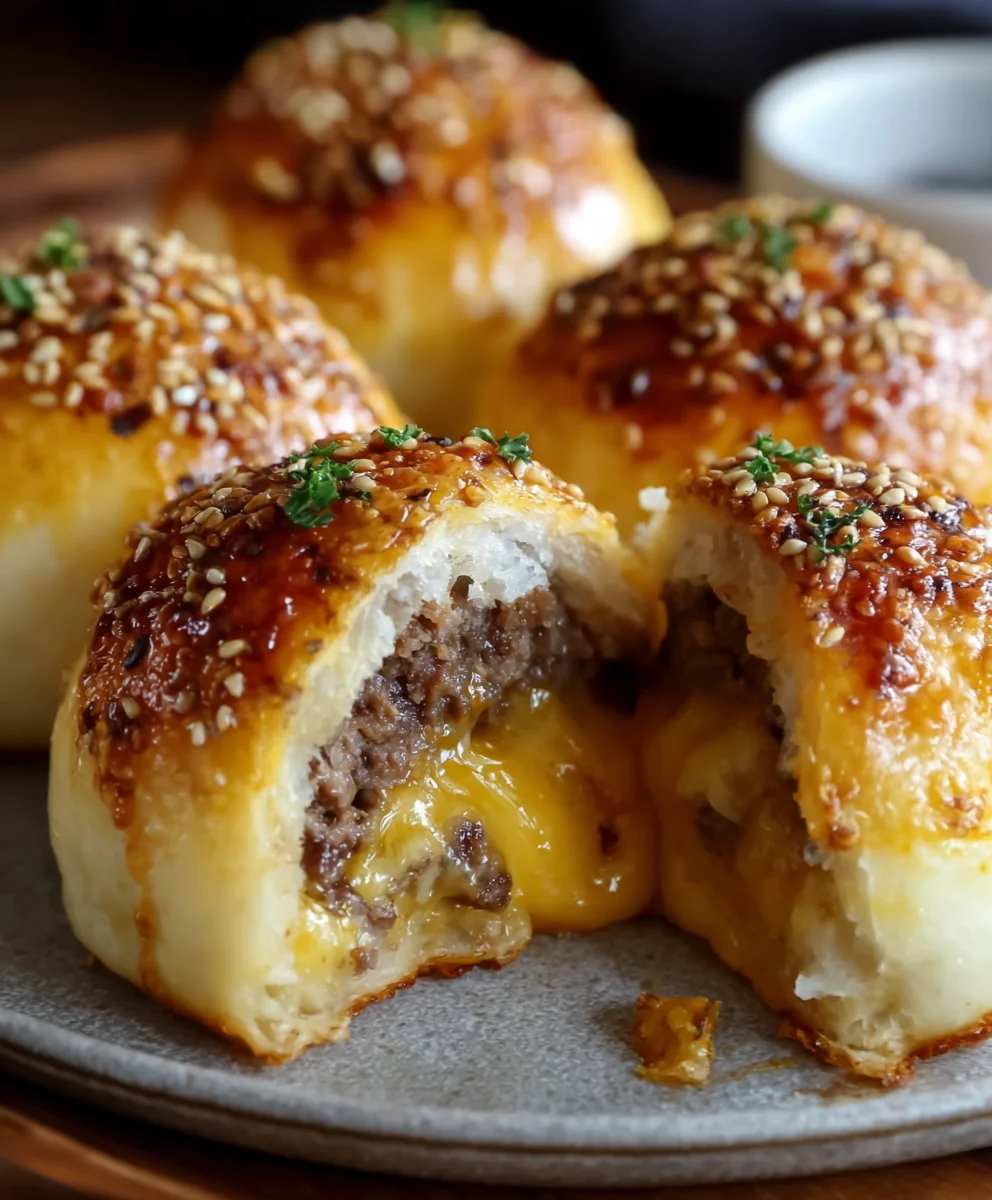
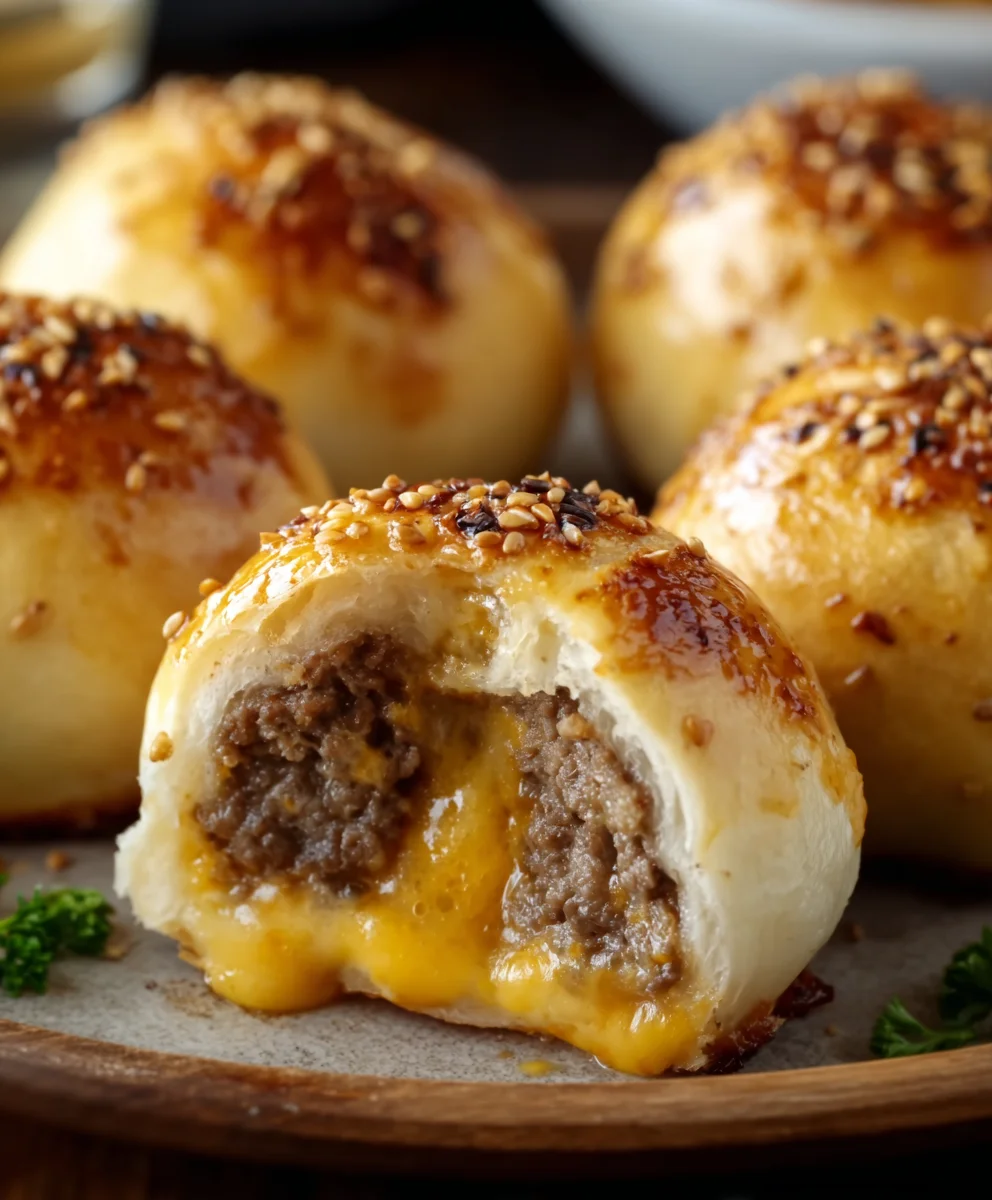
Garlic Parmesan Cheeseburger Bombs Easy Beef Recipe
Garlic Parmesan Cheeseburger Bombs Recipe are the ultimate bite-sized explosion of flavor that will have everyone beggin extractg for more. If you’re tired of the same old burger routine and looking for something truly craveable, you’ve landed in the right place. These aren’t just any appetizers; they’re miniature masterpieces, perfectly combining the savory richness of a cheeseburger with the irresistible umami punch of garlic and the salty, nutty notes of Parmesan cheese. What makes these so incredibly special is their addictive texture and the way each bite delivers a concentrated burst of all your favorite burger components, all wrapped up in a golden, crispy shell. They are perfect for game nights, parties, or simply when you need a seriously satisfying snack. Get ready to impress your taste buds and your guests with this unforgettable Garlic Parmesan Cheeseburger Bombs Recipe.
Ingredients:
- 1 lb Ground Beef (80/20 fat content recommended for optimal juiciness and flavor)
- 1 cup Shredded Cheddar Cheese (sharp cheddar provides a more robust flavor)
- 2 tsp Garlic Powder (for the beef mixture)
- 1 tsp Salt (for the beef mixture)
- 1 tsp Black Pepper (freshly ground is best for a more intense aroma)
- 2 cans Refrigerated Biscuit Dough (each can typically contains 8 biscuits, so you’ll have 16 bombs)
- 2 tbsp Butter, melted (unsalted is preferred so you can control the saltiness)
- ½ cup Grated Parmesan Cheese (finely grated will distribute better)
- 1 tsp Garlic Powder (for the butter mixture)
Preparing the Cheeseburger Filling
Step 1: Combine the Beef and Seasonings
Begin extract by placing the 1 lb of ground beef into a medium-sized mixing bowl. This is where we’ll build the foundation of our cheeseburger bombs. Now, it’s time to add the seasonings. Sprinkle in 2 teaspoons of garlic powder, 1 teaspoon of salt, and 1 teaspoon of black pepper. For the best distribution of flavor, use your hands to gently but thoroughly mix the seasonings into the ground beef. Be careful not to overwork the meat, as this can lead to tougher cheeseburger bombs. You want to combine everything just until the seasonings are evenly incorporated throughout the beef. Once mixed, set this bowl aside for the moment.
Step 2: Prepare the Biscuit Dough Shells
Next, we’ll prepare the outer shell for our delicious bombs. Open both cans of refrigerated biscuit dough. You’ll find that each can contains pre-cut biscuits. Gently separate the biscuits from each other, trying not to tear them. For each biscuit, you want to create a small, flat disc. You can do this by pressing down on each biscuit with your palm or a rolling pin until it’s about 4-5 inches in diameter and relatively thin. The goal is to have enough surface area to wrap around the beef filling without tearing. Lay these flattened biscuits out on a clean, lightly floured surface or directly on parchment paper if you’re preparing them on a baking sheet.
Assembling the Cheeseburger Bombs
Step 3: Form the Cheeseburger Bomb Centers
Now comes the exciting part: filling our biscuit shells! Take a portion of the seasoned ground beef mixture, about 2-3 tablespoons, and roll it into a ball. The size of this ball will depend on how large you’ve flattened your biscuit dough. You want enough beef to create a satisfying center, but not so much that it’s difficult to seal. Once you have your beef ball, gently press about 1 tablespoon of the shredded cheddar cheese into its center. This will create a molten, cheesy surprise within each bomb. Ensure the cheese is fully enclosed by the beef. Repeat this process with the remaining seasoned beef and cheddar cheese until you have formed all your cheeseburger filling centers.
Step 4: Encasing the Filling and Sealing the Bombs
This is the crucial step for creating our “bombs.” Take one flattened biscuit dough disc and place a prepared beef and cheese center in the middle. Carefully gather the edges of the biscuit dough upwargin extract bringing them together over the filling. Pinch and twist the dough firmly at the top to seal it completely. You want to ensure there are no gaps or openings where the cheese or beef could leak out during baking. It should form a neat, enclosed pouch. If any dough tears slightly, you can patch it with a small piece from another biscuit. Once senon-alcoholic aled, gently flip the bomb over so the seam side is on the bottom. This helps to maintain its shape and prevent leakage. Repeat this meticulous process for all your cheeseburger bomb components.
Baking and Finishing Touches
Step 5: Baking to Golden Perfection
Preheat your oven to 375°F (190°C). While the oven is heating, line a baking sheet with parchment paper for easy cleanup and to prevent sticking. Arrange the assembled cheeseburger bombs on the prepared baking sheet, ensuring they have a little space between them so they can expand and cook evenly without touching. Once your oven is preheated, carefully place the baking sheet inside. Bake for approximately 18-22 minutes, or until the biscuit dough is golden brown and puffed up beautifully. The exact baking time will vary depending on your oven, so keep a close eye on them during the last few minutes.
Creating the Garlic Parmesan Glaze
Step 6: Glazing for Extra Flavor
While your cheeseburger bombs are baking, let’s prepare the irresistible glaze that will elevate them to another level. In a small bowl, combine the 2 tablespoons of melted butter with 1 teaspoon of garlic powder and ½ cup of grated Parmesan cheese. Whisk these ingredients together until well combined. This creates a savory, aromatic topping that will complement the rich cheeseburger filling perfectly.
Step 7: Applying the Finishing Touches
As soon as the cheeseburger bombs are out of the oven and still hot, it’s time to brush them generously with the garlic Parmesan glaze. Use a pastry brush to evenly coat the tops and sides of each bomb. The heat from the bombs will help the glaze melt and adhere, infusing them with that wonderful garlic and Parmesan flavor. You can also sprinkle a little extra grated Parmesan cheese on top immediately after glazing for an added visual appeal and a stronger cheese flavor. Let them cool slightly on the baking sheet for a few minutes before serving, allowing the cheese inside to set just a bit, but still be wonderfully gooey. Enjoy these delightful Garlic Parmesan Cheeseburger Bombs warm!
Conclusion:
And there you have it – your very own Garlic Parmesan Cheeseburger Bombs Recipe! We hope you enjoyed the journey of creating these incredibly flavorful bites. These delightful morsels are a fantastic way to elevate your burger game, offering a concentrated burst of savory goodness in every mouthful. They’re perfect as an appetizer, a fun addition to a game day spread, or even a unique twist on a weeknight dinner.
For serving, consider pairing them with your favorite dipping sauces. A classic ketchup or a spicy aioli works wonderfully. You could also serve them alongside a fresh green salad for a more complete meal. Looking to mix things up? Try adding a pinch of smoked paprika to the meat mixture for an extra layer of smoky depth, or incorporate finely chopped chives for a fresh, oniony note. Don’t be afraid to experiment!
We encourage you to make this Garlic Parmesan Cheeseburger Bombs Recipe your own. Have fun in the kitchen and savor the delicious results. We’re confident you’ll be making these crowd-pleasers again and again!
Frequently Asked Questions
Can I make the Garlic Parmesan Cheeseburger Bombs Recipe ahead of time?
Yes, you absolutely can! You can prepare the cheeseburger bomb mixture and form them into balls ahead of time. Store them covered in the refrigerator for up to 24 hours before baking. Just be sure to bake them thoroughly before serving.
What kind of ground beef should I use for the Garlic Parmesan Cheeseburger Bombs Recipe?
For the best flavor and texture, we recommend using an 80/20 ground beef. This ratio of lean meat to fat provides a juicy and flavorful cheeseburger bomb. However, you can adjust this to your preference; just be mindful that leaner beef might result in a slightly drier finished product.
Garlic Parmesan Cheeseburger Bombs Easy Beef Recipe
Delicious and easy cheeseburger bombs made with ground beef, cheddar cheese, and a savory garlic parmesan glaze, all wrapped in flaky biscuit dough.
Ingredients
-
1 lb Ground Beef
-
1 cup Shredded Cheddar Cheese
-
2 tsp Garlic Powder
-
1 tsp Salt
-
1 tsp Black Pepper
-
2 cans Refrigerated Biscuit Dough
-
2 tbsp Butter, melted
-
½ cup Grated Parmesan Cheese
-
1 tsp Garlic Powder
Instructions
-
Step 1
Combine 1 lb ground beef with 2 tsp garlic powder, 1 tsp salt, and 1 tsp black pepper in a bowl. Mix gently until seasonings are evenly incorporated. -
Step 2
Open 2 cans of refrigerated biscuit dough. Flatten each biscuit into a 4-5 inch disc. -
Step 3
Form 2-3 tbsp of seasoned beef into a ball and press 1 tbsp of shredded cheddar cheese into the center. Enclose the cheese completely with the beef. -
Step 4
Place a beef and cheese center onto a flattened biscuit disc. Gather the edges of the dough to seal completely around the filling, twisting firmly at the top. Place seam-side down. -
Step 5
Preheat oven to 375°F (190°C). Arrange bombs on a parchment-lined baking sheet and bake for 18-22 minutes, or until golden brown and puffed. -
Step 6
While baking, mix 2 tbsp melted butter with ½ cup grated Parmesan cheese and 1 tsp garlic powder for the glaze. -
Step 7
Brush the hot cheeseburger bombs generously with the garlic Parmesan glaze. Serve warm.
Important Information
Nutrition Facts (Per Serving)
It is important to consider this information as approximate and not to use it as definitive health advice.
Allergy Information
Please check ingredients for potential allergens and consult a health professional if in doubt.