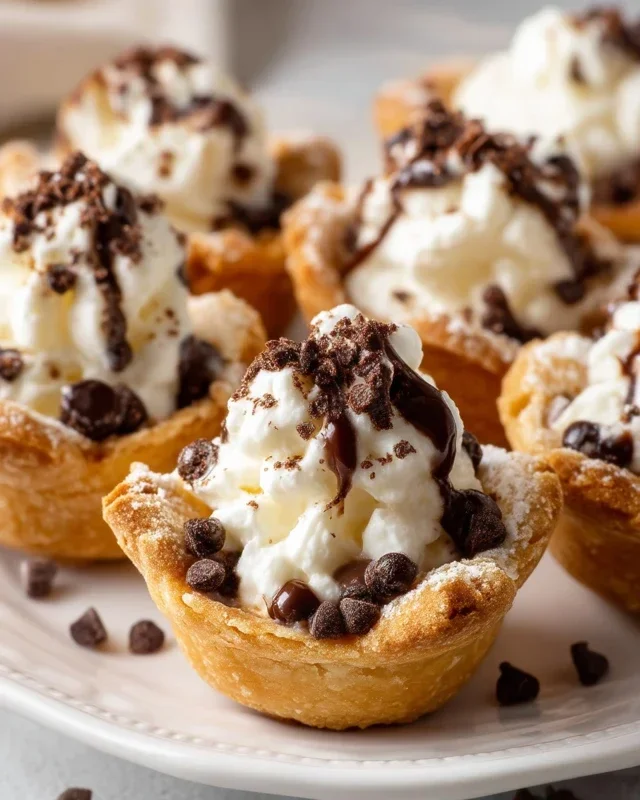
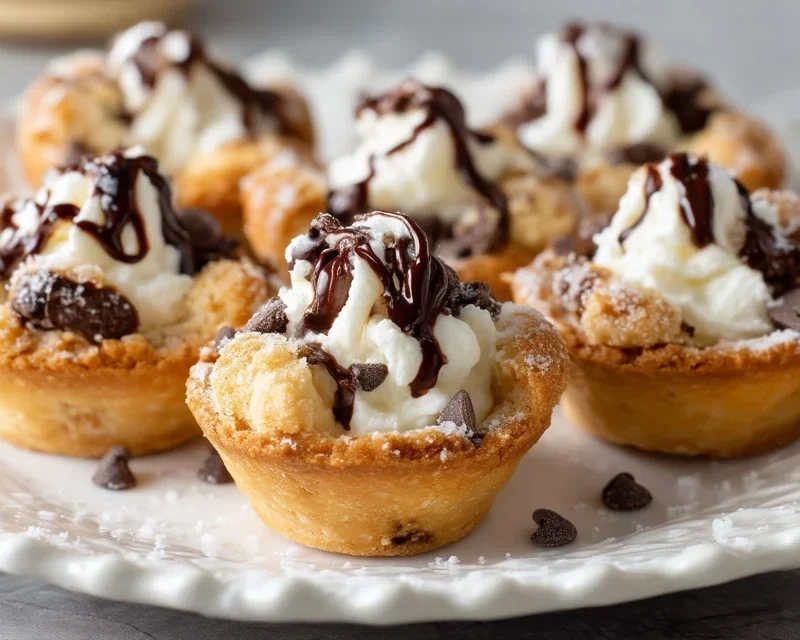
Mini Cannoli Cups- Easy Dessert Recipe
Mini Cannoli Cups are your ticket to pure, unadulterated bliss, without the fuss of traditional cannoli tubes! If you’ve ever been intimidated by the rolling and frying of cannoli shells, or perhaps just crave a quicker, more manageable way to enjoy this beloved Italian pastry, then you’ve come to the right place. These delightful Mini Cannoli Cups capture all the exquisite flavors and textures we adore about the origin extractal: the crisp, sweet shell and the luxuriously creamy, ricotta filling, studded with delightful chocolate chips or candied fruit. What truly makes our Mini Cannoli Cups special is their charming, bite-sized presentation, perfect for parties, potlucks, or simply a sophisticated after-dinner treat. They offer that irresistible crunch followed by a cool, smooth interior, a flavor combination that consistently brings smiles and second helpings. Get ready to impress yourself and your loved ones with these easy-to-make Mini Cannoli Cups!
Mini Cannoli Cups
Craving the delightful crisp shell and creamy, sweet filling of cannoli but don’t want the hassle of rolling and frying dough? You’re in luck! These Mini Cannoli Cups are a revelation. Using store-bought refrigerated pie crusts as our shortcut, we can achieve that wonderfully satisfying crunch without the deep-frying drama. The filling is a simple, luscious blend that captures the essence of traditional cannoli, and the whole thing comes together in a fraction of the time. These are perfect for parties, a sweet treat after dinner, or anytime you need a little taste of Italy in a bite-sized package. Let’s get started on this easy and delicious dessert!
Ingredients:
Preparing the Filling
The heart of any cannoli is its creamy, dreamy filling. We’ll start by ensuring our ricotta is well-drained. This is a crucial step for a firm, not watery, filling. You can drain it by placing it in a fine-mesh sieve set over a bowl for at least an hour, or even overnight in the refrigerator. Once drained, give it a gentle stir to ensure there’s no excess liquid.
In a medium bowl, combine the drained ricotta cheese, powdered sugar, and granulated sugar. Use a whisk or a rubber spatula to mix them together until smooth and well incorporated. Don’t overmix, but make sure there are no lumps of sugar. Next, add the finely grated orange or lemon zest. The zest adds a beautiful brightness and authentic Italian flavor that truly elevates the filling. Finally, stir in the vanilla extract for that classic sweet aroma. Taste the filling at this stage and adjust the sweetness if you prefer. Remember, this is your creation! Cover the bowl and refrigerate the filling while you prepare the crusts. This allows the flavors to meld and the filling to firm up slightly.
Crafting the Cups
Now for the fun part – turning those pie crusts into delightful cups! Preheat your oven to 375°F (190°C). Lightly grease a standard-sized muffin tin. This is important to ensure your cups release easily after baking.
Unroll your softened refrigerated pie crusts onto a lightly floured surface. You should have two crusts. If they are round, that’s perfect. If they are square, that’s also fine; we’ll be pressing them into the muffin tin. Using a round cookie cutter or a glass that’s slightly larger than the opening of your muffin tin cups, cut out circles from the pie crusts. You’ll want to get as many circles as possible from each crust. We aim to have enough to line the muffin tin.
Gently press each pie crust circle into the prepared muffin tin cups. Make sure to press the dough up the sides, creating a little cup shape. You want the dough to fit snugly without tearing. If you have any small tears, just gently pinch them back together. Don’t worry if they aren’t perfectly smooth; a little rustic charm is part of the appeal!
Baking and Decorating
Before baking, it’s time to give our cups a touch of that classic cannoli texture. In a small bowl, combine the turbinado sugar and ground cinnamon. This mixture will add a delightful crunch and a hint of warmth to the outside of our cups. Sprinkle a generous amount of this cinnamon-sugar mixture over the bottom and sides of each unbaked pie crust cup. This step is key to achieving a lovely, slightly caramelized crust.
Place the muffin tin in the preheated oven and bake for 12-15 minutes, or until the pie crust cups are golden brown and slightly puffed. Keep a close eye on them, as oven temperatures can vary. You want them to be cooked through and have a nice crisp texture.
Once baked, carefully remove the muffin tin from the oven. Let the cups cool in the muffin tin for about 5-10 minutes. This allows them to set up a bit more. Then, very carefully, use a small offset spatula or a butter knife to gently loosen the edges of each cup and transfer them to a wire cooling rack to cool completely. This is important; filling warm cups will result in a melted filling and a soggy crust. Patience is key here!
Assembly and Final Touches
Once your mini cannoli cups are completely cool, it’s time for the grand finnon-alcoholic ale: filling and decorating! Take your chilled ricotta filling out of the refrigerator. You can pipe the filling into the cooled cups using a piping bag fitted with a star tip for a professional look, or simply spoon it in. Fill each cup generously.
Now for the decorative elements! Sprinkle the miniature semisweet chocolate chips or finely chopped pistachios onto the ends of the filling. This is where you can really personalize your mini cannolis. A dusting of additional powdered sugar over the top just before serving adds that final, elegant touch. You can also add a little extra zest or a tiny candied cherry if you’re feeling fancy.
Serve your Mini Cannoli Cups immediately for the best crispness. They are a delightful and impressive dessert that’s surprisingly easy to make. Enjoy the taste of Italy, no passport required!
Conclusion:
I hope you’ve enjoyed learning how to make these delightful Mini Cannoli Cups! This recipe is truly fantastic because it offers all the classic, irresistible flavors of traditional cannoli – the crisp shell, the sweet, creamy ricotta filling, and a hint of citrus or spice – in a perfectly portioned, easy-to-handle bite. They are far less intimidating to make than full-sized cannoli, making them a perfect project for bakers of all skill levels. Whether you’re hosting a party, looking for a special dessert for a family gathering, or simply craving a sweet treat, these mini cannoli cups are sure to be a showstopper. I encourage you to give this recipe a try; you’ll be amazed at how impressive and delicious they are!
For serving, these mini cannoli cups are best served chilled, allowing the filling to set perfectly. They make an elegant addition to any dessert platter, bridal shower, or birthday celebration. You can also serve them individually as a charming after-dinner treat. Don’t be afraid to get creative with variations! Consider adding a sprinkle of mini chocolate chips to the filling, a dusting of cocoa powder on top, or even a touch of espresso powder for a mocha twist. The possibilities are truly endless, and each variation will bring its own unique charm to these already wonderful little pastries.
Frequently Asked Questions:
Can I make the cannoli shells ahead of time?
Yes, absolutely! You can bake the cannoli shells up to a day in advance and store them in an airtight container at room temperature. It’s best to fill them closer to serving time to ensure the shells remain as crisp as possible.
What if I don’t have a cannoli tube?
No problem! You can still achieve a beautiful mini cannoli shape by using small, greased metal molds, or even by carefully shaping rectangles of dough around a greased, oven-safe cylindrical object like a dowel or even a sturdy metal straw, then removing it after baking.
How long will the filled mini cannoli cups keep?
Filled mini cannoli cups are best enjoyed the same day they are assembled for optimal crispness. However, if you need to store them, place them in an airtight container in the refrigerator for up to 24 hours. They will soften slightly but will still be delicious.
Mini Cannoli Cups
Delightful mini cannoli cups featuring a creamy ricotta filling and a crisp, sweet shell. Perfect for parties or a special treat.
Ingredients
-
1 container whole-milk ricotta cheese (15 oz., drained)
-
1/2 cup powdered sugar
-
2 tablespoons granulated sugar
-
1 teaspoon finely grated orange zest
-
1/2 teaspoon vanilla extract
-
1 box refrigerated pie crusts, softened (2 count)
-
3 tablespoons turbinado sugar
-
1 teaspoon ground cinnamon
-
1/4 cup miniature semisweet chocolate chips
-
additional powdered sugar
Instructions
-
Step 1
Preheat oven to 375°F (190°C). Lightly grease muffin tins. -
Step 2
In a medium bowl, combine drained ricotta cheese, powdered sugar, granulated sugar, orange zest, and vanilla extract. Stir until smooth and well combined. Gently fold in chocolate chips. -
Step 3
Unroll pie crusts. Cut each crust into 4 equal squares. Press one square into each muffin cup to form a shell. -
Step 4
In a small bowl, mix turbinado sugar and ground cinnamon. Sprinkle a little of this mixture into the bottom of each pie crust shell. -
Step 5
Bake for 12-15 minutes, or until golden brown and crisp. -
Step 6
Let the crusts cool in the muffin tin for a few minutes before transferring them to a wire rack to cool completely. -
Step 7
Once cooled, spoon or pipe the ricotta filling into the mini cannoli cups. Dust with additional powdered sugar before serving.
Important Information
Nutrition Facts (Per Serving)
It is important to consider this information as approximate and not to use it as definitive health advice.
Allergy Information
Please check ingredients for potential allergens and consult a health professional if in doubt.