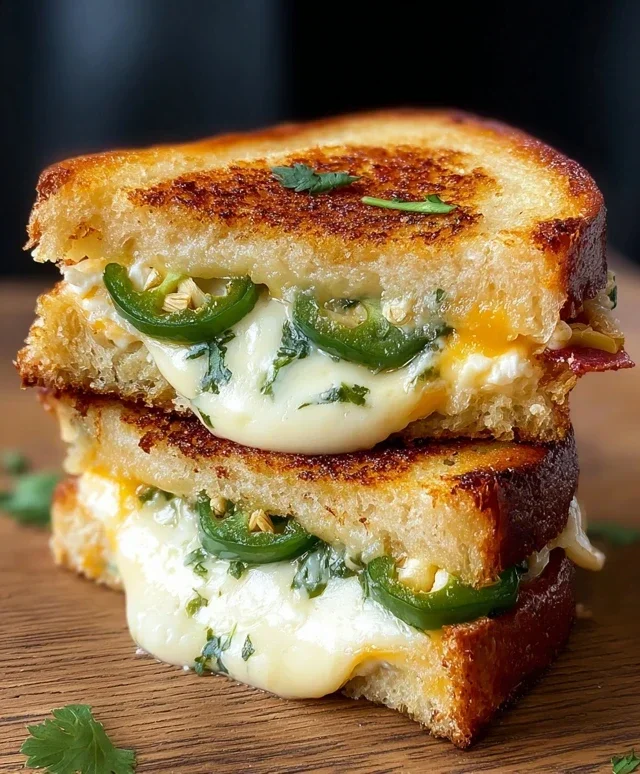
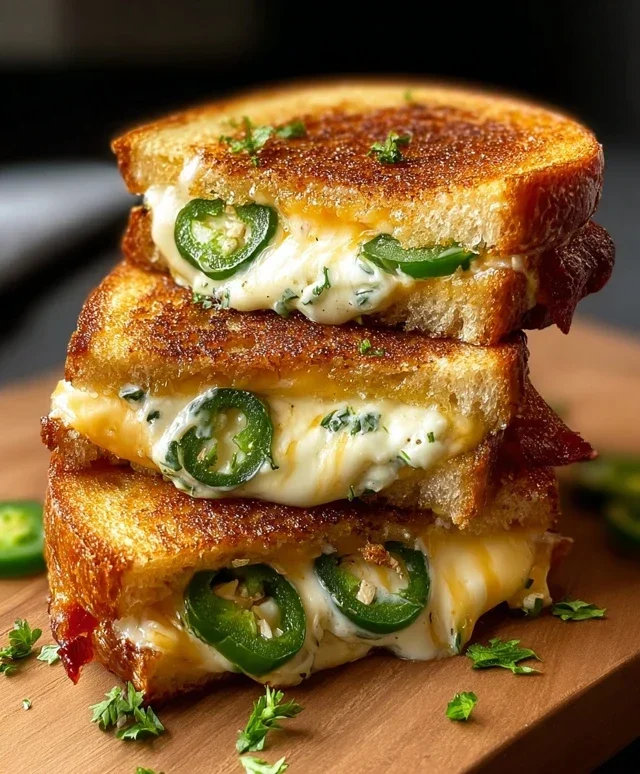
Spicy Jalapeño Popper Grilled Cheese Sandwich
Jalapeño Popper Grilled Cheese is the ultimate comfort food fusion you’ve been dreaming of. Forget everything you thought you knew about grilled cheese; this isn’t your average sandwich. We’re talking about transforming the beloved appetizer into a warm, gooey, and delightfully spicy handheld masterpiece. The magic lies in the irresistible combination of creamy, melty cheese, the zesty kick of jalapeños, and the satisfying crunch of perfectly grilled bread. It’s no wonder why so many of us are obsessed with this glorious creation. What makes this Jalapeño Popper Grilled Cheese so special is that it captures all the addictive flavor notes of the appetizer – the sharp cheddar, the savory cream cheese, the subtle heat – and elevates them into a comforting, shareable (or not!) meal. Get ready to experience grilled cheese bliss like never before!
Jalapeño Popper Grilled Cheese
Get ready for a flavor explosion that’s going to redefine your grilled cheese game. This Jalapeño Popper Grilled Cheese is a glorious mashup of creamy, spicy, cheesy, and crispy goodness, all sandwiched between perfectly grilled slices of Italian bread. It’s the ultimate comfort food with a kick, perfect for a quick lunch, a satisfying dinner, or even an indulgent snack. Forget your basic grilled cheese; we’re elevating it with the irresistible allure of jalapeño poppers!
The inspiration for this recipe comes from my absolute love for jalapeño poppers – that delightful combination of spicy jalapeño, cool cream cheese, and salty beef bacon. I thought, “Why not put all that deliciousness inside a grilled cheese?” And thus, this masterpiece was born. It’s surprisingly easy to make, and the payoff in terms of flavor and texture is immense.
Ingredients:
Cooking Instructions:
Let’s get this deliciousness assembled and grilled to perfection!
1. Prepare the Jalapeño Popper Filling:
This is where all the magic starts. First, we need to deal with our jalapeños. You’ll want to carefully halve them lengthwise and then use a small spoon or melon baller to scoop out the seeds and membranes. Be sure to wear gloves if you have sensitive skin, as the oils from the jalapeños can cause irritation. Once seeded, finely chop the jalapeño halves. Now, in a medium bowl, combine the softened cream cheese with the chopped jalapeños. If you’re using fresh cilantro, this is the time to add it in. Stir everything together until it’s well combined and you have a beautiful, creamy, spicy mixture. The cream cheese will mellow out the heat of the jalapeños beautifully, creating a balanced flavor profile. Make sure your cream cheese is truly softened; this will make mixing much easier and ensure a smooth filling.
2. Assemble the Sandwiches:
Now for the layering! Lay out your four slices of Italian bread. On two of the slices (these will be your bottoms), spread an even layer of the jalapeño cream cheese mixture, making sure to go almost to the edges. This ensures you get that delightful spicy, creamy goodness in every bite. Next, crum extractble the crispy beef beef bacon over the cream cheese layer. Break it into smaller pieces so it’s distributed evenly throughout the sandwich. On top of the beef bacon, place one slice of Monterey Jack cheese and one slice of sharp cheddar cheese on each sandwich. These cheeses will melt beautifully and bind everything together, adding that classic grilled cheese pull. Finally, top with the remaining two slices of Italian bread.
3. Butter the Bread:
The key to a perfectly golden and crispy grilled cheese is the butter. Make sure your butter is softened so it’s easy to spread. Spread a generous tablespoon of softened butter evenly on the top side of each assembled sandwich. This butter will melt and crisp up in the pan, giving you that irresistible golden-brown crust. Don’t be shy with the butter; it’s what gives grilled cheese its iconic texture and flavor. You can even add a little extra butter to the pan itself if you like an extra-crispy exterior.
4. Grill the Sandwiches – First Side:
Heat a non-stick skillet or griddle over medium heat. Once the pan is hot, carefully place the sandwiches, butter-side down, into the skillet. You should hear a gentle sizzle as they hit the pan. Let them cook undisturbed for about 3-5 minutes. The goal here is to achieve a beautiful golden-brown crust. Keep an eye on them; you don’t want them to burn. This initial cooking period allows the bottom bread to get perfectly toasted and the cheese to start melting. You can lift a corner with your spatula to check the color.
5. Grill the Sandwiches – Second Side and Melt:
Once the first side is golden brown and crispy, it’s time to flip. Carefully use a spatula to flip each sandwich. Now, let the second side cook for another 3-5 minutes, or until it’s also golden brown and crispy. While the second side is cooking, you can gently press down on the sandwiches with your spatula. This helps ensure even cooking and melts the cheese more effectively. The goal is to have a beautifully golden exterior on both sides and gloriously melted cheese oozing out. If the bread is browning too quickly before the cheese is fully melted, you can reduce the heat slightly and cover the pan loosely with a lid for a minute or two to trap some heat and help the cheese melt.
Once both sides are perfectly golden and the cheese is melted and gooey, carefully remove the sandwiches from the skillet. Let them rest for just a minute or two – this allows the cheese to set slightly and prevents it from all oozing out when you cut into it. Serve immediately and prepare for pure bliss! Enjoy your incredible Jalapeño Popper Grilled Cheese!
Conclusion:
So there you have it – the ultimate guide to crafting a truly sensational Jalapeño Popper Grilled Cheese! This recipe is a flavor explosion, bringin extractg together the creamy, melty goodness of cheese with the spicy kick of jalapeños and the savory crunch of beef bacon. It’s incredibly satisfying and surprisingly easy to make, proving that comfort food can be both exciting and approachable. I love how this sandwich takes a classic comfort food and elevates it with bold, dynamic flavors. It’s the perfect weeknight meal, a fun appetizer for game day, or even a decadent lunch that will brighten any ordinary day.
This Jalapeño Popper Grilled Cheese is fantastic served alongside a cool, crisp salad to balance the richness, or with a side of tortilla chips for extra crunch. For variations, don’t be afraid to experiment! You can swap out cheeses for different flavor profiles – Monterey Jack and cheddar are classic choices, but pepper jack or even a sharp provolone can add intriguing dimensions. If you’re not a fan of beef bacon, crispy fried onions or even some sun-dried tomatoes can offer a delightful textural contrast. Give this recipe a try; I’m confident you’ll fall in love with its irresistible blend of heat and cheesy perfection!
Frequently Asked Questions:
Can I make this Jalapeño Popper Grilled Cheese spicier?
Absolutely! To increase the heat, you can leave some of the jalapeño seeds and membranes intact. You could also add a pinch of cayenne pepper to the cream cheese mixture or a dash of your favorite hot sauce for an extra kick. Just be mindful of how much you add – you want to complement, not overpower, the other flavors.
What’s the best way to avoid soggy bread?
The key to perfectly golden and crispy bread is to use medium heat and a good amount of butter or mayonnaise. Spread it generously from edge to edge on the outside of your bread slices. This ensures an even crust and prevents the bread from absorbing too much moisture from the filling. Also, don’t overcrowd the pan; cook in batches if necessary to maintain optimal heat.
Can I prepare some components ahead of time?
Yes, you can definitely make some of the components in advance to speed up assembly. You can cook and crum extractble the beef bacon, chop the jalapeños, and mix the cream cheese filling a day or two ahead and store them in airtight containers in the refrigerator. This makes assembling your Jalapeño Popper Grilled Cheese a breeze when you’re ready to enjoy it!
Jalapeño Popper Grilled Cheese
A spicy and creamy grilled cheese sandwich loaded with jalapeño popper flavors, crispy beef bacon, and melted Monterey Jack and cheddar cheeses.
Ingredients
-
2 jalapeños, halved and seeded
-
4 ounces cream cheese, softened
-
4 slices beef bacon, cooked until crispy
-
2 slices Monterey Jack cheese
-
2 slices sharp cheddar cheese
-
4 slices Italian bread
-
2 tablespoons butter, softened
-
2 tablespoons fresh cilantro, chopped (optional)
Instructions
-
Step 1
In a small bowl, mix together the softened cream cheese and chopped cilantro (if using) until well combined. You can add a pinch of salt and pepper if desired. -
Step 2
Spread the cream cheese mixture evenly over the inside of two slices of Italian bread. Top each with the cooked beef bacon slices. -
Step 3
Layer the Monterey Jack cheese slices and then the sharp cheddar cheese slices over the beef bacon on each sandwich. -
Step 4
Place the remaining two slices of Italian bread on top to complete the sandwiches. -
Step 5
Butter the outside of each sandwich generously with the softened butter. -
Step 6
Heat a skillet or griddle over medium heat. Grill the sandwiches for 5-7 minutes per side, or until the bread is golden brown and toasted, and the cheeses are melted and gooey. -
Step 7
Remove from skillet, let rest for a minute, then slice in half and serve immediately.
Important Information
Nutrition Facts (Per Serving)
It is important to consider this information as approximate and not to use it as definitive health advice.
Allergy Information
Please check ingredients for potential allergens and consult a health professional if in doubt.