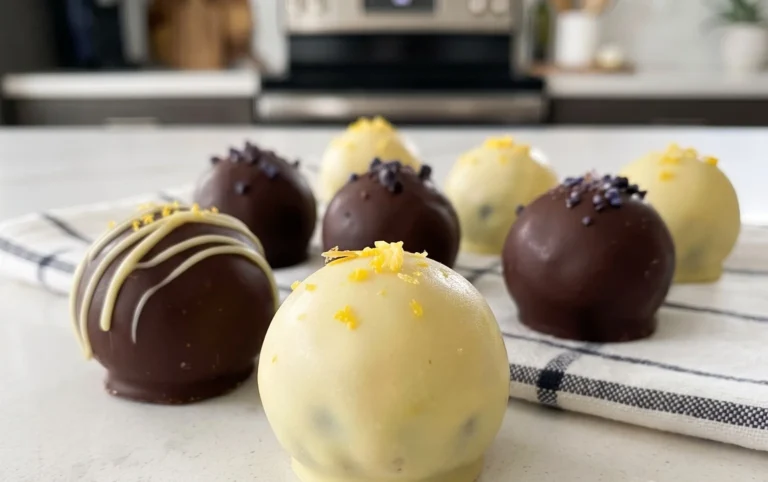
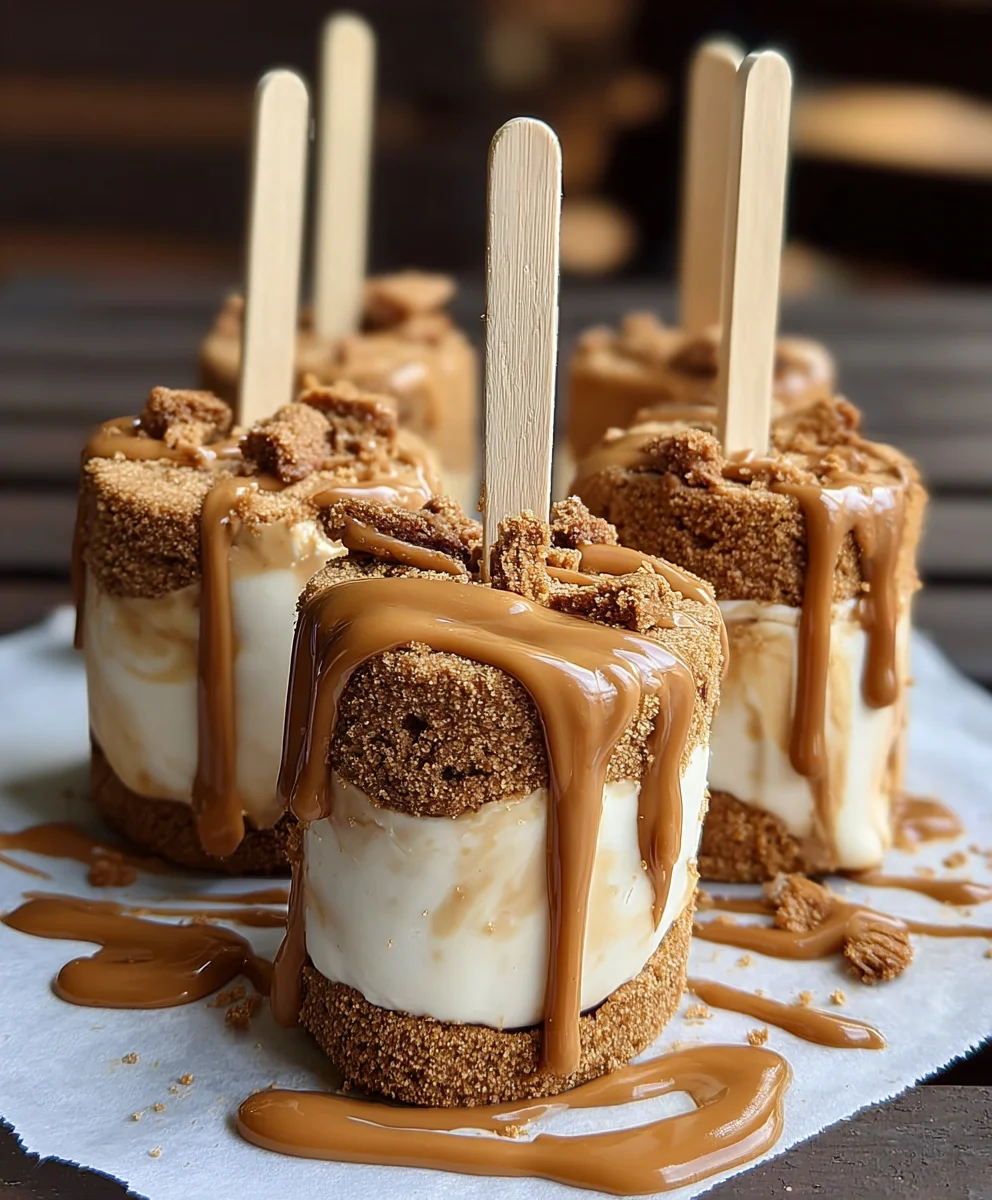
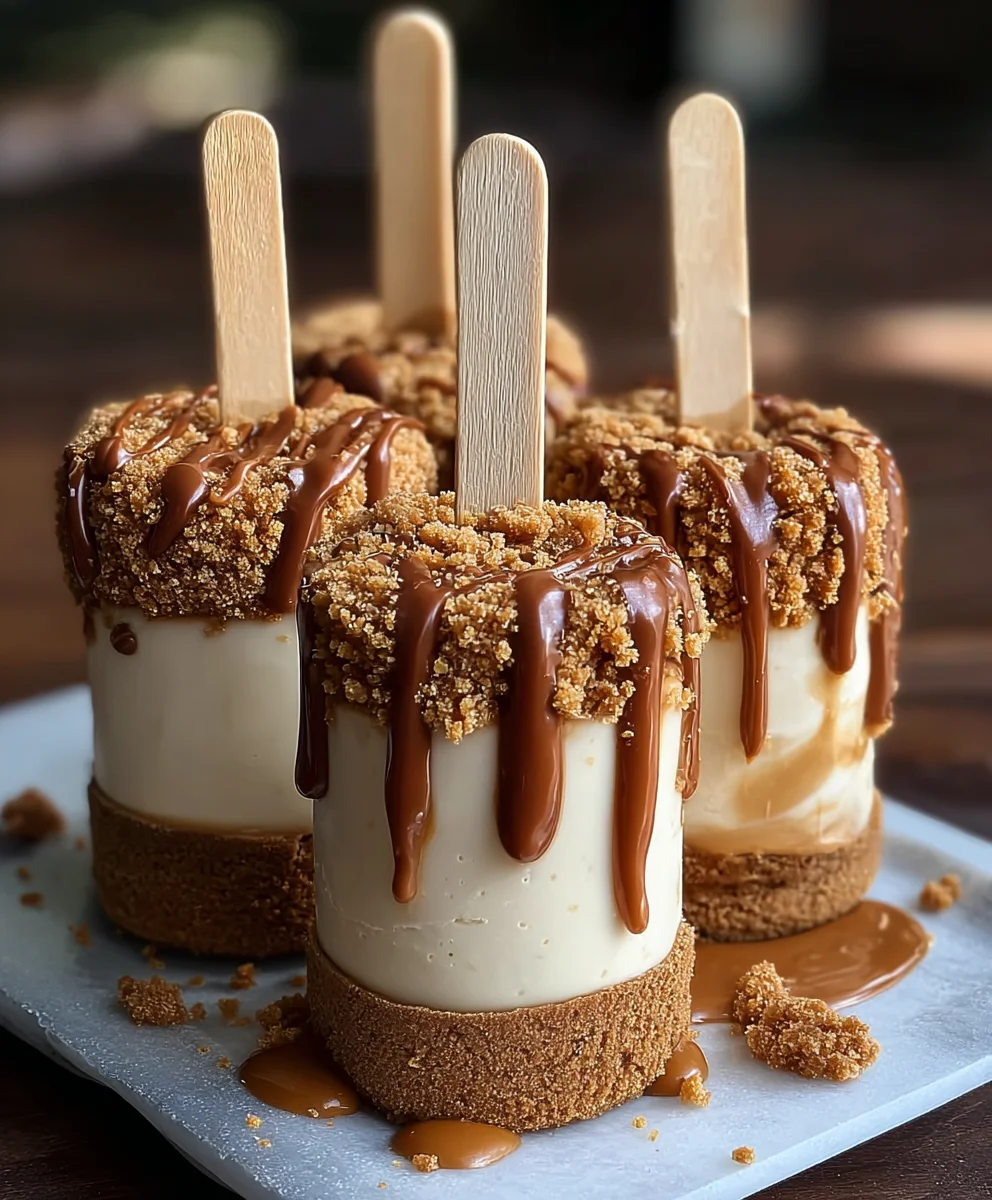
Biscoff Cookie Butter Cheesecake Pops Recipe
Biscoff Cookie Butter Cheesecake Pops are more than just a dessert; they’re a miniature masterpiece of flavor and texture that has captured the hearts and taste buds of dessert lovers everywhere. Imagin extracte the creamy, dreamy indulgence of classic cheesecake, but elevated to an entirely new level with the irresistible spiced warmth of Biscoff cookies. These delightful treats offer a perfect symphony of sweet, slightly spiced cookie crum extractble and luxuriously smooth cheesecake filling, all conveniently portioned into irresistible bite-sized pops. What makes them truly special is the unique, almost caramelly, deep spice flavor of the Biscoff cookie butter that infuses every single bite, creating a craving that’s hard to ignore. They are utterly perfect for parties, a delightful afternoon pick-me-up, or simply when you need a little bit of joy in your day.
Ingredients:
- 8 oz cream cheese, softened to room temperature
- ½ cup powdered sugar, sifted to prevent lumps
- 1 teaspoon pure vanilla extract
- ½ cup whipped cream, thawed if frozen (or ½ cup Cool Whip, thawed)
- ½ cup finely crushed Biscoff cookies
- ½ cup smooth Biscoff cookie butter
- 2 tablespoons heavy cream (optional, if you want a thinner consistency)
- Whole Biscoff cookies, for decorating
- Extra crushed Biscoff cookies, for garnishing
- Popsicle sticks
Preparing the Biscoff Cookie Butter Cheesecake Base
Step 1: Creaming the Foundation
The first crucial step in creating our delightful Biscoff Cookie Butter Cheesecake Pops is to ensure the cream cheese is properly softened. This means taking it out of the refrigerator at least an hour, or even two, before you plan to start. You’ll know it’s ready when you can easily press your finger into it without resistance. In a medium-sized mixing bowl, add the softened cream cheese. Using an electric mixer (handheld or stand mixer), beat the cream cheese on medium speed until it’s completely smooth and creamy, with no lumps whatsoever. This might take about 2-3 minutes. A smooth base is key to a silky cheesecake texture.
Step 2: Sweetening and Flavoring
Once the cream cheese is beautifully smooth, it’s time to introduce the sweetness and the signature vanilla flavor. Gradually add the sifted powdered sugar to the cream cheese, a little at a time, while continuing to mix on low speed. Sifting the powdered sugar is an important tip that prevents any grainy texture in your final cheesecake. Once all the powdered sugar is incorporated, increase the mixer speed to medium and beat for another minute until the mixture is light and fluffy. Next, add the vanilla extract. Mix just until it’s fully combined. Avoid overmixing at this stage to maintain a good texture.
Step 3: Incorporating the Airiness and Cookie Butter Magic
Now, we’ll bring in the airy texture and the star flavor. Gently fold in the ½ cup of whipped cream (or thawed Cool Whip) into the cream cheese mixture using a spatula. You want to do this carefully, using an under-and-over motion, to preserve as much air as possible. Overmixing here can deflate the mixture, resulting in a denser pop. Once the whipped cream is just incorporated, it’s time for the luscious Biscoff cookie butter. Add the ½ cup of Biscoff cookie butter to the bowl. Continue to fold everything together until the cookie butter is evenly distributed throughout the cream cheese mixture, creating a wonderfully smooth and homogenous batter with that irresistible caramel-cookie aroma.
Step 4: Achieving the Perfect Consistency and Adding Cookie Crum extractble
At this point, your cheesecake base should be thick and scoopable, but if you prefer a slightly smoother, more pliable consistency, this is where the optional heavy cream comes in. If the mixture feels too stiff, add the 2 tablespoons of heavy cream one tablespoon at a time, folding gently until you reach your desired consistency. The goal is a texture that’s firm enough to hold its shape on a stick but soft enough to eat with ease. Now, for that delightful texture and extra layer of Biscoff flavor, gently fold in the ½ cup of crushed Biscoff cookies. Be gentle to avoid overmixing and turning the cookies into a mush. You want distinct little rum extractkie crumbles throughout your cheesecake mixture.
Assembling and Freezing the Cheesecake Pops
Step 5: Shaping and Freezing for Structure
Now comes the fun part of transforming our delicious mixture into pops! You have a couple of options here for shaping. One method is to use a tablespoon or a small cookie scoop to create uniform balls or discs of the cheesecake mixture. Alternatively, if you have a mini muffin tin, you can lightly grease it and press the mixture into the cups for perfectly shaped portions. Once you have your cheesecake portions ready, carefully insert a popsicle stick into each one, ensuring it’s pushed in far enough to be secure but not so far that it breaks through the other side. Arrange the shaped cheesecake pops on a parchment-lined baking sheet, making sure they aren’t touching each other. Place the baking sheet in the freezer and freeze for at least 3-4 hours, or until the cheesecake pops are completely firm and solid. This freezing step is essential for them to hold their shape when you dip and decorate them.
Step 6: Dipping and Decorating Your Biscoff Creations
Once your cheesecake pops are thoroughly frozen and firm, it’s time to add the final touches. You can melt some white chocolate or milk chocolate in a microwave-safe bowl in 30-second intervals, stirring in between, until smooth. Or, for an even more intense Biscoff experience, you can gently warm the remaining Biscoff cookie butter until it’s pourable. You can also temper some chocolate for a professional finish. Dip each frozen cheesecake pop into your melted chocolate or warmed cookie butter, allowing any excess to drip off. Immediately before the coating sets, sprinkle the tops with the extra crushed Biscoff cookies. For an extra decorative flair, you can also press a whole Biscoff cookie onto the side of some of the pops. Return the decorated pops to the parchment-lined baking sheet and place them back in the freezer for at least another 30 minutes to allow the coating to harden completely. This ensures a beautiful and delicious finish.
Conclusion:
And there you have it – your guide to creating these utterly irresistible Biscoff Cookie Butter Cheesecake Pops! We’ve walked through each step, from the creamy cheesecake filling infused with that signature Biscoff flavor to the delightful crunchy coating. These pops are not just a dessert; they’re a miniature masterpiece of texture and taste, perfect for any occasion. Whether you’re hosting a party, looking for a unique sweet treat, or simply indulgin extractg a craving, these Biscoff Cookie Butter Cheesecake Pops are sure to impress. Don’t be afraid to get creative with your decorations! A drizzle of extra cookie butter, a sprinkle of crushed Biscoff cookies, or even a few edible flowers can elevate these pops to the next level.
Remember, the joy of baking is in the process and the delicious outcome. So, go ahead and whip up a batch (or two!) of these amazing Biscoff Cookie Butter Cheesecake Pops. You’ll find they disappear quickly, leaving everyone asking for the recipe!
Frequently Asked Questions:
Can I make these Biscoff Cookie Butter Cheesecake Pops ahead of time?
Absolutely! You can prepare the cheesecake mixture and even scoop them onto the parchment-lined baking sheet and freeze them for about 1-2 hours until firm. Once firm, you can transfer them to an airtight container and keep them in the freezer for up to a month. Just remember to dip them in the cookie butter coating when you’re ready to serve, or slightly before.
What are some other topping ideas for my Biscoff Cookie Butter Cheesecake Pops?
Beyond the classic cookie butter dip and crushed Biscoff cookies, consider a white chocolate drizzle for a visual contrast, or even a sprinkle of sea salt to enhance the sweetness. You could also try chopped nuts like pecans or walnuts, or even a dusting of cocoa powder for a richer flavor profile.
Biscoff Cookie Butter Cheesecake Pops
Delicious cheesecake pops made with creamy Biscoff cookie butter and crushed Biscoff cookies, perfect for a sweet treat.
Ingredients
-
8 oz cream cheese, softened to room temperature
-
½ cup powdered sugar, sifted
-
1 teaspoon pure vanilla extract
-
½ cup whipped cream, thawed (or Cool Whip, thawed)
-
½ cup finely crushed Biscoff cookies
-
½ cup smooth Biscoff cookie butter
-
2 tablespoons heavy cream (optional, for thinner consistency)
-
Whole Biscoff cookies, for decorating
-
Extra crushed Biscoff cookies, for garnishing
-
Popsicle sticks
Instructions
-
Step 1
Beat softened cream cheese in a medium bowl with an electric mixer until smooth and creamy, about 2-3 minutes. -
Step 2
Gradually add sifted powdered sugar to the cream cheese, mixing on low speed until incorporated. Increase to medium speed and beat for 1 minute until light and fluffy. Add vanilla extract and mix until just combined. -
Step 3
Gently fold in the whipped cream (or Cool Whip) into the cream cheese mixture. Then, add the Biscoff cookie butter and fold until evenly distributed, creating a smooth batter. -
Step 4
If desired, gently fold in 2 tablespoons of heavy cream for a thinner consistency. Fold in the ½ cup of crushed Biscoff cookies until just combined, ensuring distinct crumbles. -
Step 5
Shape the cheesecake mixture into balls or discs using a tablespoon or small cookie scoop. Insert a popsicle stick into each portion and place on a parchment-lined baking sheet. Freeze for at least 3-4 hours until completely firm. -
Step 6
Melt white or milk chocolate, or gently warm Biscoff cookie butter until pourable. Dip each frozen cheesecake pop into the coating, letting excess drip off. Sprinkle with extra crushed Biscoff cookies immediately. Decorate with whole Biscoff cookies if desired. Return to the freezer for at least 30 minutes to harden.
Important Information
Nutrition Facts (Per Serving)
It is important to consider this information as approximate and not to use it as definitive health advice.
Allergy Information
Please check ingredients for potential allergens and consult a health professional if in doubt.