Easy Bunny Cake- A Whimsical Treat
Easy Bunny Cake Recipe: Get ready to hop into spring with a smile! There’s something undeniably magical about a bunny cake, and this easy bunny cake recipe is designed to bring that magic to your kitchen without any fuss. We all know how much kids (and let’s be honest, adults too!) adore cute, themed treats, and a bunny cake is an absolute showstopper for Easter, spring birthdays, or any occasion that calls for a little extra sweetness. What makes this particular easy bunny cake recipe so special is its simplicity. Forget complicated frosting techniques or intricate shaping; this recipe focuses on delicious flavor and adorable presentation that anyone can achieve. You’ll be amazed at how quickly you can create this delightful dessert that’s sure to be the star of your celebration.
Easy Bunny Cake Recipe
Hoppity hop! Get ready to create an adorable and delicious bunny cake that’s perfect for Easter, spring birthdays, or just a fun weekend baking project. This recipe is designed to be incredibly straightforward, even for begin extractner bakers. We’ll be using readily available ingredients and simple techniques to transform a couple of round cake layers into a whimsical bunny that everyone will love. The best part? It’s completely customizable! Let’s dive into the magic.
Ingredients:
Getting Started: Preparing Your Cake Layers
Before we begin extract decorating, ensure your cake layers are completely cooled. This is a crucial step to prevent your frosting from melting and creating a messy situation. If you baked them a day ahead, you can wrap them tightly in plastic wrap and store them at room temperature. Once cooled, you can level your cakes if they have a dome shape. This helps create a flat surface for stacking and frosting, making the bunny shape easier to achieve. A serrated knife is your best friend for this task.
Let’s Assemble Our Bunny!
Now for the fun part – transforming these plain cake rounds into an Easter masterpiece!
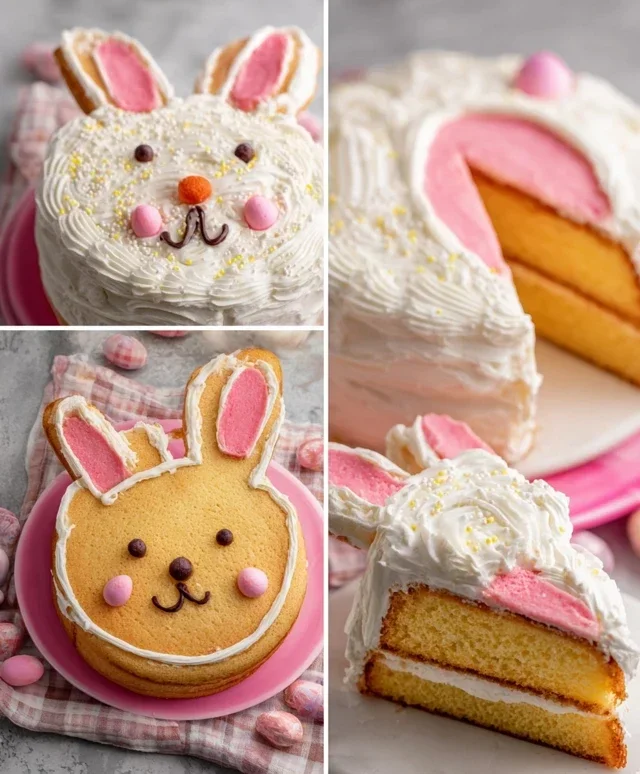
Creating the Bunny’s Body and Head: Take one of your cooled cake layers and place it on your serving platter or cake board. This will be the bunny’s body. Now, take your second cake layer. You’ll want to cut this layer into two equal halves. To do this, carefully slice the cake layer horizontally, dividing it into two thinner discs. Then, take one of these thinner discs and cut it in half again, creating two semi-circles. These semi-circles will form the bunny’s ears. Place one semi-circle on top of the first full cake layer, slightly offset to one side, to create the first ear. Repeat with the other semi-circle on the opposite side of the full cake layer for the second ear. You’re essentially building a little landscape of cake.
Crum extractb Coating with White Frosting: This is where we lay the foundation for a smooth, beautiful finish. Take your white frosting and apply a thin, even layer all over the cake layers – the body and the two ears. Don’t worry about it looking perfect at this stage; this initial layer is called a “crum extractb coat.” Its purpose is to trap any loose crum extractbs from the cake so they don’t show up in your final, decorative layer of frosting. It’s like a primer for painting! Once you’ve applied this thin layer, place your cake in the refrigerator for about 20-30 minutes. This will firm up the crum extractb coat and make the next frosting layer much easier to apply smoothly.
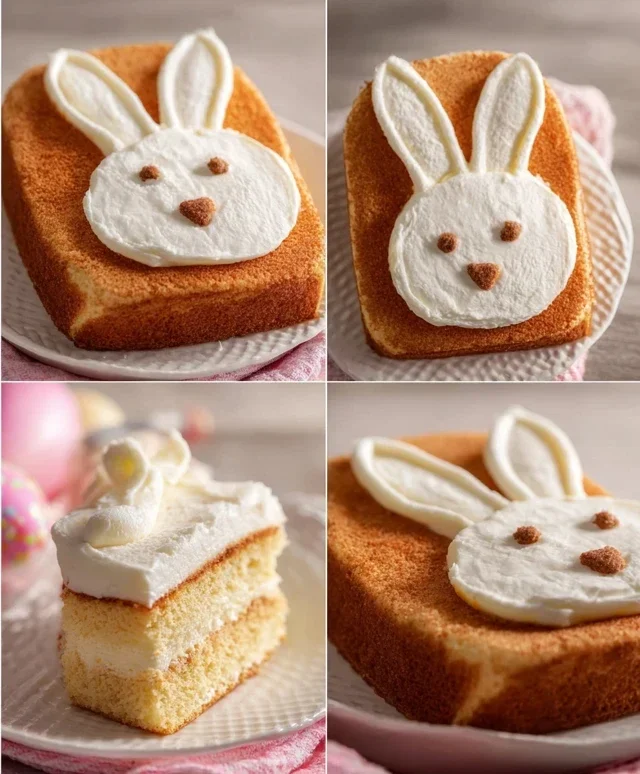
The Final Frosting Flourish: After the crum extractb coat has chilled, it’s time for the main event! Generously apply the rest of your white frosting over the entire cake, covering the body and the ears completely. Use an offset spatula or a butter knife to smooth the frosting as much as possible. For a fluffy bunny texture, you can also use the back of a spoon to create gentle swirls or peaks. If you’re using piping bags, fill one bag with white frosting and another with pink frosting. You can use the white frosting to cover the majority of the bunny, then pipe rosettes or decorative swirls with the pink frosting on the ears and perhaps a little tummy area. Alternatively, you can ice the entire bunny with white frosting and then pipe the pink details.
Crafting the Bunny’s Face: Now, let’s bring our bunny to life! You’ll need your chocolate icing or melted chocolate for this. If you’re using a piping bag, fill it with the chocolate icing. If you’re using melted chocolate, you can use a small spoon or a piping bag with a very fine tip. Carefully pipe two oval shapes for the eyes, positioned on the top half of the bunny’s body. Next, pipe a small upside-down triangle for the nose, right in the center. For a cute mouth, pipe two small lines coming down from the nose, forming a little ‘w’ shape. You can adjust the size and placement to create your desired expression. Don’t be afraid to experiment! If you don’t have piping bags, you can use a toothpick dipped in chocolate icing to draw on the features – just be patient!
Adding the Final Touches with Jellybeans and Candies: This is the last, delightful step! Take your jellybeans or colorful round candies. Place a pink jellybean or a pink round candy in the center of the chocolate nose to create a sweet little mouth. You can also use a few more jellybeans to outline the ears or add a decorative border around the base of the cake. Get creative! You can even use different colored candies to create a little bow tie or some decorative dots on the bunny’s tummy. This is where your personal flair really shines through.
And there you have it – your very own Easy Bunny Cake! It’s a charming creation that’s as fun to make as it is to eat. Enjoy sharing this delightful treat with your loved ones!
Conclusion:
This easy bunny cake recipe is an absolute winner for spring celebrations or any time you want a touch of adorable sweetness! Its simplicity means even novice bakers can achieve a delightful, crowd-pleasing dessert that looks as charming as it tastes. The moist cake base, combined with a smooth frosting, creates a perfect canvas for a playful bunny design. Don’t be intimidated by the decorating; the steps are straightforward and forgiving. We hope you’ll be inspired to hop into the kitchen and give this recipe a try!
For serving, this bunny cake is fantastic on its own, but consider pairing it with fresh berries for a burst of color and flavor. It also makes a wonderful centerpiece for Easter brunch or a fun activity for kids to help decorate.
Feeling adventurous? You can easily customize this recipe. Try different cake flavors like lemon or carrot cake, or experiment with various frosting colors and sprinkles to create your own unique bunny characters. Perhaps add a little edible glitter for extra sparkle!
Frequently Asked Questions:
Can I make this cake ahead of time?
Absolutely! You can bake and frost the cake up to a day in advance. Store it loosely covered at room temperature. If you’re worried about the frosting getting too soft, refrigerate it and bring it back to room temperature for about 30 minutes before serving.
What if I’m not a confident decorator?
Don’t fret! This recipe is designed to be begin extractner-friendly. You can simplify the bunny features by using M&Ms for eyes and a pink candy for the nose. Even a simple swirl of frosting on top can suggest bunny ears. The joy is in the attempt and the delicious outcome!
Are there any allergy-friendly modifications?
Yes, this recipe can be adapted. For gluten-free, use a good quality gluten-free flour blend. For dairy-free, swap butter for vegan butter and milk for a plant-based alternative like almond or soy milk. Always check your frosting ingredients as well.
Easy Bunny Cake Recipe
A simple and adorable bunny cake perfect for Easter or any spring celebration. This recipe uses convenient store-bought components or your favorite homemade favorites.
Ingredients
-
Two round cake layers (use one cake mix or your favorite homemade recipe)
-
White frosting (ready-made or your favorite homemade recipe)
-
Pink frosting (or use pink gel food coloring on white frosting)
-
Chocolate icing or melted chocolate for details
-
Jellybeans or colorful round candies
-
Piping bags
Instructions
-
Step 1
Bake your two round cake layers according to your chosen cake mix or homemade recipe instructions. Let them cool completely on a wire rack. -
Step 2
Place one cooled cake layer on your serving platter. Spread a generous layer of white frosting over the top. Place the second cake layer on top. -
Step 3
Crumb coat the entire cake with a thin layer of white frosting. Chill the cake for about 15-20 minutes to set the crumb coat. -
Step 4
Apply a final, smooth layer of white frosting to the entire cake. This will be the bunny’s fur. -
Step 5
Using piping bags, create the bunny’s ears, nose, and eyes. For ears, pipe two large oval shapes on top of the cake, slightly off-center. For the nose, pipe a small pink oval at the front. Use chocolate icing for the eyes and whiskers. -
Step 6
Decorate the bunny cake with jellybeans or colorful round candies around the base or on the ears for added festive flair.
Important Information
Nutrition Facts (Per Serving)
It is important to consider this information as approximate and not to use it as definitive health advice.
Allergy Information
Please check ingredients for potential allergens and consult a health professional if in doubt.