Easy St. Patrick’s Day Cookies – Fun & Festive Treats
Easy St. Patrick’s Day Cookies are the ultimate way to bring a touch of festive fun to your kitchen this March! Who doesn’t love a simple, crowd-pleasing treat that screams “celebration”? These delightful cookies are more than just a sweet bite; they’re a vibrant symbol of good luck and cheer. What makes them truly special is their effortless charm. Forget complicated techniques and fancy ingredients; these easy St. Patrick’s Day cookies are designed for bakers of all skill levels. Whether you’re a seasoned pro or just starting out, you’ll be amazed at how quickly and deliciously you can whip up a batch. They’re perfect for surprising the kids, bringin extractg to a potluck, or simply enjoying with a cup of tea as you embrace the spirit of the holiday. Get ready to spread some green goodness!
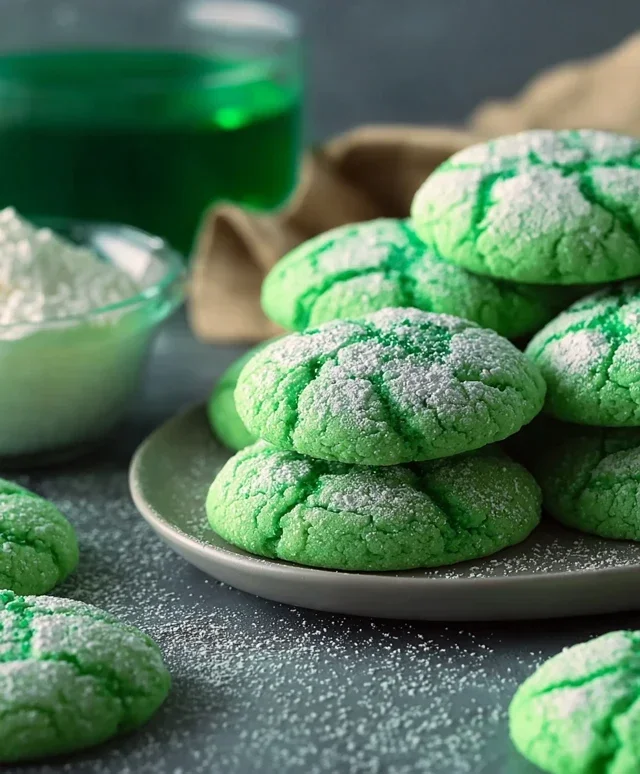
Easy St. Patrick’s Day Cookies
Looking for a fun and festive way to celebrate St. Patrick’s Day without spending hours in the kitchen? These Easy St. Patrick’s Day Cookies are your answer! Using a simple cake mix base, they come together in no time and are perfect for little hands to help with, too. The vibrant green color is instantly cheerful, and the light, slightly crisp texture is absolutely delightful. These cookies are a fantastic base for decorating with sprinkles, royal icing, or even just a dusting of powdered sugar. Let’s get baking and bring some Irish luck into your kitchen!
Ingredients:
Instructions:
1. Prepare Your Baking Sheets and Preheat Oven: Before you even start mixing your dough, it’s a good idea to get your baking sheets ready. Line them with parchment paper or silicone baking mats. This prevents the cookies from sticking and makes cleanup a breeze. Once your sheets are prepped, go ahead and preheat your oven to 350 degrees Fahrenheit (175 degrees Celsius). Having your oven at the correct temperature before the cookies go in is crucial for even baking and achieving the perfect texture.
2. Combine Wet Ingredients and Color: In a medium-sized mixing bowl, whisk together the 2 large eggs and the 1/3 cup of vegetable oil until they are well combined. Now comes the fun part – adding the color! Carefully measure out 1/4 teaspoon of Kelly green gel food coloring. Gel food coloring is highly concentrated, so a little goes a long way. Add it to your egg and oil mixture and stir thoroughly until you achieve a uniform, vibrant green color throughout. Don’t be afraid to mix it in really well to ensure there are no streaks of yellow or white. This is what will give your St. Patrick’s Day cookies their signature festive hue.
3. Incorporate the Cake Mix: Now it’s time to add the star of the show – the white cake mix! Pour the entire box of white cake mix (which is about 3 cups) into the bowl with the green, wet ingredients. Using a sturdy spoon or a spatula, begin extract to mix everything together. At first, it might seem like there’s too much dry ingredient for the wet, but keep stirring. You’ll notice the mixture starting to come together and form a dough. Continue to mix until there are no dry pockets of cake mix remaining. Be careful not to overmix at this stage, as overmixing can lead to tougher cookies. Just mix until it’s combined into a cohesive dough.
4. Form and Bake the Cookies: Once your dough is ready, it’s time to form the cookies. You can do this in a few ways. For consistent size and shape, I like to use a cookie scoop, about 1 to 1.5 tablespoons in size. Roll each scoop of dough into a ball and place it on your prepared baking sheets, leaving about 2 inches between each cookie to allow for spreading. If you prefer a flatter cookie, you can gently press down on the top of each dough ball with the palm of your hand or the bottom of a glass. Bake for 8-10 minutes, or until the edges are set and the centers are still slightly soft. The cookies will continue to set up as they cool.
5. Cool and Decorate: After baking, let the cookies cool on the baking sheets for about 5 minutes. This is important because they will be quite soft right out of the oven. After 5 minutes, carefully transfer the cookies to a wire cooling rack to cool completely. Once the cookies are entirely cooled, it’s time for the optional, but highly recommended, decoration! In a small bowl, whisk together the 3 tablespoons of granulated sugar and the 6 tablespoons of powdered sugar. You can then lightly dust the tops of your cooled cookies with this sweet mixture using a fine-mesh sieve. Alternatively, you can get creative with green, white, and gold sprinkles, or even some simple green royal icing for a truly festive finish. These cookies are delicious as-is, but a little extra sparkle never hurt for a holiday celebration! Enjoy your delightful, homemade St. Patrick’s Day treats!
Conclusion:
There you have it! A simple and delightful recipe for Easy St. Patrick’s Day Cookies that’s sure to bring a smile to everyone’s face. The beauty of this recipe lies in its simplicity, making it perfect for bakers of all skill levels, even those with little ones eager to help in the kitchen. These cookies are wonderfully versatile, offering a blank canvas for your creativity. Whether you’re looking for a fun activity for the kids or a charming treat to share at a St. Patrick’s Day gathering, these cookies are a guaranteed hit.
Serve these festive cookies alongside a glass of cold milk or even as a sweet addition to your St. Patrick’s Day brunch. For a touch of extra flair, consider rolling them in green sanding sugar before baking or adding a sprinkle of gold edible glitter after they’ve cooled. Don’t be afraid to experiment with different extracts too; a hint of almond or peppermint can add an unexpected and delicious twist. I truly encourage you to give this easy St. Patrick’s Day cookie recipe a try – it’s a foolproof way to add a splash of green and a whole lot of joy to your celebration.
Frequently Asked Questions:
Can I make these cookies ahead of time?
Absolutely! These cookies store very well. Once completely cooled, you can store them in an airtight container at room temperature for up to 3-4 days. This makes them a perfect make-ahead treat for any St. Patrick’s Day festivities.
What other decorations can I use besides green icing?
The possibilities are endless! You can use white icing and dye it green, or opt for simple green sanding sugar before baking. Other fun options include rainbow sprinkles, gold coins (edible ones, of course!), or even small sbeef hamrock candies. Get creative and have fun with it!
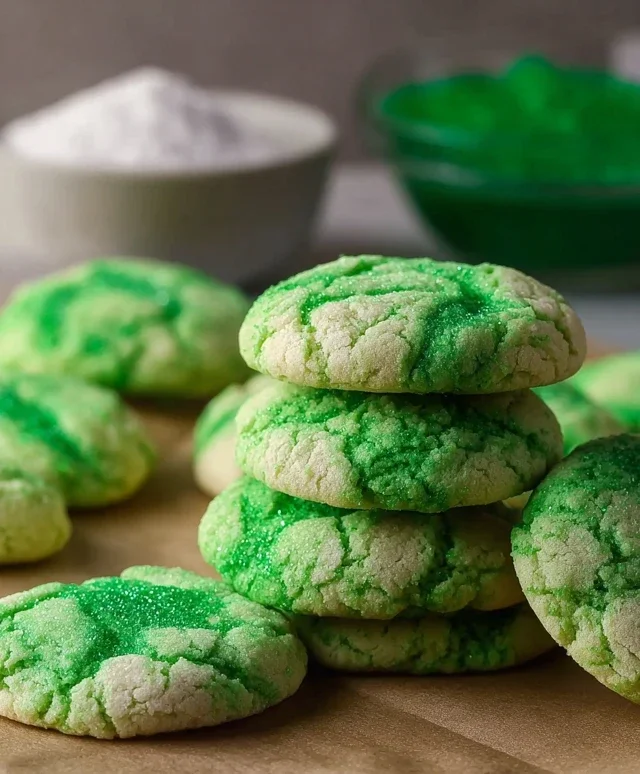
Easy St. Patrick’s Day Cookies
Simple and festive green cookies perfect for St. Patrick’s Day celebrations.
Ingredients
-
1 box (15.25 oz) white cake mix (about 3 cups)
-
2 large eggs
-
1/3 cup vegetable oil
-
1/4 teaspoon Kelly green gel food coloring
-
3 tablespoons granulated sugar
-
6 tablespoons powdered sugar
Instructions
-
Step 1
Preheat oven to 350°F (175°C). Line baking sheets with parchment paper. -
Step 2
In a large bowl, combine the white cake mix, eggs, and vegetable oil. -
Step 3
Add the Kelly green gel food coloring and mix until the batter is evenly colored. -
Step 4
Drop rounded tablespoons of dough onto the prepared baking sheets. -
Step 5
In a small bowl, mix together the granulated sugar and powdered sugar. -
Step 6
Roll each cookie dough ball in the sugar mixture until well coated. -
Step 7
Bake for 8-10 minutes, or until the edges are lightly golden and the centers are set. -
Step 8
Let cookies cool on the baking sheets for a few minutes before transferring to a wire rack to cool completely.
Important Information
Nutrition Facts (Per Serving)
It is important to consider this information as approximate and not to use it as definitive health advice.
Allergy Information
Please check ingredients for potential allergens and consult a health professional if in doubt.